Wednesday, December 14, 2016
Tips How to Upload Application in Google Play Store
Tips How to Upload Application in Google Play Store
Often times we want to share the applications that we have made with fellow android users, but sometimes we are confused about how to get publicity through google play store. In this article let us share together about how to publish on google play android app store (which was originally named the android market).
One of the most effective ways to share your applications to users is to publish it in an app market like Google Play. Publishing on Google Play is an easy process that you can do in just a few simple steps to register, configure, upload, and publish.
Registration only takes a few minutes and should be done only once. Configuration steps and can be done through the issuance of all the Google Android Developer after you sign up as a developer of Google Play. To start publishing Google Play, the first time I read this topic and then go to the Google Android Developer and register as Google Play.
You should prepare in advance is the release keystore. What is a release keystore? Release keystore file distribution is standard procedure apk (Android Package) which is recommended by Google. In our time developing your android application, when we debug our project, right then also we got the file. Apk that can be installed directly on the android device.
However to make. Apk well-formed or in accordance with the standard software, we have to perform this procedure. Standards that must be determined is the determination of the active period of application, handling public / private key associated with the application updates, and security issues.

How:
1. Preparing release keystore
- Open cmd. Start - Run - cmd
- Go to the folder jdk bin directory instalation
- Type the following command:
- Validity was followed by a number means that our application will be active up to 10000 days.
- Then you will be prompted to enter your particulars such as password, name, organization, city, and state.
- The result of the process is a file named my-release-key.keystore located in the bin folder on our android project.

2. How to Perform the Application Package Keystore:
The next step is our mem-package apk with the keystore earlier:
- Open Eclipse
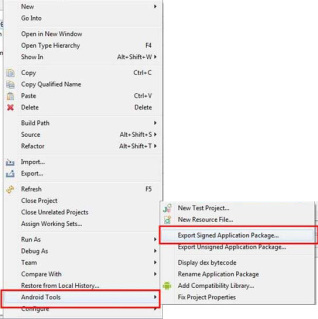
- Right click on the project that will dipackage with keystore> select Android Tools> Export Signed Application Package

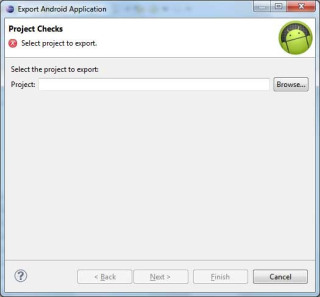
- Then you select the project that you want to publish android in Google Play Store, click Browse and select the project.

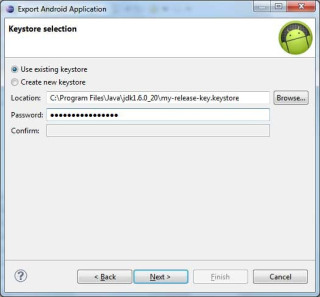
- Click Next. Then enter keystore dialog menu selection. Enter the password and click Next again immediately.

- Then we set the outcomes positioning apk file we have created. Once we get the apk that we make sure the release-storenya, our application was ready to publish to Google Play Store.
3. How to publish apps to the Android Market:
Once we are done with all the preparations on the application, it is time we turn on the preparations at Play Store:
- Prepare a google account, for the condition this one Im sure you already have it.
- Create an android developer account, for the rest you can read here.
- We have to pay the cost of making the android developers account. Want to know the price? $ 25! And we have to pay by credit card.
- Open and complete the registration form here.
-Here we can choose upload application. And we will be taken to a page to register our application in the Play Store.
- Uploading apk is not enough. There are some requirements that we must meet, among others:
1. Screenshot Application
We need to prepare at least two pieces of our application screenshot. Size can be 320 x 480, 480 x 800, 480 x 854 or 1280 x 800. File 24 bit PNG or JPEG (no alpha) Full bleed, no border. Its easy, can use the screenshot feature of DDMS perspective in eclipse. Screen shoot will be seen by users of your application in the overview section of the Google Play Store web and mobile.
2. High Resolution Icon
The mandatory nature icon. With a size of 512 x 512 pixels, 32 bit PNG or JPEG and has a large maximum of 1024 KB. This icon will be displayed on the Play Store web and also in the Play Store for mobile devices with high resolution.
3. Promotional Graphic
This chart is optional, with a size of 180 x 120 pixels, 24 bit PNG or JPEG (no alpha) Full bleed, no border. This chart will be displayed in the android market on each mobile device.
4. Feature Graphic
Feature graphs also are optional. With a size of 1024 x 500 pixels, 24 bit PNG or JPEG (no alpha). There is a possibility this chart will downsize to a mini or micro. Featured graphic header will be in use in your applications in Play Store web version.
5. Promotional Video
If you have a promotional video for your existing applications on You Tube. Then you can put the video link in this section (optional).
6. Listing Details
This section is the section where we explain about our application through words. Detail listing is divided into several sections:
a. Title (Name of our application in the Play Store)
b. Description (Description about our application, usefulness and how to use)
c. Recent Changes (changes that occur in this version, usually when we put the upgrade feature the latest information in this section)
d. Text Promo
e. Application Type (Is its applications or games)
f. Category (category choice for our application, a detailed explanation can be found here)
7. Contact Information
We can put information on the website, email address and telephone number that can be in contact, associated with our application.
- When we publish our application by pressing the publish button located at the bottom of the page, then when its also our application on Google Play Store directly can be seen and downloaded by everyone. This process is done without waiting for the verification process for days.
- If you are still confused you can read directly on the linking of the site here.
One of the most effective ways to share your applications to users is to publish it in an app market like Google Play. Publishing on Google Play is an easy process that you can do in just a few simple steps to register, configure, upload, and publish.
Registration only takes a few minutes and should be done only once. Configuration steps and can be done through the issuance of all the Google Android Developer after you sign up as a developer of Google Play. To start publishing Google Play, the first time I read this topic and then go to the Google Android Developer and register as Google Play.
You should prepare in advance is the release keystore. What is a release keystore? Release keystore file distribution is standard procedure apk (Android Package) which is recommended by Google. In our time developing your android application, when we debug our project, right then also we got the file. Apk that can be installed directly on the android device.
However to make. Apk well-formed or in accordance with the standard software, we have to perform this procedure. Standards that must be determined is the determination of the active period of application, handling public / private key associated with the application updates, and security issues.

How:
1. Preparing release keystore
- Open cmd. Start - Run - cmd
- Go to the folder jdk bin directory instalation
- Type the following command:
keytool-genkey-v-keystore my-release-key.keystore-aka-keyalg ALIAS_NAME RSA-keysize 2048-validity 10000
- Validity was followed by a number means that our application will be active up to 10000 days.
- Then you will be prompted to enter your particulars such as password, name, organization, city, and state.
- The result of the process is a file named my-release-key.keystore located in the bin folder on our android project.

2. How to Perform the Application Package Keystore:
The next step is our mem-package apk with the keystore earlier:
- Open Eclipse
- Right click on the project that will dipackage with keystore> select Android Tools> Export Signed Application Package

- Then you select the project that you want to publish android in Google Play Store, click Browse and select the project.

- Click Next. Then enter keystore dialog menu selection. Enter the password and click Next again immediately.

- Then we set the outcomes positioning apk file we have created. Once we get the apk that we make sure the release-storenya, our application was ready to publish to Google Play Store.
3. How to publish apps to the Android Market:
Once we are done with all the preparations on the application, it is time we turn on the preparations at Play Store:
- Prepare a google account, for the condition this one Im sure you already have it.
- Create an android developer account, for the rest you can read here.
- We have to pay the cost of making the android developers account. Want to know the price? $ 25! And we have to pay by credit card.
- Open and complete the registration form here.
-Here we can choose upload application. And we will be taken to a page to register our application in the Play Store.
- Uploading apk is not enough. There are some requirements that we must meet, among others:
1. Screenshot Application
We need to prepare at least two pieces of our application screenshot. Size can be 320 x 480, 480 x 800, 480 x 854 or 1280 x 800. File 24 bit PNG or JPEG (no alpha) Full bleed, no border. Its easy, can use the screenshot feature of DDMS perspective in eclipse. Screen shoot will be seen by users of your application in the overview section of the Google Play Store web and mobile.
2. High Resolution Icon
The mandatory nature icon. With a size of 512 x 512 pixels, 32 bit PNG or JPEG and has a large maximum of 1024 KB. This icon will be displayed on the Play Store web and also in the Play Store for mobile devices with high resolution.
3. Promotional Graphic
This chart is optional, with a size of 180 x 120 pixels, 24 bit PNG or JPEG (no alpha) Full bleed, no border. This chart will be displayed in the android market on each mobile device.
4. Feature Graphic
Feature graphs also are optional. With a size of 1024 x 500 pixels, 24 bit PNG or JPEG (no alpha). There is a possibility this chart will downsize to a mini or micro. Featured graphic header will be in use in your applications in Play Store web version.
5. Promotional Video
If you have a promotional video for your existing applications on You Tube. Then you can put the video link in this section (optional).
6. Listing Details
This section is the section where we explain about our application through words. Detail listing is divided into several sections:
a. Title (Name of our application in the Play Store)
b. Description (Description about our application, usefulness and how to use)
c. Recent Changes (changes that occur in this version, usually when we put the upgrade feature the latest information in this section)
d. Text Promo
e. Application Type (Is its applications or games)
f. Category (category choice for our application, a detailed explanation can be found here)
7. Contact Information
We can put information on the website, email address and telephone number that can be in contact, associated with our application.
- When we publish our application by pressing the publish button located at the bottom of the page, then when its also our application on Google Play Store directly can be seen and downloaded by everyone. This process is done without waiting for the verification process for days.
- If you are still confused you can read directly on the linking of the site here.
Available link for download