Tuesday, January 31, 2017
System Image Recovery From OEM Partition
System Image Recovery From OEM Partition
Gigabyte Xpress Recovery2
Gigabyte Xpress Recovery2 supported motherboard provide system image recovery from OEM Partition for desktop computer with just pressing F9 while booting, when your computer face any problem. Xpress Recovery2 back up data on hard disks on SATA and PATA IDE controllers.System Requirements:
- Intel x86 platforms.
- At least 64M bytes of system memory.
- VESA-supported VGA cards.
Note:
1. Everything from your hard disk will be deleted. So backup your important file and data before proceeding.
2. Xpress Recovery2 will backup system image file at the end of the hard disk, so you must have enough (At least 4 GB recommended. But in actual you must have free unallocated space depending on the size of the data to be backed up) unallocated hard drive partition space in advance.
3. If you have not enough hard disk unallocated space then delete and make free unallocated space for data backup. As Xpress Recovery2 will backup image at the end of the Hard Disk so the last partition must be unallocated and must have enough space(As shown in the picture below) otherwise you will be given an error message like "Not enough Hard Disk space".
 |
| Gigabyte Unaalocated Space |
5. To install Xpress Recovery2 with clean Windows installation, boot from your Windows Installation disc. Go to window installation page. Delete all hard drive partitions. Just create one partition(Drive C:) and install window in the very partition and left the remaining partition unallocated for data backup(as Ive already mentioned in Step 3)
Steps:
1. Go to BIOS setting and make you CD/DVD ROM as your first device.Save setting and exit.
2. Insert your motherboard driver CD and restart your computer. After restart a message will be displayed.. "Boot from CD/DVD:"... "Press any key to boot from CD..." Press any key to enter Xpress Recovery2 setup
3. Xpress Recovery2 takes a few second to load.
 |
| Xpress Recovery2 |
4. Now Xpress Recovery2 setup page will start.
5. Select backup(with keyboard) and press enter.
 |
| Xpress Recovery2 |
6. Data backup will start. And it may takes a long time depending upon the size of your data to be backed up.
 |
| Xpress Recovery2 |
7. After completion restart. Data backup with Xpress Recovery2 has been done.
Additional Info:
1. The driver CD is just required for the first time only to install Xpress Recovery2. Thereafter user can access Xpress Recovery2 just by pressing F9 while booting.
2. Install Xpress Recovery2 immediately after installing OS, all required drivers and softwares.
3. Data restoration will replace everything of Drive C: with the backed up System Image.
Some Errors:
1. Not enough Hard Drive space- That means youve not sufficient space to backup in the last unallocated drive in your hard disk.
 |
| Xpress Recovery2 |
2. All primary partition is in use or IDE Drive not detected- That means youve no unallocated space at the end of your hard disk.
For other limitation and requirement go to Gigabyte Official Xpress Recovery2 page.
Available link for download
Toshiba Satellite L735 Windows 8 Drivers
Toshiba Satellite L735 Windows 8 Drivers
Toshiba Satellite L735 Windows 8 Drivers
Bluetooth Stack Windows 8 - Upgrade 9.10.00 World Wide
Bulletin Board Windows 8 - Upgrade 2.1.21 World Wide
Bulletin Board Assistant Windows 8 - Upgrade 2.1.0.8 World Wide
Bulletin Board Assistant Windows 8 - Upgrade 1.7.0.2 World Wide
CardReader Controller Realtek Semiconductor Corporation Windows 8 - Upgrade 1.0.0.12 World Wide
ChipSet Utility Intel Windows 8 - Upgrade 9.2.0.1015 World Wide
Display nVidia Windows 8 - Upgrade 9.18.13.546 World Wide
Eco Utility Windows 8 - Upgrade 1.3.22.0 World Wide
Eco Utility Toshiba Windows 8 - Upgrade 1.3.22.64 World Wide
Intel PROSet/Wireless Software Intel Windows 8 - Upgrade 15.5.2.0.6 World Wide
Intel PROSet/Wireless WiMAX Software Intel Windows 8 - Upgrade 7.5.100726 World Wide
Media Controller Windows 8 - Upgrade 1.1.88.1 World Wide
Modem Conexant Windows 8 - Upgrade 7.80.4.53 World Wide
PC Health Monitor Windows 8 - Upgrade 1.7.17.64 World Wide
Rapid Storage Technology Intel Windows 8 - Upgrade 11.5.2.1001 World Wide
ReelTime Windows 8 - Upgrade 1.7.23 World Wide
Sleep Utility Windows 8 - Upgrade 1.4.0025.000101 World Wide
Sound nVidia Windows 8 - Upgrade 1.2.23.3 World Wide
Sound Conexant Windows 8 - Upgrade 8.54.44.0 World Wide
Value Added Package Windows 8 - Upgrade 1.6.0130.640205 World Wide
Webcam Windows 8 - Upgrade 2.0.3.38 World Wide
Wireless Display Intel Windows 8 - Upgrade 3.5.34.0 World Wide
Wireless Lan Intel Windows 8 - Upgrade 15.5.0.41 World Wide
Wireless Lan Atheros Windows 8 - Upgrade 10.0.0.75 World Wide
Wireless Lan Intel Windows 8 - Upgrade 15.5.0.43 World Wide
Available link for download
Toshiba Satellite C665 SP5101A Drivers for Windows XP
Toshiba Satellite C665 SP5101A Drivers for Windows XP
| List of Toshiba C665-SP5101A Drivers for Windows XP | ||
| Drivers Vendors | Drivers List | Download |
|---|---|---|
| Intel Chipset SW Installation Utility v9.2.0.1015 | Chipset | Download |
| AMD AHCI v1.2.1.269 | Ahci | Download |
| AMD Graphics Card Display v8.15.10.2086 | VGA | Download |
| Conexant Audio v4.119.0.61 | Audio | Download |
| Synaptics TouchPad v15.0.8.1 | TouchPad | Download |
| Atheros Ethernet NIC v1.0.0.26 | LAN | Download |
| Toshiba Web Camera Application v1.1.1.15 | Webcam | Download |
| Realtek Card Reader v6.1.7600.30111 | Card Reader | Download |
| Toshiba Face Recognition v3.1.3 | Face Recognition | Download |
| Bluetooth Stack v8.00.07_Whitney T | Bluetooth | Download |
| Atheros Bluetooth Filter v1.0.7 | Bluetooth Filter | Download |
| Realtek Wireless LAN v1.0 | Wifi | Download |
| Atheros Wireless LAN v8.0.0.258.0 | Wifi | Download |
Available link for download
Tips How add signature inside pdf documents with Adobe Reader new version
Tips How add signature inside pdf documents with Adobe Reader new version
How you sign a PDF with Acrobat Reader?
At first you need to download latest Adobe Acrobat Reader DC.
- Open the document with Acrobat Reader DC.
- Select the Tools tab --> Fill & Sign
- In the next window click on open under the heading Compile and Signature.
- Select top of the document sign command
- Select the + next to the item Add signature.

- Now you can choose from three ways to sign this PDF:
- Type: write your name and surname and will be shown.
- Draw: mouse or a touch screen you can make your signature as if I had a pen and will be saved.
- Image: Upload an image of your signature from your PC.

- Click on the apply button and drag the text box where you have to put signature and you have finished.
Available link for download
Monday, January 30, 2017
Update Android Market to Google Play Store
Update Android Market to Google Play Store


Available link for download
STOCKROM EVERCOSS A12 BACKUP BY VOLCANO TESTED
STOCKROM EVERCOSS A12 BACKUP BY VOLCANO TESTED
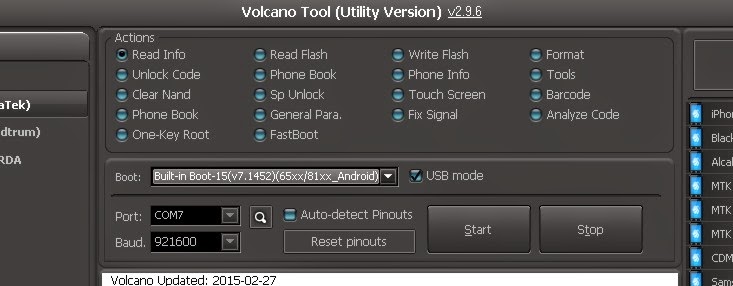
2015-04-09 1:56:35 PM >>Connecting...
2015-04-09 1:56:35 PM >>Connecting...
2015-04-09 1:56:35 PM >>CPU TYPE:MT6572
2015-04-09 1:56:35 PM >>CPU TYPE:MT6572
2015-04-09 1:56:35 PM >>Hardware version:CA01
2015-04-09 1:56:35 PM >>Hardware version:CA01
2015-04-09 1:56:35 PM >>Software version:0000
2015-04-09 1:56:35 PM >>Software version:0000
2015-04-09 1:56:35 PM >>SecCfgVal :0x00000000
2015-04-09 1:56:35 PM >>SecCfgVal :0x00000000
2015-04-09 1:56:35 PM >>BromVersion :0xFF
Available link for download
Sunday, January 29, 2017
VLC Media Player v2 1 5 Full Latest
VLC Media Player v2 1 5 Full Latest

Description:-
Requirements:-
Previews:-
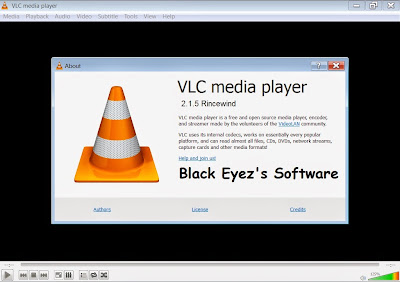
Download Link:-
 |
| Download VLC |
Available link for download
Wise Care 365 Pro 3 85 Build 343 Final With Serial
Wise Care 365 Pro 3 85 Build 343 Final With Serial

system utilities for your PC. Easy to use and effective, Wise Care 365 is the best solution to improve your PCs performance. Get Wise Care 365 and your computer will never run slow again!
What can Wise Care 365 do?
? Clean up, defragment and optimize the Windows Registry
? Defragment and free up space on your hard disk
? Protect your privacy by erasing personal tracking data
? Recover lost files
? Hide important files or folders
? Prevent unauthorized use of personal applications
? Auto shut down your PC
? Free up Memory to boost game and enterprise software performance
? Simple "One Click Tune-up" option will optimize your PC
Why choose Wise Care 365?
? An all-in-one utility
Wise Care 365 includes both Wise Disk Cleaner and Wise Registry Cleaner. However, with other attractive and exciting features, it is far more than just that. Wise Care 365 will keep your PC in tiptop shape and running at peak performance!
? Able to find more hidden problems than any other similar programs.
Wise Care 365 can detect more hidden invalid registry issues than other similar programs, which is accredited by CHIP and PCWorld.
? Simpler and easier to use
It takes just one click to use Wise Care 365. As if by magic, your old PC will transform into a brand new and blazing fast one after Wise Care 365s automatic cleanup and tune-up.
? Now with the fastest scanning speed
The scanning speed of Wise Care 365 is twice as fast as CCleaner?s, as well as Advanced System Care Pro 5.
? Highly reviewed by professionals and users
All the features in Wise Care 365 got highly reviewed by PCWorld, PCAdvisor, ComputerBild, CHIP, CNET, ZDNet, and so on.
? Highly experienced developers
A group of top programmers, all of whom have at least ten-years experience, spent three years creating Wise Care 365 after collecting an abundance of feedback from users..

(1): Download Wise Care From Home Page
(2): run the setup
(3): Use the Serial To Activate .
(4): Enjoy and Support Developers, Buy It, They Deserved It!

Available link for download
Windows 8 1 Update 1 Highly Compressed Download Link
Windows 8 1 Update 1 Highly Compressed Download Link
 |
| Windows 8.1 Update 1 Highly Compressed |
Available link for download
Toshiba 401 All
Toshiba 401 All
Download toshiba 401 all!!!
Info:
File name: Toshiba401All.zip
Driver version: 2.5.9
File size: 3.95 MB
OS: Win Vista, Windows 8
File is safe, uploaded from tested source.
Available link for download
SUPERAntiSpyware v6 0 Professional With Serial Keys
SUPERAntiSpyware v6 0 Professional With Serial Keys

SUPERAntiSpyware Professional features our highly advanced Real-Time Protection to ensure protection from installation or re-installation of potential threats as you surf the Internet. Used in conjunction with our First Chance Prevention and Registry Protection, your computer is protected from thousands of threats that attempt to infect and infiltrate your system at startup or while shutting down your system.
Advanced Detection and Removal:
Detect and Remove Spyware, Adware, Malware, Trojans, Dialers, Worms, KeyLoggers, HiJackers, Parasites, Rootkits, Rogue Security Products and many other types of threats.
Light on System Resources and wont slow down your computer like many other anti-spyware products. Wont conflict with your existing anti-spyware or anti-virus solution!
Real-Time Protection:
- Real-Time Blocking of threats! Prevent potentially harmful software from installing or re-installing!
- First Chance Prevention examines over 50 critical points of your system each time your system starts up and shuts down to eliminate threats before they have a chance to infect and infiltrate your system.
- Schedule either Quick, Complete or Custom Scans Daily or Weekly to ensure your computer is free from harmful software.
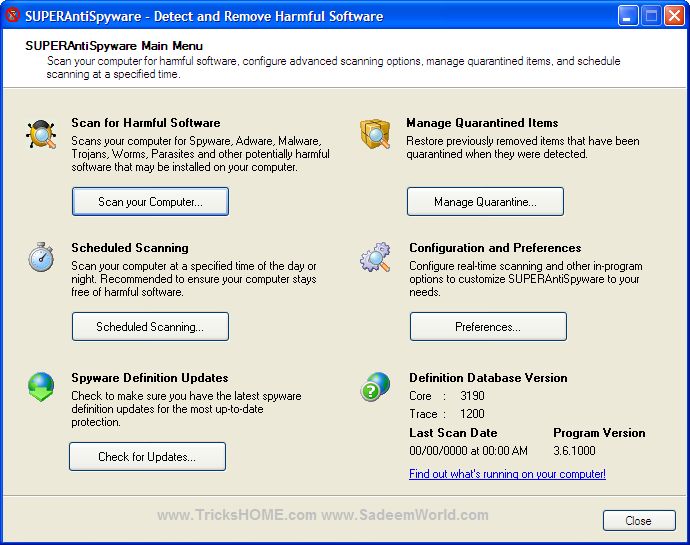
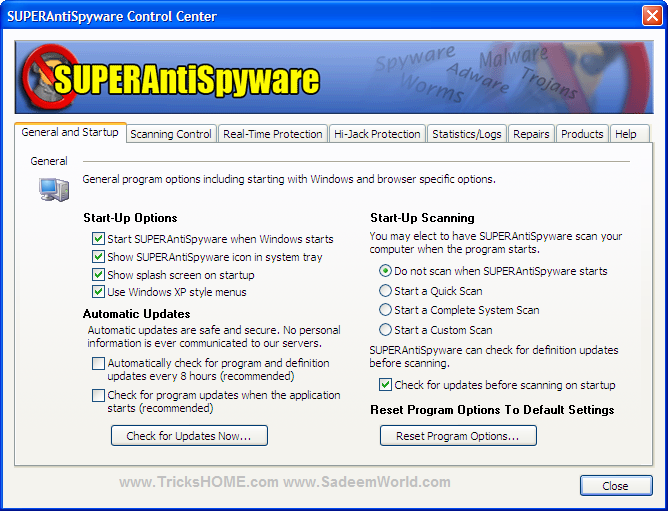
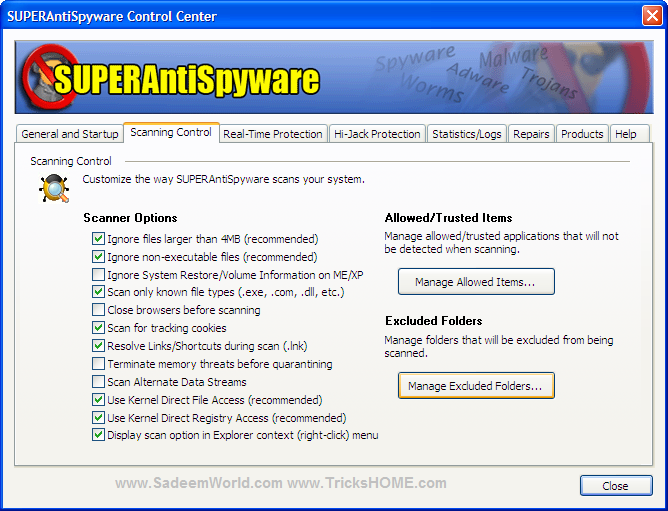
Installation Note:
- Install Program (Trial Mode)
- Connect Internet
- Use the given KEY to Activate
- Close Application "Tray Icon" From Taskbar
- Then UpDate Database
- Enjoy! :)
Download Links:
Available link for download
Windows 2016 MVA whats new
Windows 2016 MVA whats new
1 | Instructor Introductions and Prep
Meet your instructors, and learn what you should know as you come to this course.
2 | Introduction to Windows Server 2016
Get a high-level overview of whats new in Windows Server 2016, from a conceptual standpoint.
3 | The Software-Defined Datacenter ? Part 1
Take a look at whats new in Windows Server 2016 Hyper-V and software-defined networking.
4 | The Software-Defined Datacenter ? Part 2
Get a high-level overview of whats new in Windows Server 2016 storage, including software-defined storage.
5 | Security and Authentication
Look at the newest features in Windows Server 2016 security and Remote Desktop Services (RDS), including Credential Guard and RDS Scaling.
6 | Application Platform
Take a look at containers and Nano Server, along with implementation and management.
Post-Event Survey
Please take this survey after you have completed this course.
Available link for download
Friday, January 27, 2017
SybeX CCNA Routing and Switching Study Guide PDF by Todd Lammle
SybeX CCNA Routing and Switching Study Guide PDF by Todd Lammle

About Book:-
About the Author:-
Note:-
Download Link:-

Password (If Needed):-
Available link for download
Tips OSX How to Save Space Hard Drive Mac
Tips OSX How to Save Space Hard Drive Mac


Available link for download
WhatsApp Plus Ala Droidindonesia
WhatsApp Plus Ala Droidindonesia
Available link for download
Thursday, January 26, 2017
Utiliser plusieurs certificats SSL sur un seul serveur apache avec une seul adresse ip
Utiliser plusieurs certificats SSL sur un seul serveur apache avec une seul adresse ip
Utiliser plusieurs certificats SSL sur un seul serveur apache avec une seul adresse ip

Le but de l?article du jour est d?utiliser plusieurs certificats SSL sur une mˆme machine via le SNI (ce qui ‚tait impossible il y a quelques ann‚es de cela cf. wikipedia, le premier patch ‚tant sorti en 2004, les premiŠres impl‚mentation sur les serveurs apache se sont fait sur la version 2.2.12 en Juillet 2009).
Depuis peu donc, on peut s?amuser … installer plusieurs certificats SSL, mais ‡a n‚cessite un tout petit peu de configuration (vraiment un tout petit peu en fait).
Les outils n‚cessaire :
- Des certificats SSL (de pr‚f‚rences valide c?est gratuit chez startSSL)
- Un serveur apache de version 2.2.12 ou sup‚rieur
- La librairie openssl 0.9.8j ou sup‚rieur
il faut modifier la config ® /etc/apache2/ports.conf ¯ et faire en sorte que le ifmodule du mod_ssl ressemble … ‡a :
- <IfModule mod_ssl.c>
- NameVirtualHost *:443
- Listen 443
- </IfModule>
Puis enfin cr‚er le fichier de configuration s?occupant de vos certificats et de les servir suivant le nom de domaine demand‚ (chez moi blog.gaetan-grigis.eu et un-autre-sous-domaine.gaetan-grigis.eu).
- <VirtualHost *:443>
- ServerName aitibourek.blogspot.com
- DocumentRoot /var/www/blogaitibourek
- SSLEngine on
- SSLProtocol all -SSLv2
- SSLCipherSuite ALL:!ADH:!EXPORT:!SSLv2:RC4+RSA:+HIGH:+MEDIUM
- SSLCertificateFile /etc/apache2/cert/blog.crt
- SSLCertificateKeyFile /etc/apache2/cert/blog.key
- SSLCertificateChainFile /etc/apache2/cert/sub.class1.server.ca.crt
- SSLCACertificateFile /etc/apache2/cert/ca.crt
- SetEnvIf User-Agent ".*MSIE.*" nokeepalive ssl-unclean-shutdown
- CustomLog /var/log/apache2/ssl_request.log
- "%t %h %{SSL_PROTOCOL}x %{SSL_CIPHER}x "%r" %b"
- </VirtualHost>
- <VirtualHost *:443>
- ServerName un-autre-sous-domaine.aitibourek.fr
- DocumentRoot /var/www/un-autre-sous-domaine
- SSLEngine on
- SSLProtocol all -SSLv2
- SSLCipherSuite ALL:!ADH:!EXPORT:!SSLv2:RC4+RSA:+HIGH:+MEDIUM
- SSLCertificateFile /etc/apache2/cert/un-autre-sous-domaine.crt
- SSLCertificateKeyFile /etc/apache2/cert/un-autre-sous-domaine.key
- SSLCertificateChainFile /etc/apache2/cert/sub.class1.server.ca.crt
- SSLCACertificateFile /etc/apache2/cert/ca.crt
- SetEnvIf User-Agent ".*MSIE.*" nokeepalive ssl-unclean-shutdown
- CustomLog /var/log/apache2/ssl_request.log
- "%t %h %{SSL_PROTOCOL}x %{SSL_CIPHER}x "%r" %b"
- </VirtualHost>
NB: On peut bien s–r en cr‚er autant qu?on veut, c?est pas limit‚ … deux sous-domaines.
Available link for download
TuneUp Utilities 2013 13 0 2020 14 Full Licensed Box net
TuneUp Utilities 2013 13 0 2020 14 Full Licensed Box net
TuneUp Utilities 2013 13.0.2020.14 Full Licensed | 30 MB
Available link for download
Top 3 Options on How to Reset Windows 8 1 Login Password Instantly
Top 3 Options on How to Reset Windows 8 1 Login Password Instantly
If you have used Windows computer before, it is hard for you to change the OS. As for me, I used to make use of Windows 7 operating system; I love the beautiful Windows 7 user interface. Therefore, when I hear that Microsoft wont support Windows 7 update, I am not willing to upgrade my system to Windows 8.1 but I have to. That is for the security of my Windows-based computer. But if you tell me to change to Mac, I will not make the decision. However, there is a problem when I upgrade the pc to Windows 8.1. That is, I lost login password on Windows 8.1 and have no idea about how to do that.
As we all know, there is not only a kind of password in Windows 8.1. Except for the Windows login password, also Microsoft account password, picture password, folder password and so forth. Although not all the password we need to create, once we forgot one, it is going to be a big trouble in my daily life because we always need to use the computer.
Consequently, if we can try our best to figure out the available method to reset Windows 8.1 login password, it will be great! As a matter of fact, after collecting a variety of ways, we can follow the below options to access Windows 8.1 or reset login password on Windows 8.1.

Option 1: Reset Windows 8.1 Admin Password with Safe Mode
In every Windows-based computer, people are able to use the safe mode to boot into the Windows operating system. All you have to do is to press Win + R in the keyboard to enter the Run box, and then type ?msconfig? in the pop up box. Then press the Enter button of the keyboard. After this operation, turn to the boot tab, and then check ?Safe boot?. After that, choose ?Minimal?, the normal safe mode, and then click the ?OK? button. Finally, restart your computer and then to access Windows 8.1 with safe mode. Then you can reset Windows 8.1 admin password in the control panel.
Option 2: Windows 8.1 Login Password Reset with Password Reset Disk
If you have created a Windows 8.1 password reset disk before you lost Windows 8.1 password, now you can make use of the disc to reset it at once. It is the normal way to reset Windows 8.1 login password. Therefore, you had better figure out the disc and then insert it to your locked Windows 8.1 computer, then restart it and follow the prompt to reset it.
Option 3: Reset Password in Windows 8.1 with Software
There is no doubt that the most efficient way to reset Windows 8.1 user password is to take advantage of the Windows 8.1 password reset program. That software is the one of the common method to rescue your computer. It is safe and easy to use, and usually supports customer service in all life.
One of the best Windows 8.1 password reset tool is the SmartKey Windows Password Recovery software. Besides the based features, its new GPU technical up to 10 X is faster than the other third party tools. It has 3 editions, which are Standard, Professional and Ultimate. You might as well see how to use it as below.
- Step 1: Download and install this smart Windows password recovery key from another accessible Windows-based computer. Then click its shortcut on your desktop of the pc.
- Step 2: Use a CD/DVD/USB to boot a Windows 8.1 password reset drive and then take the drive to your locked machine.
- Step 3: Reset user password on Windows 8.1 by using the bootable disc successfully.
Available link for download
Wednesday, January 25, 2017
Toshiba Satellite L775 Windows 8 Drivers
Toshiba Satellite L775 Windows 8 Drivers
Toshiba Satellite L775 Windows 8 Drivers
Bluetooth Stack Windows 8 - Upgrade 9.10.00 World Wide
Bulletin Board Windows 8 - Upgrade 2.1.21 World Wide
Bulletin Board Assistant Windows 8 - Upgrade 2.1.0.8 World Wide
Bulletin Board Assistant Windows 8 - Upgrade 1.7.0.2 World Wide
CardReader Controller Realtek Semiconductor Corporation Windows 8 - Upgrade 6.1.7600.30126 World Wide
ChipSet Utility Intel Windows 8 - Upgrade 9.2.0.1015 World Wide
Display nVidia Windows 8 - Upgrade 9.18.13.0546 World Wide
Display Intel Windows 8 - Upgrade 9.17.10.2843 World Wide
Eco Utility Windows 8 - Upgrade 1.3.22.0 World Wide
Eco Utility Windows 8 - Upgrade 1.3.22.64 World Wide
HDD/SSD Alert Utility Windows 8 - Upgrade 3.1.0.7 World Wide
HDD/SSD Alert Utility Windows 8 - Upgrade 3.1.64.7 World Wide
Intel PROSet/Wireless WiMAX Software Intel Windows 8 - Upgrade 7.5.100726 World Wide
Media Controller Toshiba Windows 8 - Upgrade 1.1.88.1 World Wide
PC Health Monitor Windows 8 - Upgrade 1.7.17.64 World Wide
Rapid Storage Technology Intel Windows 8 - Upgrade 11.5.2.1001 World Wide
ReelTime Windows 8 - Upgrade 1.7.23 World Wide
Registry Patch Windows 8 - Upgrade 1.0 World Wide
Sound nVidia Windows 8 - Upgrade 1.3.18.0 World Wide
Sound Realtek Semiconductor Corporation Windows 8 - Upgrade 6.0.1.6687 World Wide
TouchPad Synaptics Windows 8 - Upgrade 15.2.11.1 World Wide
Value Added Package Windows 8 - Upgrade 1.6.0130.320205 World Wide
Value Added Package Windows 8 - Upgrade 1.6.0130.640205 World Wide
Webcam driver Windows 8 - Upgrade 2.0.3.38 World Wide
Wireless Display Intel Windows 8 - Upgrade 3.5.34.0 World Wide
Wireless Lan Realtek Semiconductor Corporation Windows 8 - Upgrade 2.00.0020 World Wide
Wireless Lan Atheros Windows 8 - Upgrade 10.0.0.75 World Wide
Wireless Lan Intel Windows 8 - Upgrade 15.5.0.43 World Wide
Available link for download
USB Disk Security Latest and Full Version
USB Disk Security Latest and Full Version

Download Usb Disk Security Full Version

Available link for download
Tips Presenting LCD Retro Theme in Android
Tips Presenting LCD Retro Theme in Android
To download a needed resource pack, click the following links:
Available link for download
UNetbootin to create a Linux USB from Linux
UNetbootin to create a Linux USB from Linux
- Open a terminal (applications > accessories > terminal)
- Type
wget unetbootin.sourceforge.net/unetbootin-linux-latest - Type
chmod +x ./unetbootin-linux-* - Type
sudo apt-get install p7zip-full - Type
sudo ./unetbootin-linux-*Alternately, you can double click the unetbootin-linux-* file to run it, since it was marked executable in step 3.


Available link for download