Friday, April 28, 2017
Windows Media Center Personal Video Recorder PVR How To
Windows Media Center Personal Video Recorder PVR How To
So I decide to do some research and see why this is. Well, money plain and simple. The provider companies provide this equipment for a fee because they know they can get it. Most people just go with the flow and know this process as the price of doing business. Well I take it because your reading this that you are not an individual that likes to do this because youre looking for alternatives. Hence the reason the FCC made it mandatory for providers to allow third party intervention. See http://en.wikipedia.org/wiki/CableCARD for additional information.
I will now attempt to go into detail on how to set this up and provide links to areas of information throughout this how to that have already been established.
Required:
- CableCARD or MCard tuner from your provider. My provider was Verizon FIOS and I ordered the MCard from their website and waited the week for it to arrive at my house. You only need one per CableCARD device. Other cable companies also provide this MCard. Cox and Comcast.
- CableCARD tuner. I purchased a Ceton InfiniTV PCIe device for my computer through newegg.com for about $199 (they should be on sale now as the PCIe 6 device [$299] just came out). The PCIe 4 device was fine for me in recording 4 separate channels at one time. You can use the USB device as I tried but had issues and switched to the PCIe device.
- Personal Computer (PC) with the minimum requirements as stated by Ceton. I also added a 2TB hard drive for recording space.
- Windows 7 or 8 operating system (OS) with Media Center (MC). I purchased Win7 OS and upgraded to Win8 and got the free upgrade to MC before 30 Jan 2013 cut off. If you do not already have MC then purchase through Microsoft. Believe its still $60.
- HD TV service from your service provider.
- To provide service to other rooms throughout the house you will need a Windows Media Center Extender (WMCE). If you already have an XBOX360 you have a WMCE. If you need to purchase one Ceton makes one that is cheaper than buying a new XBOX360 called the Echo. You could also purchase used XBOX360s from GameStop, Newegg.com, etc. Think of this device as your new set-top box. Youll own it and wont pay rent on it.
- A router and this is were it gets iffy. The industry tots that a WiFi "N" router can handle media streaming. This might be the case in testing but in my experience hasnt panned out for me. I had to go to an all wired architecture. By all wired I also mean power line networks. I have my main 60" LCD LED mounted over my fireplace with no access to a hard wired CAT 5/6 cable. I do however have access to a home power plug. I plugged the network homeplug (network power line) into the power outlet and the other end of the power line adapter close to my router and finished network connectivity. I purchased the Belkin AV500 and it works great. They do have a new Powerline Gigabit HD version out now and for a little extra doe might be worth it. Refer to the owners manual for proper setup. Recommend not using surge / multi-plugs power strips as they do not work well with these devices. Youll know because the bandwidth speed is crap. Also ensure the two plugs you decide to connect are on the same circuit. Security reasons, I would recommend encryption because even the plugs on the outside of your house could be used to tap into the network. Everywhere else I ran hard line CAT 5/6 cable linking to other WMCEs.
- You might require a swtich if you run out of CAT5/6 plugs on your router from overcrowding. I went gigabit 10/100/1000. Not necessary as 10/100 switches will have more than plenty of bandwidth to stream. I wanted to ability to transfer file from one computer to another with greater speed is why I went gigabit.
Once you have the above items your ready to setup.
-Connect your Ceton InfiniTV Tuner to your computer. See the installation instructions.
-Install the CableCARD to the Ceton InfiniTV Tuner.
-Turn on your computer.
-Download the Ceton software. Downloading ensure you have the latest and greatest drivers and software.
-Ensure the device is working properly. Start the Ceton Diagnostics.

-The device should be recognized.

-Follow the detailed installation instructions to get the tuners up and running. This will require you to contact your service provider and advise them of your CableCARD serial number found under the diagnostics. You more than likely will not have green check marks if the CableCARD has not been activated. The service provider must send the correct signal to the CableCARD to ensure the encrypted signals are decrypted by the card. Do not hang up with your service provider until you see the green check marks. They will dynamically update so keep watching.

-The WMC should download the program guide and your ready to watch TV and record.
Ceton also has an Android app and iPhone app to control your WMC remotely also. Be advise that it wont let you watch the shows from that device only manage.
Now to extend your WMC to another device like an XBOX360 to Ceton Echo follow these instructions. The devices have to be connected to your network.
Now play with your new WMC PVR for a while to make sure things are working before returning your set-top boxes.
After becoming familiar with you WMC you might later get into converting your recorded show. Programs like MCE Buddy and MC-TV Converter automatically convert the proprietary WMC codec format to .avi or .mp4 and remove commercials.
Even further you could be interested in serving out your record TV to your mobile devices like phone or tablet. You would likely use Remote Potato to stream your converted TV without commercials to these devices from your WMC computer. The phone or tablet would used the Remote Media Center program to link to that server.
Happy Recording...
Available link for download

Wednesday, April 26, 2017
Tips How to read file p7m DigitalSign Reader
Tips How to read file p7m DigitalSign Reader
During these years it happened that often some end users had problems to read on their computer .p7m files.
For that purpose and considering that finding suitable free tool for me was not immediately straight I take note of software that worked fine for me.
DigitalSign Reader 5.0
http://www.comped.it/it/prodotti/digitalsign-reader/digitalsign-reader-5-scaricalo-subito
I hope that this information could be useful for someone.
Available link for download
Tuesday, April 25, 2017
Troubleshooting After upgrading from Vista to Windows 7 cant download anything and Youtube shows a black screen Error
Troubleshooting After upgrading from Vista to Windows 7 cant download anything and Youtube shows a black screen Error
After upgrading from Vista to Windows 7, cant download anything and Youtube shows a black screen.
Hello,
I upgraded from Vista to Windows 7 Home Premium.
I bought the full version, but just chose to upgrade, not fully install.
I did this because a Windows Update caused a problem with my network card software and I lost my Internet Connectivity (my computer could not "see" the network.)
After the update, which ran fine, I got my Internet back, but now I cant download a thing.
If I try to go to Youtube it doesnt play anything, the screen is just black.
Any suggestions? Very frustrated.
I am running AVG Internet Security with Windows Defender Firewall.
Thank very much.
Anwsers to the Problem After upgrading from Vista to Windows 7, cant download anything and Youtube shows a black screen.
Download Error Fixer (Free)
Hi,
úÿÿÿÿÿÿÿÿ Do you receive any error message while downloading the files?
úÿÿÿÿÿÿÿÿ Which browser are you using to download the files?
ÿ
Let?s follow the steps provided below and check if that helps:
Method 1:
I would suggest you to use the Internet Explorer in No Add-on mode.
To run in No Add-on mode follow the steps below ?
a.
Click Start, and then type Internet Explorer in the Start Search box.
b.
Click Internet Explorer (No Add-On).
Internet Explorer opens without add-ons, toolbars, or plug-ins.
c.
Test Internet Explorer to verify that it works correctly.
If the issue is not present in No Add-on mode you may check which particular Add-on is interfering referring to the links provided.
You may also refer to the below links for further assistance on the issue ?
http://windows.microsoft.com/en-US/windows7/Internet-Explorer-add-ons-frequently-asked-questions
ÿ
Method 2:
If the issue persists I suggest you to reset Internet explorer settings and check if you can resolve the issue ? Use the below steps to reset the Internet Explorer manually:
a.
Open Internet Explorer.
b.
Clickÿ Tools, and then clickÿ Internet Options.
c.
Click the Advanced tab.
d.
Under Reset Internet Explorer Settings, click Reset.
For more assistance refer to the link mentioned below ? To optimize Internet Explorer:
http://support.microsoft.com/kb/936213
If the above steps did not help then follow the steps provided belolw.
Method 3: Try to download and install the Adobe flash player and check for the issue.
Click on the link provided below to download and install Adobe flash player:
http://www.adobe.com/support/flashplayer/downloads.html#fp10.2
ÿ
Disclaimer: The Reset Internet Explorer Settings feature might reset security settings or privacy settings that you added to the list of Trusted Sites.
The Reset Internet Explorer Settings feature might also reset parental control settings.
We recommend
that you note these sites before you use the Reset Internet Explorer Settings feature.
How to Avoid Downloading Malware
Where are you getting the download?
There are malicious people who download valid copies of a popular download, modify the file with malicious software, and then upload the file with the same name. Make sure you are downloading from the developers web page or a reputable company.
Cancel or deny any automatic download
Some sites may automatically try start a download or give the appearance that something needs to be installed or updated before the site or video can be seen. Never accept or install anything from any site unless you know what is downloading.
Avoid advertisements on download pages
To help make money and pay for the bandwidth costs of supplying free the software, the final download page may have ads. Watch out for anything that looks like advertisements on the download page. Many advertisers try to trick viewers into clicking an ad with phrases like "Download Now", "Start Download", or "Continue" and that ad may open a separate download.
Recommended Method to Repair the Problem: After upgrading from Vista to Windows 7, cant download anything and Youtube shows a black screen.:


How to Fix After upgrading from Vista to Windows 7, cant download anything and Youtube shows a black screen. with SmartPCFixer?
1. Click the button to download Error Fixer . Install it on your computer. Open it, and it will scan your system. The errors will be shown in the list.

2. After the scan is finished, you can see the errors and problems need to be fixed. Click Fix All.

3. The Repair part is finished, the speed of your computer will be much higher than before and the errors have been fixed. You can also use other functions in SmartPCFixer. Like dll downloading, windows updating and print spooler error repair.

Related: Fast Solution to Problem: Error http//go.microsoft/fwlink/?linkId=144689 occurs at every reboot,,Troubleshooting:I tried to download the latest version of Internet Explorer 9, but it will not update the download due to a message that states "Wrong version of Internet Explorer installer" Error,Fast Solution to Error: IE9 Search Taking Me to Web Pages Rather Than Search Results,Random freezing after updating to SP1 (Windows 7) Tech Support,[Anwsered] Thinkpad 8611 Boot,How to Resolve - Svchost Helper?,Fast Solution to Problem: L30 101 Driver Windows 7,Troubleshooter of Error: Io Device,How to Fix Error - Dell Laptop Code 39?
Read More: Solution to Error: after scanning a word document, why are some words missing and other words scrunched together,Fast Solution to Problem: Aligning Metro Tiles in a Single File column?,How Can I Fix - ALGEBRA EQUATION graph IN EXCEL?,Troubleshooting:After performing Norton scan, lost all inbox emails.,[Solved] after os reinstall windows 7 ultimate will not do a complete system restore because it doesnt recognize the image on the external hard drive,Able To Install Multiple Versions Of Office?,A couple of years ago I downloaded a homeccounting template I cant find now is there a place where I can look for other templates that are not lis ated?,add on information bar - Preventing me from being able to download anything,addin for excel doesnt exist in "C:Program FilesMicrosoft OfficeOffice121033",Adding degrees on Calculator
Available link for download
Sunday, April 23, 2017
Successor to Acer Aspire 4530
Successor to Acer Aspire 4530
If you guys are interested in Acer Aspire 4530, DO NOT get it.

Available link for download
Saturday, April 22, 2017
Tips Android How To Take Screenshot on HTC One
Tips Android How To Take Screenshot on HTC One
HTC has 2 ways to take a screenshot: 1) version of Android (4.0 and above) and 2) his own version of HTC. For the first way is a universal way for users of Android 4.0 to the above: a combination of pressing the Power and Volume Down buttons, while the 2nd way is the HTC version that uses a combination of buttons; Power and Home button.
For the first way, you have to press both the Volume Down button and its Power simultaneously until there was a shutter sound, then release both buttons. Thumbnail of the screenshot will appear briefly on the screen, and it will pop up a new notification in the Notification Shade. You can tap the notification to view it, or access it on the album is also in the application Screenshot Gallery.

2nd way is the HTC version; You can take a screenshot by pressing the Home button Power button. This method can also be done in a number of HTC products such as the HTC One X, X HTC Desire, HTC Desire dam U. To retrieve it, simply press the Power button for a half second and then quickly press the Home button. Do not press the Power button too long because it will actually bring up the option to turn off the phone.

Difference of these two methods are both have flash animations and also shutter a different tone. 2nd way will bring the message at the bottom of the screen and does not show up in the notifications, so you can only see it in the screenshot album in the Gallery application.
Good luck!
Available link for download
Friday, April 21, 2017
When and How to Reset Mac SMC System Management Controller
When and How to Reset Mac SMC System Management Controller
 |
| Reset Mac SMC |
The system management controller (SMC) is a chip in your intel-based Mac, which plays significant roles in controlling thermal and power management,keyboards and other peripherals, battery charging, video mode switching and cooling fans, sleep and wake, hibernation,Power buttons and LED indicators. It also enables enforcement of the Mac OS X End User License, allowing it to identify when it is running on non-Apple hardware.
 |
| Reset Mac SMC |
If the SMC firmware is corrupt because of any reason, your mac will start behaving strangely with no apparent reason ? the trackpad would stop working,lights won?t be working correctly,display resolution will change,your computer wont turn on or a number of other issues mentioned below. Most of the time, these issues can be solved by closing all of your apps and restarting the computer. Sometimes, though, you?ll need to reset the SMC by following the computers model-specific intructions described by Apple.
 |
| SMC-for-macbook-air-13inch-a1466-2013 |
Fans
- Cooling fans running at high speed.
Lights
- Keyboard Backlight Issues.
- Incorrect behavior with the Status Indicator Lights or Battery Indicator Lights.
- Backlight displays not responding to ambient light changes.
Power
- Your computer won?t turn on
- Non-responsive power button
- Unexpected sleep or shutdown
- Battery not charging properly
- MagSafe LED displays incorrect activity
- A Mac notebook computer doesnt respond properly when you close or open the lid.
System Performance
- The trackpad doesn?t work
- Computer running slowly despite low CPU load
- Long "Bounce" times for application icons in the dock.
- External displays and Ambient Light Sensing
- Unexpectedly switching into or out of target display mode for external displays.
- Your computer won?t connect to Wi-Fi
- Applications may not function correctly, or they may stop responding after being opened.
- The illumination around the I/O ports on a Mac Pro (Late 2013) does not activate when you move the computer.
Resetting the SMC is usually accomplished by removing all power from the system for a period of time (by unplugging the mains connector or removing the battery) or by operating the power button in a special way.Read the following steps to know how to Reset SMC.
Reset the SMC on Mac notebook computers
First determine whether the battery is removable. Mac notebook computers that have a nonremovable battery include MacBook Pro (Early 2009) and later, all models of MacBook Air, MacBook (Late 2009), and MacBook (Retina, 12-inch, Early 2015). Learn more about Mac notebook batteries.
Reset SMC of Macbook whose battery is nonremovable
- Shut down the Mac.
- Plug in the MagSafe or USB-C power adapter to a power source and to your Mac.
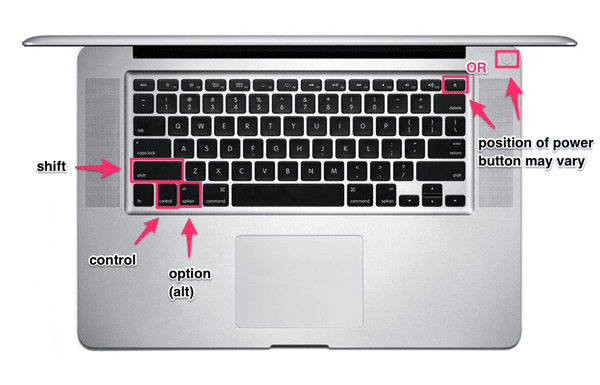
- Using the built-in keyboard, press Shift-Control-Option on the left side of the keyboard, then press the power button at the same time.
 | |
|
- Release all keys, then press the power button again to turn on your Mac
Reset SMC of Macbook whose battery is removable
- Shut down the Mac.
- Disconnect the MagSafe power adapter from the Mac.
- Remove the battery. (Learn about removing the battery in MacBook and MacBook Pro computers.)
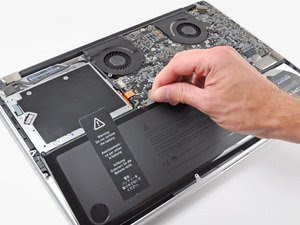 |
| Remove the Battery of Macbook Pro to Reset SMC |
- Press and hold the power button for 5 seconds.
- Reconnect the battery and MagSafe power adapter.
- Press the power button to turn on the Mac.
- The LED on MagSafe power adapters might change states or temporarily turn off when you reset the SMC.
- Shut down the Mac.
- Unplug the power cord.
- Wait 15 seconds.
- Plug the power cord back in.
- Wait 5 seconds, then press the power button to turn on the Mac.
- For Intel-based Xserve computers that arent responding, you can shut down locally or by using remote commands. You can also shut down by pressing and holding the power button for 5 seconds.
Note:- Resetting the SMC does not reset or otherwise change the contents of NVRAM or PRAM on Intel-based Macs.
The SMC is responsible for these and other low-level functions on Intel-based Macs:
- Responding to presses of the power button
- Responding to the display lid opening and closing on portable Macs
- Battery management
- Thermal management
- The SMS (Sudden Motion Sensor)
- Ambient light sensing
- Keyboard backlighting
- Status indicator light (SIL) management
- Battery status indicator lights
- Selecting an external (instead of internal) video source for some iMac displays
 |
| Update for SMC |
Available link for download
Upload DVDs to Dropbox for viewing anywhere
Upload DVDs to Dropbox for viewing anywhere

Dropbox is a mobile document and media storage tool that allows you to sync you files online for backup. Anything like movies and music you save to your computer can be saved to your Dropbox. If you are looking for a way to upload DVD to Dropbox for viewing as above thread mentioned, read on to find the best solution.
Hot Search: Dropbox Transfer Guides | iTunes to Dropbox | Blu-ray to Dropbox | Compress videos to Dropbox |
As you know, Dropbox doesnt support DVD video format. If you have some nice DVD movies and want to add to Dropbox for streaming and playback on iPhone, iPad, Android, Surface 3, BlackBerry, Plex, PS4/3, PSP, PS Vita, WDTV, smart TV and more media devices, you have to rip and copy DVD to Dropbox readable formats, as MP4, MOV, etc.
To do so, a DVD ripping software is essential. Here Pavtub DVDAid is recommended to you. This DVD ripping tool can rip any encrypted DVD and convert DVD to Dropbox readable MP4, MOV etc. formats as well as other popular formats, like rip DVD to AVI, MKV, M3U8, H.265, WMV, MPG, FLV, SWF, M4V, etc. on Windows (including Windows 10, 8.1 and 8). For the video size limit of Dropbox site, the built-in editor also allows you to extract DVD clips with the very part you want. Or, you can just choose to rip certain chapters of a DVD as you like.
If you are a Mac user, please turn to DVDAid for Mac, support Mac OS X Yosemite 10.10, 10.9 Mavericks, 10.8 Mountain Lion, 10.7 Lion, Snow Leopard10.6, Leopard 10.5.
Now download the right version of the program and follow the guide below.


Other Download
- Pavtube old official address: http://www.pavtube.cn/dvd_ripper/
- Cnet Download: http://download.cnet.com/Pavtube-DVDAid/3000-7970_4-76158510.html
Part I. How to rip DVD to Dropbox readable video format for uploading?
Step 1. Load DVD movies
Insert the DVD disc into your computer?s DVD drive and run DVD Ripper. You can click the "Load DVD" button to load the DVD files to the program. DVD ISO/IFO, VIDEO_TS folder are supported also.

Step 2. Specify output format
As has been stated above, Dropbox supports MP4, etc video files. So you can just select "Common Video" > "H.264 Video(*.mp4)" as the output video format. Also you can transfer your DVD to media hub, Cloud Storage and External Hard Drive/Thumb Drive, Flash drive, Plex for storage and playback.

Step 3. Trim/Edit DVD files
Since Dropbox has limitations about the uploading video size(If you only have the free account, you only have 2 GB of space), please pay attention to the video size when ripping DVD movies for Dropbox. Here we should highlight the trim function on this software. Just click "Edit" to trim the DVD videos to get the very part you want. Besides trimming, cropping, adding watermark, adjusting special effect, are well supported as well.
Step 4. Start converting DVD to Dropbox
When all these settings are ready, you can click the "Convert" button to begin the DVD to Dropbox conversion. When the ripping is done, you can click on "Open" button to locate the ripped videos.
Part II. How to Upload the ripped DVD movies to Dropbox for storage?
1. Sign in to the Dropbox website.
2. Click the Upload button from the very top of the window. The upload button.
3. A window will appear. Click the Choose File button and then select the file on your computer that you?d like to add to your Dropbox.
4. Choose as many files as you like, and then click the Start Upload button.
5. The window will disappear, your files will start uploading, and youll be shown a progress indicator. That?s it, you?ve added files to your Dropbox!
Detailed steps can be found here.

Thats all the instructions to rip and upload DVD to Dropbox for sharing.
More Tips
- Transfer iTunes Movies to USB for Playing on 4K TV
- Enjoy iTunes Movies on Galaxy S6 Edge+
- Play iTunes M4V videos on ASUS ZenPad S 8.0
- How to Import a DVD to play on iPad Pro?
- Convert MPEG-4 to Prores 422 for Final Cut Pro Editing
- Convert MKV files to iPad Air 2/iPad Mini 3 for Playing
- 50% OFF Pavtube iMedia Converter for Mac on 2015 Easter Crazy Discount
- HD Videos to Galaxy A7 - Play All kinds of movies on Galaxy A7
Available link for download
Wednesday, April 19, 2017
Ways of Perfectly Convert MKV to MP4 for Apple TV
Ways of Perfectly Convert MKV to MP4 for Apple TV
MKV is similar in conception to other multimedia containers like AVI, MP4 or MOV. Its more flexible in compression and usually renders in a smaller size with same quality video/audio output, especially for HD videos. Great-quality movies are increasingly seen being delivered over the internet via MKV format. Is there a way to play MKV on Apple TV without converting the video format? Apple TV so far does not support MKV video properly. The most convenient approach is to convert the MKV file into Apple TV supported formats, like H.264/MPEG-4 video up to 720p.
In this guide, we will show you the best three methods of convert MKV to Apple TV best video formats for enjoyment. Just pick up the way as you like.
Top Effective Way of Convert MKV files to M4V with Apple TV Compaitable format
If you want to stream MKV files to the Apple TV, Apple TV 3/2, Apple TV 4, Apple TV 5 for playback, you?ll need to convert your MKV files to Apple friendly format (e.g. m4v). Along with some help from third-party software. With Pavtube iMedia Converter for Mac, a great Mac MKV Converter for Apple TV 4, you can easily achieve your goal smoothly. In addition to converting MKV to the new Apple TV, it also can MP4, H.265, Tivo, AVCHD, VOB, MPEG-2, MXF, WMV, AVI, DivX, Xvid, Flash format, WebM, and etc to Apple TV 4 video format.
Overall, this all-in-one Video Converting tool can help you to rip Blu-ray, DVD and various video files to your Apple TV 4 for watching. Furthermore, it is also equipped with advanced editing function like add subtitles, effect, text or picture watermark to MKV files, crop MKV black bars, trim or merge MKV files, compress output file size and etc. (Learn more functions in this review).
Free Download Top MKV to MP4 Converter for Apple TV:


Other Download:
- Pavtube old official address: http://www.pavtube.cn/imedia-converter-mac/
- Cnet Download: http://download.cnet.com/Pavtube-iMedia-Converter/3000-2194_4-76177788.html
The following guide shares with you how to encode 1080p/720p MKV to Apple TV 4 for playback on Mac step-by-step.
Step 1. Install and launch the MKV Converter for Apple TV 4, and click ?Add file? or ?Add from folder? button to load your MKV files. The software supports batch conversion so that you can add several MKV files to convert at one time. You can also load Internet torrents movies to Apple TV4.

Step 2. Click on ?Format? boarder to set output format.
Click on the dropdown menu of ?Format? and then move your pointer to ?Apple TV 3 1080P Dolby Digital Pass-through(*.m4v)? from ?Apple TV? which is the compatible format for Apple TV 4. Then you can set the output folder by clicking ?Browse? icon as you need.

Step 3: Adjust audio and video parameters.
Click the ?Settings? icon and you will go into a new interface named ?Profile Settings?. You can adjust codec, aspect ratio, bit rate, frame rate, sample rate and audio channel in the interface according to your needs and optimize the output file quality. To get AC3 5.1 auido files, you can set audio codec to AC3 and change audio channels to 5.1 Channels. Learn>> how to set up Apple TV 4.

Step 4. Finally click on ?Convert? button to start converting MKV to 1080p HD M4V for Apple TV 4 on Mac.
After conversion, get converted video files for transferring to ATV 4 from Mac. In this way, you can get MKV files playable on Apple TV 4 with Mac OS X without problems. We hope this short article will bring some new multimedia life to your Apple TV 4.
How To Perfectly Convert MKV to MP4 for Apple TV
As we continue with our obsessive compulsion with hacking the crap out of the Apple TV 2G, today well be covering how to convert MKV videos into an MP4 format thats acceptable in your iTunes library so you can stream it via WiFi with 5.1 sound. Why Apple keeps their systems so closed is beyond us, but like many things in life, when theres a will, theres a way! Now, lets get hackin!
Update: Thanks, funstraw! Fixed the numbering for ya. Not sure how that happened.. hehe :)
WHAT YOU NEED:
* Apple TV 2G
* Windows PC (OSX users will have to use the Handbrake alternative or something like that, but you wont get getting 5.1 sound unfortunately)
* XMedia Recode (FREE)
HOW TO DO IT:
1) Download and install XMedia Recode.
2) Launch XMedia Recode.

3) Drag and drop your MKV into the program. 4) Select the MKV you want to convert.

5) Under Format Tab, change the Format the MP4 and the video codec to MPEG-4 AVC/H.264, audio codec to AAC. 6) Under the Video Tab, check the box that says "Video copy."

7)Now, under the Audio Track 1 Tab, check to box "Audio copy" if AAC is your default soundtrack. If its DTS or anything else, choose Bitrate 448 and change Channels to 5.1 (or if you have only 2 channels, choose Stereo). 8) Hit Add Job, then Encode. 9) If everything was done right, it shouldnt take more than 10 minutes on a Core 2 Duo machine to remux it into the MP4 container. 10) Now just drag into iTunes and enjoy the 5.1 sound with no damage hit to video quality! :)
Source:http://www.apartmenttherapy.com/how-to-convert-mkv-to-mp4-for-135756
Using FFMPEG to convert MKV to M4V for Apple TV
Being able to quickly convert MKV to M4V for iTunes has so far proved very useful.
The following process has worked so far for a variety of MKV files that are H.264 and either AAC, AC3 or DTS audio.
I have created a similar batch file for converting FLAC audio files into MP3.Objectives
I wanted to achieve the following:
- Quickly convert MKV to M4V
- Ensure the audio tracks are iTunes / Apple TV compatible
- Be able to process a number of files at a time
- Work quickly
I use the following folder structure:
c:source (The folder I put all my MKV files into)
c:sourcedone (The folder the original MKV is moved into after processing)
c:output (The folder that the complete M4V files are written to)
c:ffmpeg in (The location that FFMPEG is installed in)
There are some key elements to the batch file which are worth discussing a little further.
- Give the batch file a name like convert.bat and save it, you can then run it by double clicking on it or by calling it from a command prompt
- The whole thing is built inside a for do loop, meaning it will run once for every .MKV file it finds in c:source
- By using the -map feature, we are able to take the primary audio from the source MKV file and create both a stereo AAC track at 160k and a 5.1 AC3 track at 640k which keeps both iTunes and the Apple TV happy
- Once the file has been converted, it is moved from c:source to c:sourcedone
Source:http://www.epinionated.net/quickly-convert-mkv-to-m4v-for-apple-tv/
Read More:
- Watch HD movies on Apple TV 3 with Dobly Digital 5.1 sounds
- Best Program to stream 2016 DVD movies for Apple TV 3
- Convert Tivo to Apple TV without commercials on El Capitan
- Convert Any Video to M3U8 for Streaming to Apple TV
- Stream H.265/HEVC 4K Video to Apple TV Via Plex
Available link for download
Monday, April 17, 2017
The Most Important Passages From Apples Challenge to the FBI BusinessWeek
The Most Important Passages From Apples Challenge to the FBI BusinessWeek
Available link for download
Top 5 Alternatives to MakeMKV Top Best Alternatives
Top 5 Alternatives to MakeMKV Top Best Alternatives
Part One: Why we need to find a Best alternatives of MakeMKV?
1. Output Limits. The biggest limitation is that the output is only in MKV format. If you want to watch DVD movie on iPhone, iPad or iPod, you may be disappointed, you know. You require some third-party software to help you convert Blu-ray to other formats that iPhone, iPad or iPod support, like M4V, MP4 and MOV. So, MakeMKV is not the one-stop solution for your DVD ripping as it claimed to be.
2. DVD Content Selection. The second step for DVD ripping in MakeMKV is selecting the DVD content. In the software interface, once the video source is opened you will see its contents as a tree structure. Normally, disc contains different titles (main movie and video clips). You need to select which titles you want to save and what tracks to keep in each title. For each item you will also see detailed information such as item type, size, length, codec, language and so on. This job presents many difficulties to the new recruit. Because beginners may not understand what these items mean and what are the consequences of their choices.
3. The Size of Output Text. I just had one test with MakeMKV software. I ripped a standard DVD and the size of output MKV movie file was up to 6GB. The subtitle of output movie was as big as you see.
4.Poor Picture Quality. As a 6GB large output file, the image quality was so bad, as shown above.
Based on these reasons above, you?d better choose a MakeMKV alternative that supports more output formats and devices and featured much higher selectivity, easier operation and ?the maximum high-definition experience?. Following are the top 5 bet alternatives of MakeMKV.
Part Two: Top Five Best MakeMKV Alternatives for Better Blu-ray/DVD Copying/Ripping
1-ByteCopy

ByteCopy is another professional Blu-ray DVD converter that convert movies to MKV, MP4, MOV with various subtitles and audio tracks. After using ByteCopy, you can enjoy 2D and 3D movie with multiple audio tracks and subtitles. It is capable in ripping BD and DVD to MP4 and MOV with multiple audio streams without quality loss. It can also convert BD and DVD from hard discs to virtually any popular video and audio format freely and easily. It is noteworthy that this Top Blu-ray/DVD Converter provides optimized TV profile specifically.
>> OFFICIAL WEBSITE
2-SlySoft AnyDVD

First in the list is SlySoft AnyDVD that is one of the best alternatives to MakeMKV. It is best for disabling unwanted movie features like forces subtitles, forced delays, and no-skip marks. It changes the format of video into a format that can be used on any windows operating system. The core features of SlySoft AnyDVD are: supports NTSC, supports PAL-DVDs, compatible with all video DVD media, works will all DVD drives, work with all DVD editing tools, etc.
>>OFFICIAL WEBSITE
3-HandBrake

HandBrake is one of the best video transcoders for converting video from all format to a selection of modern and widely supported codecs. It is free and open source and available for Windows, Mac and Linux. It can process from various multimedia formats to any DVD and Blu-ray sources that don?t contain any kind of copy protection. Outputs are file containers, video encoders, audio encoders and audio pass-thru. Following are the top six best alternatives to HandBrake.
>>OFFICIAL WEBSITE
4-RipIt

RipIt is a DVD ripper for Mac OS X that enables the users to watch their movies anywhere. Use RipIt and transfer DVDs to Mac with ease and speed then carry these movies without the need to carry around discs. Easily transfer a DVD in one of two ways either ripping copies or compressing. Ripping is for subtitles, extras and alternatuive tracks. Compressing is for making the track capable in playing on iPhone, iPad, iPod and Apple TV.
>>OFFICIAL WEBSITE
5-MacX DVD Ripper

MacX DVD Ripper is a DVD ripper that backs up and rips DVD movies to MOV, MP4, MPEG, FLV, iTunes video, minus all the copy protections that are vastly utilized in DVD movies. It has the ability to rip homemade disc and encrypted DVD movies for viewing on iPhone, iPad, iPod, Apple TV, Android HTC, Samsung, XOOM, Galaxy Tab, PSP, etc. MacX DVD Ripper is one of the best alternatives to MakeMKV for DVD ripping and converting.
>>OFFICIAL WEBSITE
6-Avidemux

Avidemux is a free video editor and convertor for cutting, filtering, and encoding tasks. It supports many file types, including AVI, DVD compatible MPEG files, MP4 and ASF using a variety of codecs. It is available for Linux, BSD, Mac OS X, and Windows operating system. Binaries available here are freely redistribute for covering mounting CD/DVD and download site. It is one of the best alternatives to Handbrake. Avidemux can be also used in place of MakeMKV.
>>OFFICIAL WEBSITE
Conclusion
Pavtube ByteCopy offers the most simplified way for DVD content selection. That is, it helps user pick out the main title with full DVD content after loading the DVD. You just need to load DVD (first step), choose output format/device (second step), and run the conversion (third step). Before starting the process of DVD ripping and video converting, you can also, of course, select your preferable parameters if you want to customize the output video.
Note: Much wonderful software bundled with ByteCopy will provide you more amazing experience in converting videos. Go to Money Saving Software Bundles to get special offer for more software, such as ByteCopy + Video Converter Ultimate = Only $79.9, Save $27.1, ByteCopy($42) + ChewTune($29) = Only $54.9, Save $16.1 and so on.
Read More:
- Pavtube Softwares Comparison: BDMagic vs DVDAid vs ByteCopy vs Ultimate Converter
- Best Blu-ray Ripper Review: Pavtube BDMagic & Handbrake Comparison
- Best DVD Copying & Ripping Review: Pavtube DVDAid vs AnyDVD
- Best Video Converter Ultimate Reviews: Pavtube and Wondershare
- AnyDVD Alternatives to Copy Protected Blu-ray/DVD in Windows/Mac
Available link for download