Showing posts with label how. Show all posts
Showing posts with label how. Show all posts
Friday, April 28, 2017
Windows Media Center Personal Video Recorder PVR How To
Windows Media Center Personal Video Recorder PVR How To
Windows Media Center PVR How To
So I decide to do some research and see why this is. Well, money plain and simple. The provider companies provide this equipment for a fee because they know they can get it. Most people just go with the flow and know this process as the price of doing business. Well I take it because your reading this that you are not an individual that likes to do this because youre looking for alternatives. Hence the reason the FCC made it mandatory for providers to allow third party intervention. See http://en.wikipedia.org/wiki/CableCARD for additional information.
I will now attempt to go into detail on how to set this up and provide links to areas of information throughout this how to that have already been established.
Required:
- CableCARD or MCard tuner from your provider. My provider was Verizon FIOS and I ordered the MCard from their website and waited the week for it to arrive at my house. You only need one per CableCARD device. Other cable companies also provide this MCard. Cox and Comcast.
- CableCARD tuner. I purchased a Ceton InfiniTV PCIe device for my computer through newegg.com for about $199 (they should be on sale now as the PCIe 6 device [$299] just came out). The PCIe 4 device was fine for me in recording 4 separate channels at one time. You can use the USB device as I tried but had issues and switched to the PCIe device.
- Personal Computer (PC) with the minimum requirements as stated by Ceton. I also added a 2TB hard drive for recording space.
- Windows 7 or 8 operating system (OS) with Media Center (MC). I purchased Win7 OS and upgraded to Win8 and got the free upgrade to MC before 30 Jan 2013 cut off. If you do not already have MC then purchase through Microsoft. Believe its still $60.
- HD TV service from your service provider.
- To provide service to other rooms throughout the house you will need a Windows Media Center Extender (WMCE). If you already have an XBOX360 you have a WMCE. If you need to purchase one Ceton makes one that is cheaper than buying a new XBOX360 called the Echo. You could also purchase used XBOX360s from GameStop, Newegg.com, etc. Think of this device as your new set-top box. Youll own it and wont pay rent on it.
- A router and this is were it gets iffy. The industry tots that a WiFi "N" router can handle media streaming. This might be the case in testing but in my experience hasnt panned out for me. I had to go to an all wired architecture. By all wired I also mean power line networks. I have my main 60" LCD LED mounted over my fireplace with no access to a hard wired CAT 5/6 cable. I do however have access to a home power plug. I plugged the network homeplug (network power line) into the power outlet and the other end of the power line adapter close to my router and finished network connectivity. I purchased the Belkin AV500 and it works great. They do have a new Powerline Gigabit HD version out now and for a little extra doe might be worth it. Refer to the owners manual for proper setup. Recommend not using surge / multi-plugs power strips as they do not work well with these devices. Youll know because the bandwidth speed is crap. Also ensure the two plugs you decide to connect are on the same circuit. Security reasons, I would recommend encryption because even the plugs on the outside of your house could be used to tap into the network. Everywhere else I ran hard line CAT 5/6 cable linking to other WMCEs.
- You might require a swtich if you run out of CAT5/6 plugs on your router from overcrowding. I went gigabit 10/100/1000. Not necessary as 10/100 switches will have more than plenty of bandwidth to stream. I wanted to ability to transfer file from one computer to another with greater speed is why I went gigabit.
Once you have the above items your ready to setup.
-Connect your Ceton InfiniTV Tuner to your computer. See the installation instructions.
-Install the CableCARD to the Ceton InfiniTV Tuner.
-Turn on your computer.
-Download the Ceton software. Downloading ensure you have the latest and greatest drivers and software.
-Ensure the device is working properly. Start the Ceton Diagnostics.
-The device should be recognized.

-Follow the detailed installation instructions to get the tuners up and running. This will require you to contact your service provider and advise them of your CableCARD serial number found under the diagnostics. You more than likely will not have green check marks if the CableCARD has not been activated. The service provider must send the correct signal to the CableCARD to ensure the encrypted signals are decrypted by the card. Do not hang up with your service provider until you see the green check marks. They will dynamically update so keep watching.

-The WMC should download the program guide and your ready to watch TV and record.
Ceton also has an Android app and iPhone app to control your WMC remotely also. Be advise that it wont let you watch the shows from that device only manage.
Now to extend your WMC to another device like an XBOX360 to Ceton Echo follow these instructions. The devices have to be connected to your network.
Now play with your new WMC PVR for a while to make sure things are working before returning your set-top boxes.
After becoming familiar with you WMC you might later get into converting your recorded show. Programs like MCE Buddy and MC-TV Converter automatically convert the proprietary WMC codec format to .avi or .mp4 and remove commercials.
Even further you could be interested in serving out your record TV to your mobile devices like phone or tablet. You would likely use Remote Potato to stream your converted TV without commercials to these devices from your WMC computer. The phone or tablet would used the Remote Media Center program to link to that server.
Happy Recording...
Available link for download
Wednesday, April 26, 2017
Tips How to read file p7m DigitalSign Reader
Tips How to read file p7m DigitalSign Reader
During these years it happened that often some end users had problems to read on their computer .p7m files.
For that purpose and considering that finding suitable free tool for me was not immediately straight I take note of software that worked fine for me.
DigitalSign Reader 5.0
http://www.comped.it/it/prodotti/digitalsign-reader/digitalsign-reader-5-scaricalo-subito
I hope that this information could be useful for someone.
Available link for download
Saturday, April 22, 2017
Tips Android How To Take Screenshot on HTC One
Tips Android How To Take Screenshot on HTC One
Whether you are one of those who ended up being a fan of Android because HTC captivated? If yes, here is a little guide on how to take screenshots on your new phone.
HTC has 2 ways to take a screenshot: 1) version of Android (4.0 and above) and 2) his own version of HTC. For the first way is a universal way for users of Android 4.0 to the above: a combination of pressing the Power and Volume Down buttons, while the 2nd way is the HTC version that uses a combination of buttons; Power and Home button.
For the first way, you have to press both the Volume Down button and its Power simultaneously until there was a shutter sound, then release both buttons. Thumbnail of the screenshot will appear briefly on the screen, and it will pop up a new notification in the Notification Shade. You can tap the notification to view it, or access it on the album is also in the application Screenshot Gallery.

2nd way is the HTC version; You can take a screenshot by pressing the Home button Power button. This method can also be done in a number of HTC products such as the HTC One X, X HTC Desire, HTC Desire dam U. To retrieve it, simply press the Power button for a half second and then quickly press the Home button. Do not press the Power button too long because it will actually bring up the option to turn off the phone.

Difference of these two methods are both have flash animations and also shutter a different tone. 2nd way will bring the message at the bottom of the screen and does not show up in the notifications, so you can only see it in the screenshot album in the Gallery application.
Good luck!
HTC has 2 ways to take a screenshot: 1) version of Android (4.0 and above) and 2) his own version of HTC. For the first way is a universal way for users of Android 4.0 to the above: a combination of pressing the Power and Volume Down buttons, while the 2nd way is the HTC version that uses a combination of buttons; Power and Home button.
For the first way, you have to press both the Volume Down button and its Power simultaneously until there was a shutter sound, then release both buttons. Thumbnail of the screenshot will appear briefly on the screen, and it will pop up a new notification in the Notification Shade. You can tap the notification to view it, or access it on the album is also in the application Screenshot Gallery.
2nd way is the HTC version; You can take a screenshot by pressing the Home button Power button. This method can also be done in a number of HTC products such as the HTC One X, X HTC Desire, HTC Desire dam U. To retrieve it, simply press the Power button for a half second and then quickly press the Home button. Do not press the Power button too long because it will actually bring up the option to turn off the phone.
Difference of these two methods are both have flash animations and also shutter a different tone. 2nd way will bring the message at the bottom of the screen and does not show up in the notifications, so you can only see it in the screenshot album in the Gallery application.
Good luck!
Available link for download
Friday, April 21, 2017
When and How to Reset Mac SMC System Management Controller
When and How to Reset Mac SMC System Management Controller
 |
| Reset Mac SMC |
The system management controller (SMC) is a chip in your intel-based Mac, which plays significant roles in controlling thermal and power management,keyboards and other peripherals, battery charging, video mode switching and cooling fans, sleep and wake, hibernation,Power buttons and LED indicators. It also enables enforcement of the Mac OS X End User License, allowing it to identify when it is running on non-Apple hardware.
 |
| Reset Mac SMC |
If the SMC firmware is corrupt because of any reason, your mac will start behaving strangely with no apparent reason ? the trackpad would stop working,lights won?t be working correctly,display resolution will change,your computer wont turn on or a number of other issues mentioned below. Most of the time, these issues can be solved by closing all of your apps and restarting the computer. Sometimes, though, you?ll need to reset the SMC by following the computers model-specific intructions described by Apple.
 |
| SMC-for-macbook-air-13inch-a1466-2013 |
Fans
- Cooling fans running at high speed.
Lights
- Keyboard Backlight Issues.
- Incorrect behavior with the Status Indicator Lights or Battery Indicator Lights.
- Backlight displays not responding to ambient light changes.
Power
- Your computer won?t turn on
- Non-responsive power button
- Unexpected sleep or shutdown
- Battery not charging properly
- MagSafe LED displays incorrect activity
- A Mac notebook computer doesnt respond properly when you close or open the lid.
System Performance
- The trackpad doesn?t work
- Computer running slowly despite low CPU load
- Long "Bounce" times for application icons in the dock.
- External displays and Ambient Light Sensing
- Unexpectedly switching into or out of target display mode for external displays.
- Your computer won?t connect to Wi-Fi
- Applications may not function correctly, or they may stop responding after being opened.
- The illumination around the I/O ports on a Mac Pro (Late 2013) does not activate when you move the computer.
Resetting the SMC is usually accomplished by removing all power from the system for a period of time (by unplugging the mains connector or removing the battery) or by operating the power button in a special way.Read the following steps to know how to Reset SMC.
Reset the SMC on Mac notebook computers
First determine whether the battery is removable. Mac notebook computers that have a nonremovable battery include MacBook Pro (Early 2009) and later, all models of MacBook Air, MacBook (Late 2009), and MacBook (Retina, 12-inch, Early 2015). Learn more about Mac notebook batteries.
Reset SMC of Macbook whose battery is nonremovable
- Shut down the Mac.
- Plug in the MagSafe or USB-C power adapter to a power source and to your Mac.
- Using the built-in keyboard, press Shift-Control-Option on the left side of the keyboard, then press the power button at the same time.
 | |
|
- Release all keys, then press the power button again to turn on your Mac
Reset SMC of Macbook whose battery is removable
- Shut down the Mac.
- Disconnect the MagSafe power adapter from the Mac.
- Remove the battery. (Learn about removing the battery in MacBook and MacBook Pro computers.)
 |
| Remove the Battery of Macbook Pro to Reset SMC |
- Press and hold the power button for 5 seconds.
- Reconnect the battery and MagSafe power adapter.
- Press the power button to turn on the Mac.
- The LED on MagSafe power adapters might change states or temporarily turn off when you reset the SMC.
Reset the SMC on Mac desktop computers
Follow these steps for iMac, Mac mini, Mac Pro, and Xserve.- Shut down the Mac.
- Unplug the power cord.
- Wait 15 seconds.
- Plug the power cord back in.
- Wait 5 seconds, then press the power button to turn on the Mac.
- For Intel-based Xserve computers that arent responding, you can shut down locally or by using remote commands. You can also shut down by pressing and holding the power button for 5 seconds.
Note:- Resetting the SMC does not reset or otherwise change the contents of NVRAM or PRAM on Intel-based Macs.
The SMC is responsible for these and other low-level functions on Intel-based Macs:
- Responding to presses of the power button
- Responding to the display lid opening and closing on portable Macs
- Battery management
- Thermal management
- The SMS (Sudden Motion Sensor)
- Ambient light sensing
- Keyboard backlighting
- Status indicator light (SIL) management
- Battery status indicator lights
- Selecting an external (instead of internal) video source for some iMac displays
If the resetting does not fix the issue , you might need to update SMC.
Apple released a SMC Update Version 2.0 for all models of the mid-2013 MacBook Air. The update fixes battery problems that may cause the ultralight laptop?s battery to drain faster when the lid is closed.
 |
| Update for SMC |
System Requirements:
OS X Mavericks 10.9.2 & later
OS X Mountain Lion 10.8.5 & later
To Look for latest update available on SMC go to Apple SMC Download page.
Available link for download
Wednesday, March 22, 2017
Tutorial How to backup Print server Roles on 2008 R2 2012 and restore to a new Server
Tutorial How to backup Print server Roles on 2008 R2 2012 and restore to a new Server
If you need to backup Print Server Role on 2008 R2/2012 and import to a new one here they are steps to follow:
1. On new server install print server role
2. On new server or old server launch print server snapin and backup it and restore like following screenshots.
3. For more details you can read this articles:
http://blogs.technet.com/b/canitpro/archive/2013/06/17/step-by-step-install-use-and-remove-windows-server-migration-tools.aspx
https://technet.microsoft.com/en-us/library/jj134150.aspx
http://www.urtech.ca/2013/06/solved-how-to-migrate-printers-into-server-2012/


Available link for download
Monday, March 20, 2017
Tips How To Enable Facetime Over 3g ios 5
Tips How To Enable Facetime Over 3g ios 5
How To Enable Facetime Over 3g ios 5 - As we know, FaceTime does not work over 3G on the iPhone. It works only on WiFi. Now the good news is that you can activate FaceTime over 3G on your iPhone running iOS 5.
You do not need WiFi to make FaceTime video calls on your iPhone and also you do not need to install any jailbreak tweak on your iPhone. FSM has found a way to use that you can enable FaceTime over 3G feature on the iPhone. The most interesting is that iOS 5 includes FaceTime over 3G feature by default, but Apple has disabled this feature. Now you can activate this feature. FaceTime Over 3G you should note that you will need to have a jailbroken iPhone to enable FaceTime over 3G feature.
If you do not have jailbroken iPhone then you can follow the steps posted here to jailbreak your iPhone on iOS 5 using Redsn0w or you can follow the steps posted here to jailbreak your iPhone on iOS 5.0.1 using Redsn0w. After jailbreaking your iPhone, follow the steps posted below to activate FaceTime over 3G on your iPhone How to Enable FaceTime Over 3G Feature in iOS 5
1. First you have to buy iFile from Cydia.
2. You must go to the following address on your iPhone filesystem using iFile:
/ System / Library / CoreServices / SpringBoard.app /
3. Search N90AP.plist
4. Open the plist file and add the following line at the top of the line 720p </ key>.:
3Gvenice </ key>
You do not need WiFi to make FaceTime video calls on your iPhone and also you do not need to install any jailbreak tweak on your iPhone. FSM has found a way to use that you can enable FaceTime over 3G feature on the iPhone. The most interesting is that iOS 5 includes FaceTime over 3G feature by default, but Apple has disabled this feature. Now you can activate this feature. FaceTime Over 3G you should note that you will need to have a jailbroken iPhone to enable FaceTime over 3G feature.
If you do not have jailbroken iPhone then you can follow the steps posted here to jailbreak your iPhone on iOS 5 using Redsn0w or you can follow the steps posted here to jailbreak your iPhone on iOS 5.0.1 using Redsn0w. After jailbreaking your iPhone, follow the steps posted below to activate FaceTime over 3G on your iPhone How to Enable FaceTime Over 3G Feature in iOS 5
1. First you have to buy iFile from Cydia.
2. You must go to the following address on your iPhone filesystem using iFile:
/ System / Library / CoreServices / SpringBoard.app /
3. Search N90AP.plist
4. Open the plist file and add the following line at the top of the line
Available link for download
The Last Windows 7 ISO Youƒ??ll Ever Need How to Slipstream the Convenience Rollup
The Last Windows 7 ISO Youƒ??ll Ever Need How to Slipstream the Convenience Rollup

Microsoft has finally released a ?Convenience Rollup? for Windows 7 that combines updates from the past few years into one package (like a service pack). Microsoft doesn?t offer ISO images with these updates integrated, but you can create your own in a few simple steps.
That way, whenever you install a fresh copy of Windows 7 in the future, you won?t have to wait for it to download several years worth of updates (and reboot multiple times). It?ll have everything it needs up through May 2016.
What You?ll Need
This process requires a Windows 7 disc or ISO file with Service Pack 1 integrated. These are very easy to get at this point. You can download Windows 7 ISO images straight from Microsoft?s website, and these disc images already have Service Pack 1 integrated. Simple!
You?ll also need to download the Servicing Stack Update and Convenience Rollup packages before continuing. You?ll need the packages that match the version of the ISO you?re using. For example, if you?re going to create a 64-bit installer disc, you?ll need the 64-bit update packages.
Finally, you?ll need to download and install the Windows AIK for Windows 7. Microsoft makes this available for download as an ISO file. You?ll have to either burn it to a DVD and install it from the DVD, or install a tool like WinCDEmu to mount the Windows AIK ISO image and install software from it without burning it to disc first.
Step One: Extract the Files From the Disc or ISO
You?ll first need to extract the contents of the ISO image?or copy the files off a disc. If you have an ISO file, you can open it with a program like 7-Zip to extract the contents. If you have a disc, you can select all the files on the disc, copy them, and paste them in a folder on your computer.
In the screenshot below, we?ve copied all the files from a Windows 7 SP1 disc to a new folder in C:Win7SP1ISO on our computer. We?ll use that folder in our examples below. We also created a folder called C:updates where we put the Servicing Stack update and the Convenience Rollup package.

Step Two: Use Dism to Integrate the Updates
Next, launch a Command Prompt window as Administrator. Open the Start menu, type ?Command Prompt? to search for it, right-click the ?Command Prompt? shortcut that appears, and select ?Run as Administrator.?

Run the following command, using the path to the folder you placed the files in (in our case, C:Win7SP1ISO ):
Dism /Get-WIMInfo /WimFile:C:Win7SP1ISOsourcesinstall.wim
This will tell you the name of the Windows 7 edition in the image, which is something you?ll need later. In the screenshot below, you can see we?re using Windows 7 ENTERPRISE install media. You may be using a Windows 7 Home, Professional, or Ultimate edition instead.

You?ll now need to mount the image offline. First, create a directory to unpack it to:
mkdir C:Win7SP1ISOoffline
Now, unpack the files so the DISM command can work with them:
Dism /Mount-WIM /WimFile:C:Win7SP1ISOsourcesinstall.wim /Name:"Windows 7 ENTERPRISE" /MountDir:C:Win7SP1ISOoffline
Again, replace C:Win7SP1ISO with the folder you extracted the files to, and Windows 7 ENTERPRISE with the edition of Windows you got from the previous command.

You?ll now need to add the downloaded Servicing Stack Update?the KB3020369 update?to the Windows 7 installation files.
To integrate a 64-bit package:
Dism /Image:C:Win7SP1ISOoffline /Add-Package /PackagePath:C:updatesWindows6.1-KB3020369-x64.msu
To integrate a 32-bit package:
Dism /Image:C:Win7SP1ISOoffline /Add-Package /PackagePath:C:updatesWindows6.1-KB3020369-x86.msu
You only need to use one of the above commands?it depends on whether you?re creating 64-bit or 32-bit installation media. Replace the package path with the folder where you saved the Servicing Stack Update (in our case, C:updates )

Next, add the downloaded convenience rollup update package?that?s KB3125574. This part may take a while.
To integrate a 64-bit package:
Dism /Image:C:Win7SP1ISOoffline /Add-Package /PackagePath:C:updateswindows6.1-kb3125574-v4-x64_2dafb1d203c8964239af3048b5dd4b1264cd93b9.msu
To integrate a 32-bit package
Dism /Image:C:Win7SP1ISOoffline /Add-Package /PackagePath:C:updateswindows6.1-kb3125574-v4-x86_ba1ff5537312561795cc04db0b02fbb0a74b2cbd.msu
Just like the last step, replace the folders with your own, and only run one of the above commands. Use the appropriate one for the installation media you?re creating?32-bit or 64-bit.

Lastly, commit the changes and unmount the image:
Dism /Unmount-WIM /MountDir:C:Win7SP1ISOoffline /Commit

Step Three: Create an Updated ISO File
The install.wim file in the directory you were working with now has the Convenience Rollup package integrated. We?ll use the oscdimg tool included with the Windows AIK to make a new ISO image with your modified install.wim file integrated.
First, launch the Deployment Tools Command Prompt as Administrator. Head to Start > All Programs > Microsoft Windows AIK. Right-click the ?Deployment Tools Command Prompt? shortcut and select ?Run as Administrator.?

Run the following command at the prompt, replacing C:Win7SP1ISO with the path to the directory you used earlier. You can also replace C:Windows7Updated.iso with whatever location you want the resulting disc image to be created at.
oscdimg -n -m -bC:Win7SP1ISO ootetfsboot.com C:Win7SP1ISO C:Windows7Up

You now have an updated Windows 7 ISO file. You can burn it to a disc using the tools integrated into Windows, or create a bootable USB drive from it with Microsoft?s Windows USB/DVD Download Tool. Be sure to save this ISO in a safe place, so you can use it again later if you ever need to reinstall!

Now that Microsoft offers Windows 7 ISO images for download, it would be nice if Microsoft itself updated these images with the latest patches occasionally. However, Microsoft has never done this for anything but a service pack (or a ?build? of Windows 10), so we?re not holding our breaths.
Available link for download
Friday, March 17, 2017
Tips WhatsApp How to Restore Text Photos and Videos Deleted
Tips WhatsApp How to Restore Text Photos and Videos Deleted
How to Restore Text, Photos and Videos Deleted - WhatsApp can be said to be a pioneer messaging application that supports a variety of operating systems on mobile phones making it easier for people to communicate. WhatsApp is available on Android, iOS and Windows Mobile, so people have a different smart phone can stay connected.
Well, one of the privileges that we need from any messaging service or email service is a feature to recover deleted messages or email. And the fact that WhatsApp has this feature so that we can restore data in the form of chat messages, images and videos which may be erased.
WhatsApp even automatically back up all of our data 24 hours a day, 7 days a week and keep it all in our microSD card. Well, how to restore the lost data?
method 1
These include the most simple and direct WhatsApp to restore the lost files. All you need to do is uninstall and re-install this application. Once you get into WhatsApp, will appear the option to restore the lost data.
method 2
This app store backup files by name, for example msgstore-YYYY-MM-DD.1.db.crypt. Backup files are usually stored in the following location:
Android: / sdcard / WhatsApp / Databases / msgstore.db.
iOS: net.whatsapp.WhatsApp / Documents / ChatStorage.sqlite
Once you find the file backup, connect your smartphone to your computer. And the next open web services, Recover Messages, which offer you the facility to restore data WhatsApp, Line, SMS and email is missing.
Select the SQLite Select File, then select the backup file, and click I Accept (after reading the terms of use). Then, click the Scan button. This process will take several minutes, depending on the size of the backup file and the speed of the Internet.
Available link for download
What is srptm exe and how to remove it
What is srptm exe and how to remove it

Srptm.exe - by ReSoft LTD.
What is srptm.exe?
Srptm.exe is a part of snap.do browser hijacker. Multiple anti-virus engines have detected it as PUA/Linkury.Gen2, Adware.Linkury, not-a-virus:WebToolbar.MSIL.SmartBar.d and unwanted program. The fact that it has a valid digital signature doesnt make it less harmful. So, youve found srptm.exe malware but youre being proactive and trying to find out a little more about it. Good for you ? knowing as much as you can about all the different types of malware is a very good step towards protecting yourself and your computer as much as you can. When talking about browser hijackers, in particular, knowing how they got their name is a good clue to the way they operate, and will give you a better understanding of how to avoid one if possible. Browser hijackers, to the untrained eye look like harmless ? even useful software programs. Getting suckered in by this browser hijacker can leave your data corrupted, your files deleted and your security severely weakened. Not so harmless after all. Needles to say, I recommend you to remove srptm.exe and related malware from your computer. To do so, please run a full system scan with anti-malware software.

File name: srptm.exe
Publisher: ReSoft LTD
File Location Windows XP: C:Program FilesLPT
File Location Windows 7/8: C:Program Files (x86)LPT
Startup file: HKEY_CURRENT_USERSOFTWAREMicrosoftWindowsCurrentVersionRun ? srptm.exe

Available link for download
Tuesday, March 14, 2017
Tips How to Overclock Your Rooted Android Phone
Tips How to Overclock Your Rooted Android Phone
How to Overclock Your Rooted Android Phone - One of the advantages of Android is the ability to overclock like a PC. This time we will share how to overclock. Keep in mind, if you do not dare to take risks overclock, then you should not try. Because overclocking can damage your Android device.
STEP ONE:
Rooting
Android root function is to give the user full rights to the Android to be able to get into the Android system. By doing root, the user can add, subtract or modify files or data that lies on the Android system when in the default state (not root) files are not accessible. If the analogy like the Windows computer operating system, Android root function is to give administrator privileges to the user.
By doing root on Android will not necessarily increase the performance or capabilities of Android phones. Rooting Android as "open the door" for you to develop the operating system.
Why Android operating system developers do not give root access since the beginning?
It aims to protect the Android operating system as a whole. If users accidentally or intentionally alter or eliminate one or more file systems, it can cause the performance of mobile phone or tablet to become unstable, corrupt, and most severe brick or mobile phone can not be lit. Therefore Android developers limit access to the file system.
STEP TWO:
Flash Custom Kernel
Kernel is a software which is a major part of an operating system. Their duties to serve a variety of application programs to access hardware safely.
Due to limited access to the hardware, while there is more than one program to be served at the same time, the kernel is also tasked to regulate when and how long a program can use one part of the hardware. For more details take a look at the picture below.

So the kernel, we can maximize and minimize our Android processor frequency. For example when we want to overclock your Android device, the first thing we do is change the default kernel with kernel that has been modified to be able to reach the highest point.
To replace the Kernel, you can replace it with a custom kernel that has been posted on XDA source. Make sure that you download the custom kernel according to your device. Because if not, then the device will occur immediately bootlop even brick.
To flash a custom kernel is quite simple. You simply go to the Custom Recovery as CWM or TWRP. Always the first thing to do is back up. To maintain if something unexpected happens to your device. Then later you can simply flashing via SDcard.
STEP THREE: Using the SET-CPU
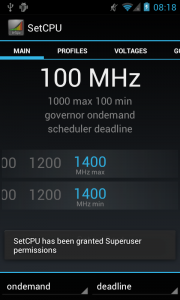
Tools used after flashing a custom kernel was to install SetCPU. SetCPU is a tool application to change the CPU settings (capable of overclock and underclock) on Android phones that have been in the position of "root", including the type of Galaxy Nexus, Nexus S, Motorola Droid, Nexus One, G1, G2, Samsung Galaxy S II, MyTouch 4G, Motorola Xoom, or one of the other devices to improve performance or save battery.
SetCPU also allows you to set up profiles to change the CPU speed under certain conditions, such as when the device is asleep or charging, when the battery level drops below a certain point, when the phone temperature is too high, or during certain time.
Comprehensive feature set SetCPU makes it useful for beginners and advanced level. Accelerate your processor to unlock the potential of your mobile phone to do multitasking, or make your CPU speed down to save battery.
SetCPU also includes a menu to set the "control voltage", available for certain devices with custom kernels that support it, to control undervolting, and to save more battery. Keep in mind that undervolting is only available for certain kernels.
How to use the SET-CPU
Select SPEED AUTO DETECT, if there is a notification root access, select ALLOW.
Then select and set the overclock to high frequency and low frequency as well (not too high or low).
After that select SET ON BOOT, when you turned on the Android gadgets, then this application will directly overclock your Android device.
SetCPU SetCPU Governors-Main-SetCPU-Voltages
STEP ONE:
Rooting
Android root function is to give the user full rights to the Android to be able to get into the Android system. By doing root, the user can add, subtract or modify files or data that lies on the Android system when in the default state (not root) files are not accessible. If the analogy like the Windows computer operating system, Android root function is to give administrator privileges to the user.
By doing root on Android will not necessarily increase the performance or capabilities of Android phones. Rooting Android as "open the door" for you to develop the operating system.
Why Android operating system developers do not give root access since the beginning?
It aims to protect the Android operating system as a whole. If users accidentally or intentionally alter or eliminate one or more file systems, it can cause the performance of mobile phone or tablet to become unstable, corrupt, and most severe brick or mobile phone can not be lit. Therefore Android developers limit access to the file system.
STEP TWO:
Flash Custom Kernel
Kernel is a software which is a major part of an operating system. Their duties to serve a variety of application programs to access hardware safely.
Due to limited access to the hardware, while there is more than one program to be served at the same time, the kernel is also tasked to regulate when and how long a program can use one part of the hardware. For more details take a look at the picture below.
So the kernel, we can maximize and minimize our Android processor frequency. For example when we want to overclock your Android device, the first thing we do is change the default kernel with kernel that has been modified to be able to reach the highest point.
To replace the Kernel, you can replace it with a custom kernel that has been posted on XDA source. Make sure that you download the custom kernel according to your device. Because if not, then the device will occur immediately bootlop even brick.
To flash a custom kernel is quite simple. You simply go to the Custom Recovery as CWM or TWRP. Always the first thing to do is back up. To maintain if something unexpected happens to your device. Then later you can simply flashing via SDcard.
STEP THREE: Using the SET-CPU
Tools used after flashing a custom kernel was to install SetCPU. SetCPU is a tool application to change the CPU settings (capable of overclock and underclock) on Android phones that have been in the position of "root", including the type of Galaxy Nexus, Nexus S, Motorola Droid, Nexus One, G1, G2, Samsung Galaxy S II, MyTouch 4G, Motorola Xoom, or one of the other devices to improve performance or save battery.
SetCPU also allows you to set up profiles to change the CPU speed under certain conditions, such as when the device is asleep or charging, when the battery level drops below a certain point, when the phone temperature is too high, or during certain time.
Comprehensive feature set SetCPU makes it useful for beginners and advanced level. Accelerate your processor to unlock the potential of your mobile phone to do multitasking, or make your CPU speed down to save battery.
SetCPU also includes a menu to set the "control voltage", available for certain devices with custom kernels that support it, to control undervolting, and to save more battery. Keep in mind that undervolting is only available for certain kernels.
How to use the SET-CPU
Select SPEED AUTO DETECT, if there is a notification root access, select ALLOW.
Then select and set the overclock to high frequency and low frequency as well (not too high or low).
After that select SET ON BOOT, when you turned on the Android gadgets, then this application will directly overclock your Android device.
SetCPU SetCPU Governors-Main-SetCPU-Voltages
Note: if you want to save battery life, you can minimize the processor clock and if you want to play heavy games you can increase the processor clock or you can also set automatically on SetCPU.
Available link for download
Sunday, March 12, 2017
Tips How To Use Paypal On Ebay
Tips How To Use Paypal On Ebay
How To Use Paypal On Ebay - Online Shopping on the internet is easy. live see stuff you want in the message depending on the payment confirmation we got (Paypal, Credit Card, Bank Transfer, etc.). In this article I try to share online shopping experience on eBay and Im doing is paying via Paypal. Honestly this is my first shopping online, fear not stuff up anyway and lost money. Shopping between countries takes approximately 45 days to hand our new stuff, and most interesting of eBay is that if we can not address them affordable while money had already been transferred they will refund the money where we sent before without deducting dime and we will be asked to change the address.
Online Shopping on eBay via Paypal. I also experienced the above yesterday, I sent an e-mail that "your residential address we can not reach" and then I change the address of my brother, and then try again and confirm the order items, a few minutes later I was sent an email from my payment (paypal) that I have made the payment via Paypal
If weve got an email from PayPal that we have made the payment via paypal. means the paypal will also be responsible for the delivery of goods.
If youve got an email like the above picture you have to wait your goods arrive at, but if the goods do not also get it within 45 days you must contact paypal so paypal contact eBay.

Something like that my first time experience shopping online and luckily my stuff up in less than one week.
Online Shopping on eBay via Paypal. I also experienced the above yesterday, I sent an e-mail that "your residential address we can not reach" and then I change the address of my brother, and then try again and confirm the order items, a few minutes later I was sent an email from my payment (paypal) that I have made the payment via Paypal
If weve got an email from PayPal that we have made the payment via paypal. means the paypal will also be responsible for the delivery of goods.
We have asked the seller to send the goods.
Thank you for using PayPal. To see all the transaction details, log in to your PayPal account.
If youve got an email like the above picture you have to wait your goods arrive at, but if the goods do not also get it within 45 days you must contact paypal so paypal contact eBay.
Something like that my first time experience shopping online and luckily my stuff up in less than one week.
Available link for download
Wednesday, March 8, 2017
What is Airport Time Capsule and how to reset its password
What is Airport Time Capsule and how to reset its password
 |
| Airport Time Capsule |
Airport Time Capsule
The AirPort Time Capsule (previously known as just Time Capsule), a rectangular tube standing 6.6 inches tall and 3.85 inches wide is a wireless router sold by Apple Inc which is unique among its kind with an internal hard drive featuring network-attached storage (NAS) and a residential gateway router.Unlike some other hard-drive-equipped routers, the Time Capsule uses a SATA interface to the hard drive, versus a USB-to-SATA bridge. Apple, however, declined to disclose the rotational speed of the drive?s platters and if the drive has a SATA 6 Gbps interface or a slower SATA 3 Gbps interface.It comes with a 2 TB or 3 TB single 3.5 inches Seagate Barracuda or a Western Digitals (WD) hard drive inside. |
| Inside View of Airport Time Capsule- With Sata HDD Connection |
 | |
|
The AirPort Time Capsule was first released on February 29, 2008, with pricing announced at US$299 (œ199) for the 500 GB version and US$499 (œ329) for the 1 TB version.The first generation Time Capsule included a full AirPort Extreme Base Station with 802.11n wireless, an Ethernet WAN port, three Ethernet LAN ports, and one USB port. The USB port can be used for an external hard drive or a printer to be shared over the network, or both, by using a third-party USB hub.
In early 2009, Apple released the second generation Time Capsule. It offered simultaneous 802.11n dual-band operation, which allows older devices to use slower wireless speeds, without affecting the overall performance of devices that can use higher 802.11n speeds.The second generation model also included the addition of Guest Networking.The hard disk storage space of each model was doubled: capacities were 1 TB 2 TB, while the prices remained unchanged.
In October 2009, several news sites reported that many first generation Time Capsules were failing after 18 months,with some users alleging that this was due to a design failure in the power supplies. Apple confirmed that certain Time Capsules sold between February 2008 and June 2008 do not power on, or may unexpectedly turn off. Apple offered free repair or replacement to affected units.
The third generation Time Capsule was released in October 2009. The only change was a reconfiguration of the internal wireless antenna, resulting in an Apple-reported 50% increase in wireless performance and 25% increase in wireless range when compared to previous models.
The fourth generation Time Capsule, released in June 2011, increased the range of WiFi signals. The internal WiFi card was changed from a Marvell WiFi chip to a better-performing Broadcom BCM4331 chip.Apple again increased the storage space in each model as the hard drive sizes were increased to 2 TB and 3 TB. The 2 TB and 3 TB models were kept at the $299 and $499 price points.Amazon is giving $20 discount on 2 TB model which you could by just for $279.
The fifth generation Time Capsule was released in June 2013 alongside the sixth generation AirPort Extreme. This generation saw the name change to AirPort Time Capsule and to a taller form factor. 802.11ac support was added with this generation. The 2 TB model was kept at $299, but the 3 TB model dropped to $399.
Technical Specification of Airport Time Capsule

AirPort Time Capsule has six ports on the back:
1. One Gigabit Ethernet Wide Area Network (WAN) port
For connecting a DSL or cable modem, or for connecting to an existing Ethernet network
2. Three Gigabit Ethernet Local Area Network (LAN) ports
For connecting Ethernet devices such as printers or computers, or for connecting to an existing Ethernet network
3. One USB2.0 port
For connecting a compatible USB printer, hard disk, or hub for connecting several devices
4. Power port
For connecting AirPort Time Capsule to an AC power source
Note:- There is no power switch on Airport Time Capsule.
Size and Weight
Dimensions: 98 mm (3.85 inches) by 98 mm (3.85 inches) by 168 mm (6.6 inches)
Weight: 1.48 kg (3.26 pounds)
Compatibility
- Interoperable with 802.11a-, 802.11b-, 802.11g-, 802.11n- and 802.11ac-enabled Mac computers, iOS devices, Apple TV, Windows-based PCs and other Wi-Fi devices
- NAT, DHCP, PPPoE, VPN Passthrough (IPSec, PPTP and L2TP), DNS Proxy, IPv6 (6to4 and manual tunnels)
- Wi?Fi Protected Access? (WPA/WPA2)4
- WPA/WPA2 Enterprise4
- MAC address filtering
- NAT firewall
- 802.1X, PEAP, LEAP, TTLS, TLS, FAST
- Time-based access control
- 50
Setup and Administration
- iPhone, iPad or iPod touch with iOS 6 or later and AirPort Utility 1.3
- Mac with OS X Lion v10.7.5 or later and AirPort Utility 6.3
- Any Wi-Fi-enabled device that uses the 802.11a/b/g/n/ac specification
- USB printer
- Mac with OS X v10.2.7 or later
- PC with Windows XP (SP3), Windows Vista (SP2), Windows 7 (SP1) or Windows 8
- Mac with OS X v10.4.8 or later
- PC with Windows XP (SP3), Windows Vista (SP2), Windows 7 (SP1) or Windows 8
- Mac with OS X v10.5.7 or later
- SSID: Apple Network XXXXXX (where XXXXXX is replaced with the last six digits of the AirPort ID).
- Default Time Capsule password: public.
Inbuilt Fan for Ventilation
- It does have a fan that vents out the bottom to keep the device cool.
 |
| Fan that vents out the bottom of Apple Time Capsule |
Automatic Wireless Backup and File Sharing
Airport Time Capsule (TC) works smartly with Time Machine in OS X 10.5 Leopard or later to back up your Mac automatically and wirelessly, so you never have to worry about losing anything important again. Every photo. Every file. Every song. Even your apps and OS X settings are saved. AirPort Time Capsule stores it all ? up to 2TB or 3TB of data.Once it is setup on the network, it?s immediately available as a file server and Time Machine backup target. As a Time Machine target, it takes a snapshot of the entire system as an initial backup after which, only the files you?ve changed are backed up ? automatically, wirelessly and in the background. Since Time Machine continuously makes a copy of everything on your Mac ? and saves multiple versions ? you can easily access and restore previous versions of a single file, a folder or even your entire Mac.
As a file server it supports both AFP(Apple Filing Protocol) and SMB(Server Message Block) provides network access to files stored on the built-in hard drive. The 7.6.1 Time Capsule firmware enables remote access of the hard drive with an iCloud account. In the past, users needed a MobileMe account to remotely access data. Fourth generation models are available with 2 TB and 3 TB of built-in storage.
Note:- Time Capsule doesnt support external drives formatted using NTFS (Windows) and doesnt offer the option to format a connected external drive to the HFS+ (Mac) file system for you. In other words, to use an external drive with the Time Capsule, you first need to make sure its already formatted using HFS+ or FAT.
Accessing Files from iPhone and iPad
You can download Apps like Remote File Browser to allow iPhone and iPad access files on Airport Time Capsule . They have both a paid version and a free version. Try the free version first they may fulfill your needs of accessing some movies and songs stored on Airport Time Capsule.
Up to Three Times Faster Wi-Fi
The new Time Capsule is 802.11ac compatible with a dual-band model, capable of operating networks on both the 2.4GHz and the 5GHz frequency bands. It?s equipped with six antennas located on the top of the unit, which Apple claims helps the AirPort users connect from farther distances: three transmit/receive for its 2.4GHz radio, and three transmit/receive for its 5GHz radio.
With three-stream 802.11ac technology, the Airport Time Capsule can reach data rates of up to 1.3Gbps when used with 802.11ac-enabled clients, which is triple the 802.11n standard. 802.11ac Wi-Fi also provides double the channel bandwidth with 80MHz-wide channels providing more room for data to flow faster. If youre using an 802.11a/b/g/n Wi-Fi device, Airport Time Capsule can still optimize the connection for those Wi-Fi standards as well.
Simultaneous Dual-Band Support -Choosing the correct frequency band
No matter which band your wireless devices use, theyll automatically connect to the best available band for the fastest possible performance.
The primary difference between the 2.4 GHz and 5GHz wireless frequencies is range as the 2.4GHz frequency is able to reach farther than the 5GHz frequency.In general, the higher the frequency of a wireless signal, the shorter its range. Thus, 2.4GHz networks cover a substantially larger range than 5GHz wireless networks.When you set up your AirPort Time Capsule, it creates two high-speed Wi-Fi networks:
- A 2.4 gigahertz (GHz) network for 802.11b, 802.11g, and 802.11n devices, such as iPhone,iPod touch, and older computers
- A 5 GHz network for 802.11n, 802.11a, and 802.11ac devices, such as iPhone, iPad, Apple TV,and newer computers
Notes:
When choosing the band for your router, it is also important to consider the capabilities of your wireless clients. Many older laptops, tablets and other typical wireless devices still work only in the 2.4GHz band, while media streaming devices and newer phones have increasingly better adoption in the 5GHz band as well.802.11ac is available only on the 5GHz frequency band.
Beamforming Puts the Focus on Your Device
With 802.11ac technology comes the intelligent, powerful beamforming antenna array. Beamforming is a signal processing technique used in wireless communications, sonars and radars for directional signal transmission and reception. Beamforming is achieved by combining elements in a transmitter/antenna array in a way where signals at particular angles experience constructive interference, while others experience destructive interference. In general, the router knows where an 802.11ac device is on the network. Then AirPort Time Capsule targets its signal to that device. So your Wi?Fi signal is stronger, clearer and faster. And each of its clients exchange information as to their physical locations. They use this information to concentrate their radio energy to achieve the highest possible throughput.

The new Time Capsule offered about the same range as the previous generation, up to about 270 feet away. Its effective range, however, is within approximately 150 feet or less, which is rather standard for a dual-band router. Note that Wi-Fi range varies a great deal depending on the environment. The device also passed my 24-hour stress test, during which it didnt disconnect once.
Internet Access for your Guest
Just like other routers Time Capsule also supports guest networking, you can set up a separate Wi?Fi network just for guests.A guest network allows access only to the Internet, so your primary network - including any external hard drive, printer, or other LAN-attached device - remains secure.
Designed with Performance in Mind- Sped up .Slimmed Down.
Apple has made the new Airport Time Capsule taller and put the antennas at the top, creating a higher platform for dispersing the signal.The new vertical design not only improves Wi?Fi performance, it also saves you valuable desk space. At less than 10 centimetres square, the footprint of AirPort Time Capsule is 75 per cent smaller than its predecessor.
Get Online Safely and Securely
AirPort Time Capsule includes a built-in firewall that creates a barrier between your network and the Internet, protecting your data from malicious attacks. When you set up AirPort Time Capsule, the firewall is automatically turned on
Printer and Hard Drive Sharing
Protect your Hard Drive with a Password
AirPort Time Capsule can turn your external USB hard drive into a secure drive you can share across your Wi-Fi network and access securely over the Internet. All the documents, videos, photos, and other files instantly become available to anyone on the network, Mac and PC users alike. Its perfect
Available link for download
Subscribe to:
Posts (Atom)