Showing posts with label bios. Show all posts
Showing posts with label bios. Show all posts
Sunday, February 26, 2017
The BIOS does not detect or recognize the ATA SATA hard drive
The BIOS does not detect or recognize the ATA SATA hard drive
BEST GREENHOUSES FOR GROOVING VEGETABLES
? ? 1(360)241-1624 ?

? ? 360organic.us ?
DURABLE! AFFORDABLE! ALUMINUM + UV POLYCARBONATE
tips if your pc slow loading or freeze: First I will give you simple fix - usually a restart will fix it. There may be an attached device that it is having issues talking to everything else. (always kip your BIOS OS other drivers up do date) Use on-board video if you got it, unplug all hard drives, DVD and CD drives, and IDE Devices, and all other card (Video, Wifi, Ect) just with those. If it get past that great! then try adding things one at a time and see what is freezes at. Also sometimes all things need is to be pulled and re-seated. Youll be surprised how often that alone fixes boot up issues like this.
I have recently waiting for the WIN logo to get over almost 30 minutes after second restart, (just wait always wait) then I unplug Lite-on DVD/CD Rewritable drive Model LH-20A1S, AND PC boots in 20 seconds. Please note if you just reinstall your OS, you will need update drivers for the DVD drive even if you updated it before, it is all gone and fresh copy windows is missing it, it is different with Firmware, these are stay on the drive
Tips for troubleshooting SerialATA & ATA/IDE internal drive that is not detected in the system BIOS.
There are several reasons why a system BIOS will not detect the presence of an internal hard drive. Follow these steps one by one to see if any can fix this problem:
Drive is not spinning up
If the drive is not receiving power, it will not spin up. To check to see if this is the cause of the BIOS not detecting the hard drive, follow these steps:
Power off the computer. Open the computer case and remove the ATA or SATA cable from the hard drive. This will stop any power saving commands from being sent. Turn on the system. Check to see if the hard drive is spinning. If you touch the side of the drive you should feel vibration. If you do not hear or feel the hard drive acting, the drive did not start.
If you cannot determine whether the drive is spinning: , Boot the computer and listen if it is, Try to shutdown the computer, Disconnect the power cord from behind your computer, Disconnect the power cable from the hard drive, Reconnect the power cord to the back of your computer ,Power on the computer, to see if the drive sound was audible before & then repeat, but only reconnect the hard drive and listen for it sound, Switch power cables with a device like Optical drive, so that you are using a functional power cable.
Check the power supply on your computer to determine whether it is providing sufficient electrical power to operate the drives and devices you have in your computer. If the drive is still not spinning, connect it in another computer if possible. Connect the drive in a SATA-USB enclosure or something similar if possible. If the drive does not spin up after all of these steps, please visit manufacture Warranty page to begin a warranty replacement order if it is still under warranty.
Drive not enabled in the BIOS:
Most personal computers display a brief message about entering System Setup soon after the power is turned on. System Setup is also called the <<system BIOS>> or sometimes call <<CMOS Setup>> - each is a name for the same thing, for example, on HP systems you will see <<F2=Setup>> in the upper right hand corner during the computer boot-up. This means to press the F2 key so you can enter the Setup or BIOS. Different computer manufactures have different methods to enter Setup, so please check your documentation for specifics.
BIOS is where the date and time are stored and where startup preferences like NumLock or Passwords are defined. In different hard disk drives are often controlled here. Hard drives are numbered in Setup as Drive 0, Drive 1, etc. or in some cases as Primary Master or Primary Slave. Which ever way these are named, they have ON & OFF setting <<sometimes AUTOMATIC or similar>>. If your drive is not detected it may be because it is turned OFF in System Setup.
In most cases, the boot drive is Drive 0 or Primary Master. When you add a second drive to the system, it may be need to be enabled by turning it ON in System Setup.
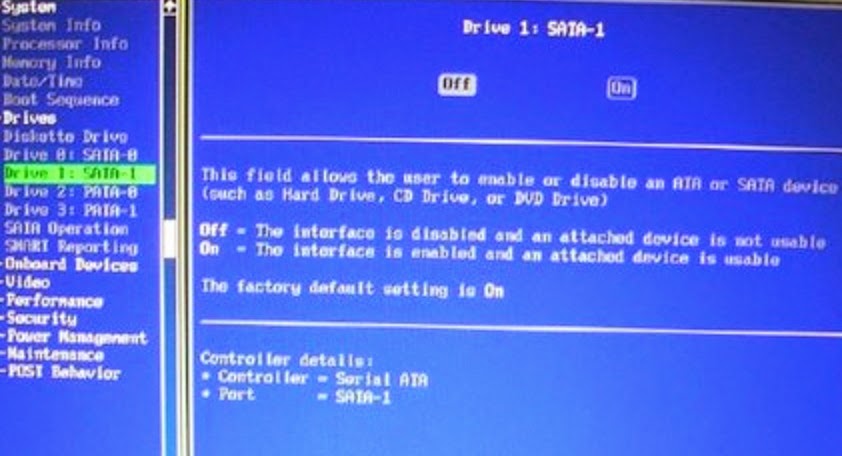 Screen shot showing System Setup section for disk drives:
Faulty or Unplugged Data Cable
Always inspect the motherboard and hard disk connections for bent or misaligned pins. Folding, crimping, pinching, or creasing data cables can cause the wires to break inside the insulation, leaving the exterior of the cable looking normal. When in doubt of data cable condition, replace it.
For SATA cables, Seagate recommends using cables shorter than 39.37 inches (1 meter). For further information, please see Document ID: 182453.
Images of Serial ATA cables. 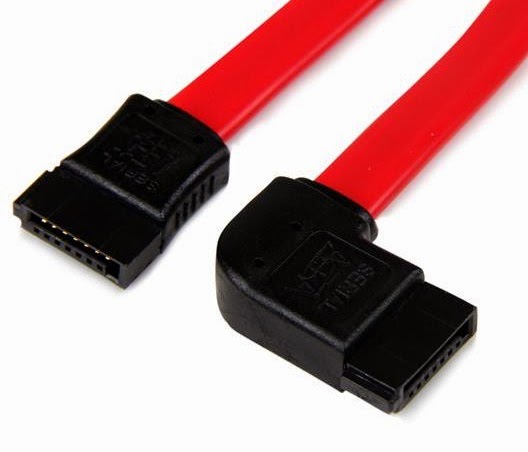
The BIOS will not detect a hard disk if the data cable is damaged or the connection is incorrect.
Serial ATA cables, can sometimes fall out of their connection. Check your SATA cables are tightly connected to the SATA port connection, sometimes you can hear click, from lock.
The easiest way to test a cable is to replace it with another cable. If you still have a problem, then the cable was not the cause.
For ATA drives, use UDMA cabling with a maximum length of 18 inches. UDMA cables have color coded connections which require proper orientation when connecting.
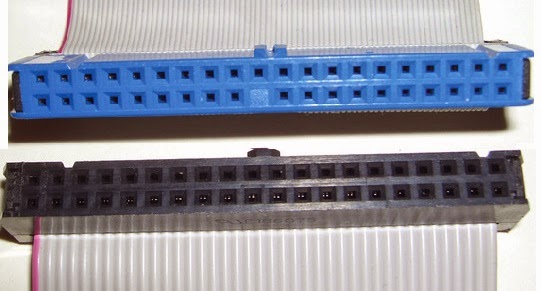 Blue connector - always connects to the motherboard.Grey (middle) connector - is used for slave devices on the cable.Black connector - is used for master device connection.
Faulty Hard Drive
If you have completed the above checks and procedures and the drive is still not properly detected, please attempt to use FreeTools to test the drive. If Tools does not detect the drive after the steps followed above, or an error code that signifies drive failure displays, please proceed to the manufacture Warranty Services page to begin a warranty replacement order.
Tips from Tomshardware website! By Paperdoc on March 16, 2012 2:37:24 AM
First, I dont expect you need to update your BIOS. A lot of people recommend "update your BIOS" whenever the mobo has trouble working with a "large" HDD because that WAS an issue for drives over 128 GB on IDE ports a while back. It has NEVER been an issue for SATA drives.
However, I do recognize that there sometimes are odd problems that can be fixed by BIOS update. If you need or want to do that without an OS installed, your manual (per the reference above from rolli59) shows you how under Section 2.1.2 on p. 2-2. It assumes you will download the latest BIOS file and place it on a USB thumb drive. Then you use a BIOS updating utility already built into your existing BIOS, following the manuals instructions.
Your manual deals with drive configuration in Sections 2.3.3 and 2.3.4 on pp 2-7 and 2-8. It does not indicate that there is any option to Enable or Disable drives, so well assume they are all Enabled. The Main screen of BIOS Setup shows the drives: if your drives are not detected and shown on this screen, you do have a problem. If you know your drives are good but all your SATA devices are Not Detected on this screen, then Id suggest you have a bad mobo.
On the other hand, Im not clear from your post that you are looking at this screen when you say, "BIOS not detecting SATA drives". If this screen does show your SATA units properly, then the BIOS HAS detected them, and you have a different problem, probably in configuration. In Section 2.3.4 you set the SATA Enhanced Mode. IF you are using Win XP in any version, you should set this to P-ATA. But assuming youre using Win7 or Vista, set this to S-ATA to get best use of your drives.
If your CD is the ONLY device on the IDE port, its jumper MUST be set to Master, and it should be plugged into the END connector on the ribbon cable. I would assume that is how it was on the old mobo, but check it.
Are you re-using your drives from before the mobo change? I would assume you are. It sounds like you are trying to Install your OS on one of them, which is a good idea. You probably cannot simply hook up your drives and expect the new mobo to boot from that - at least, not without some work to fix driver problems.
Assuming you are trying to Install to a previously-used HDD, the Install Process may tell you it cannot find any empty drive to Install to. That is NOT because the BIOS is failing to detect. It is because the drives are all "full" - that is, their entire space is assigned to existing Partitions. To do the Install of the OS, you need either to use its tools to Delete all existing Partitions on the ONE HDD youre installing to, or at least to tell it to use one specific Partition (large enough for the job) to Install to. IF you Install to any existing Partition, be aware it will wipe that entire Partition clean and you will lose all its old data.
Thank you Tomshardware website please visit them here!
Durable Greenhouses made from Polycarbonate UV Protected material and Aluminum

ALSO PLEASE VISIT THIS VIDEOS AND SEE IF YOU FIND SOMETHING NEED:
Windows Registry Tools can be downloaded here:
How to kip your PC Private by deleting DATA Permanently
http://askpctech.blogspot.com/2016/03/kip-your-pc-privat.html
This tutorial is made up on request several users, is well is fallowing video:
1)How to Delete Paint Recent Pictures from List in Windows 7
2)Win 7? Fix for ?Safely Remove Hardware and Eject Media? not working How To
3)Windows 10 How to Fix Black Screen After Booting
4)How To Remove Windows 10 Upgrade Notification On Windows 7 And Windows 8
5)How to Delete Face book Page Permanently - 2015
6)How to Uninstall Windows 10 and Downgrade to Windows 7 or 8.1
7)detected: not-a-virus:remoteadmin.win32
8)How to change pictures into icons for folders
9)Speed up your PC Disable System Restore on SSD
10)Speed up your PC Disable Scheduled De-fragmentation SSD
11)2015 Black screen of DEATH Windows 7 & 8 - with cursor at start-up SOLVED
12)Upon start up only wallpaper shows FIX
13)Here is video on Windows 7 & 8 - Black screen with cursor at start-up FIX
You can also open Task Manager by pressing Ctrl+Shift+Esc.
14) I bought a windows 7 PC but it Look alike old PC FIX:
15) Windows 7 & 8 - Black screen with cursor at start-up FIX:
16) How To Fix Minecraft OpenGL Error Windows 7 xp vista 720p :
17) removing bars using regscanner regedit & file shredder 720p:
18) How to Recover windows Explorer from error 2014 720p
19) HOW TO Save on battery online
20) Windows 7 & 8 - Black screen with cursor at start-up FIX
Upon start up only wallpaper shows no icons
CTL+ALT+DEL then click file and new task. then type explorer.exe and press ok
Best Greenhouse system 2015
Available link for download

Sunday, November 13, 2016
Tips Clear Cmos Reset BIOS Paling Mudah Tanpa Ribet
Tips Clear Cmos Reset BIOS Paling Mudah Tanpa Ribet
Cara Clear CMOS / Reset BIOS
Pada artikel sebelumnya telah ditulis Cara Masuk Setting Bios Dan Setting CMOS Laptop dan Komputer. Pada kesempatan ini akan dibahas Tips Clear Cmos / Reset BIOS paling mudah tanpa ribet. Clear CMOS / Reset BIOS merupakan cara untuk merubah setting BIOS kembali seperti semula dari settingan pabrik (defaultnya / setingan dari pabrikannya). Untuk melakukan Clear CMOS / Reset BIOS ini sangat mudah. Anda tidak usah mencabut batery yang ada pada Motherboard tetapi cukup menindahkan posisi jumper CMOS, jumper CMOS ini biasanya terpasang di sekitar batery.


Jumper tersebut terpasang diatas 3 pin. Untuk setingan awal jumper berada di pin 1,2 sedangkan pin 3 tidak diisi. Jika Anda ingin melakukan clear CMOS / reset BIOS maka Anda hanya lakukan cabut jumper tersebut dan pasang jumper tersebut ke pin 2,3 pin 1 tidak diisi. Setelah itu diamkan komputer kurang lebih 5 menit (untuk lebih memastikan CMOS clear). Setelah itu cabut lagi jumpernya kemudian pasang keposisi semula ke pin 1,2 dan pin 3 tidak diisi. Jangan lupa setelah berhasil clear CMOS / reset BIOS, setting ulang BIOS, jam, tanggal sistem, dan settingan yang lainnya kemungkinan berubah.
Catatan : kalo mau melakukan clear CMOS / reset BIOS komputer harus dalam kondisi mati dan usahakan tidak ada listrik yang menancap ke komputer. Untuk menghindari hubung singkat (konslet). Semoga bermanfaat.
Available link for download
Saturday, October 1, 2016
What is the difference between BIOS and CMOS
What is the difference between BIOS and CMOS
BEST GREENHOUSES FOR GROOVING VEGETABLES
? ? 1(360)241-1624 ?
? ? 360organic.us ?
DURABLE! AFFORDABLE! ALUMINUM + UV POLYCARBONATE
What is the difference between BIOS and CMOS?
BIOS and CMOS often times thought to be the same, but they are not. They are two different components of the computer, but they work together to make your computer function properly.


BIOS is a computer chip on the motherboard, which resembles the picture to the right. This chip

The CMOS is also a computer chip on the motherboard, but more specifically, it is a RAM chip. This is a type of memory chip which stores information about the computer components, as well as settings for those components. However, normal RAM chips lose the information stored in them when power is no longer supplied to them. In order to retain the information in the CMOS chip, a CMOS battery on the motherboard supplies constant power to that CMOS chip. If the battery is removed from the motherboard or runs out of juice (eg a dead CMOS battery), the CMOS would lose the information stored in it. Any settings you made in the CMOS setup would be lost, and you would need to make those settings changes again after a new CMOS battery was put on the motherboard. For example, with a dead CMOS battery the time and date will reset back to the manufactured date if it has been off for a long period of time....
The BIOS chip, the BIOS reads the information from the chip CMOS, when the computer is started during the boot process before. You may notice on the first launch of the screen, the screen is called the POST, the option is available to enter the BIOS setup or CMOS. When you enter this settings area, you enter settings CMOS, instead of setting BIOS. BIOS chip and the software can not be updated directly by the user. The only way to update the BIOS use the BIOS flash update program called BIOS, which updates the BIOS to a different version. These updates are usually provided either by the motherboard manufacturer or computer manufacturer.
CMOS setup allows you to change the time and date and the settings for the devices are loaded at startup, as hard drives, floppy drives and disk drives. CMOS setup allows you to enable and disable various hardware devices, including USB ports, on-board video and sound card (if any), parallel and serial ports, and other devices.
Additional information
What is the difference between BIOS and CMOS?
What are the F1 through F12 keys?
How to use system recovery options in Windows?
Random black screen while playing games
How to Delete and Clear Recent Items in Windows 7 Jump Lists
How to enter the BIOS or CMOS setup
What is the difference between BIOS and CMOS?
What are the F1 through F12 keys?
Durable Greenhouses made from Polycarbonate UV Protected material and Aluminum
Durable Greenhouses made from Polycarbonate UV Protected material and Aluminum
ALSO PLEASE VISIT THIS VIDEOS AND SEE IF YOU FIND SOMETHING NEED:
Windows Registry Tools can be downloaded here:
How to kip your PC Private by deleting DATA Permanently
http://askpctech.blogspot.com/2016/03/kip-your-pc-privat.html
This tutorial is made up on request several users, is well is fallowing video:
1)How to Delete Paint Recent Pictures from List in Windows 7
2)Win 7? Fix for ?Safely Remove Hardware and Eject Media? not working How To
3)Windows 10 How to Fix Black Screen After Booting
4)How To Remove Windows 10 Upgrade Notification On Windows 7 And Windows 8
5)How to Delete Face book Page Permanently - 2015
6)How to Uninstall Windows 10 and Downgrade to Windows 7 or 8.1
7)detected: not-a-virus:remoteadmin.win32
8)How to change pictures into icons for folders
9)Speed up your PC Disable System Restore on SSD
10)Speed up your PC Disable Scheduled De-fragmentation SSD
11)2015 Black screen of DEATH Windows 7 & 8 - with cursor at start-up SOLVED
12)Upon start up only wallpaper shows FIX
13)Here is video on Windows 7 & 8 - Black screen with cursor at start-up FIX
You can also open Task Manager by pressing Ctrl+Shift+Esc.
14) I bought a windows 7 PC but it Look alike old PC FIX:
15) Windows 7 & 8 - Black screen with cursor at start-up FIX:
16) How To Fix Minecraft OpenGL Error Windows 7 xp vista 720p :
17) removing bars using regscanner regedit & file shredder 720p:
18) How to Recover windows Explorer from error 2014 720p
19) HOW TO Save on battery online
20) Windows 7 & 8 - Black screen with cursor at start-up FIX
Upon start up only wallpaper shows no icons
CTL+ALT+DEL then click file and new task. then type explorer.exe and press ok
Best Greenhouse system 2015
If this information helped to you, please make your contribution to support this Blog and our channel.
Available link for download
Subscribe to:
Posts (Atom)