Showing posts with label hard. Show all posts
Showing posts with label hard. Show all posts
Wednesday, March 8, 2017
Troubleshoot a Failed Hard Drive
Troubleshoot a Failed Hard Drive
If you get a BSOD or other random error with the Windows operating system, it is usually assumed to be because of a virus, malware or other software error. If you?ve gone through all of the proper troubleshooting steps regarding PC viruses and other Windows software, but still are getting an error with the operating system, it may be due to a failing or erroneous hard drive.

If any PC part is to fail, or at least cause errors within the Windows OS, it?s most likely the hard drive. Sometimes, PC parts can fail without notice, leaving Windows in a non-functional state or with poor performance or random errors. In today?s article, we will review some ways that you can troubleshoot a basic hard drive.
Hard Drives
Hard drives are one of the most common computer parts that fail without notice. Additionally, hard drive errors can cause many types of Windows errors.
Checking a Hard Drive for Errors
If you can boot into Windows, you can use the built-in CHKDSK function to help troubleshoot a failing hard drive or hard drive with errors.
Begin by launching the Start Menu and selecting Computer. This will queue the Computer window, which lists all of the PC?s active drives.

In most cases, the internal and primary hard drive for a PC will be the Local Disk (C:) drive. However, it may be different depending on your PC?s drive setup. From the Computer pane, locate the PC?s hard drive andright-click it. From the context menu, select the option Properties.
This will launch the Properties dialog for the specific drive.

Click the Tools tab and select the Check now option to check the hard drive for errors.

Can?t Boot Into Windows
If you cannot boot into Windows, then you also have the option of running the CHKDSK function (mentioned above), from Windows Recovery Console. You will need a functional PC with Windows to create a System Repair Disc. As Microsoft notes, creating a System Repair Disc can be done using the following steps:

Upon booting from the system repair disc, you can run CHKDSK, but additionally, the disc has a few other utilities that can help repair and troubleshoot a Windows operating system that will not boot. Remember, for failed or erroneous hard drives, the objective is to be able to boot into Windows so that you can backup any important files or data from the drive.
Data Recovery
If none of the above options are suitable, then you can also attempt data recovery, if the hard drive has important files or data that you absolutely need. Data recovery is a bit more work, but it can be worth it in some situations.
Data recovery is complex, and can involve advanced drive troubleshooting using fdisk and commonly, specialty recovery software. If the hard drive has errors, is completely corrupt and won?t boot into Windows, you may be able to recover files simply by removing the drive from the PC and using a hard drive enclosure to connect the drive externally to an existing Windows PC. From there, you may be able to use specialty software to manually browse the Windows based disk using file structure, and manually move important files or data to another drive.
Additionally, to learn more about hard drives and complex data recovery options, you may want to check out PCStats Beginner?s Guide to Hard Drive Recovery.
Complete Reformat and Erase
In a scenario where Windows won?t boot and even the System Repair option fails to fix the hard drive, you should consider performing a complete reformat and erase, before considering the drive to be a vegetable and throwing it to the garbage. In some cases, such as a complex rootkit virus, Windows may have system level errors, in which a hard drive format is the best option.
To completely format and erase an internal PC hard drive, you can create a bootable formatting disc. For this, you may want to check out DBAN, or Darik?s Boot and Nuke. Upon booting from a DBAN disc, you can wipe the primary PC hard drive using some basic command line.
A failed Hard Drive
Worst case scenario is a completely failed hard drive that may have a failed spindle, arm or platter.

In a case where the actuator/arm or other mechanical component has failed, you may want to consider the drive to be done with. However, if you have extremely important data on the drive, and the platters are still intact and undamaged, you may be able to swap the platters to an identical drive and repair the drive, which would ultimately give you the option to recover your PC data.
This requires an advanced technical understanding of hard drives, calibration and more. So, in most cases, it would be better to have a tech or data recovery specialist do this, rather than attempt it yourself.
Those are a few ways that you can troubleshoot, recover, diagnose and fix hard drive errors and failed hard drives. Thank you for stopping by the site for today?s post. Enjoy!
Available link for download
Sunday, February 26, 2017
The BIOS does not detect or recognize the ATA SATA hard drive
The BIOS does not detect or recognize the ATA SATA hard drive
BEST GREENHOUSES FOR GROOVING VEGETABLES
? ? 1(360)241-1624 ?

? ? 360organic.us ?
DURABLE! AFFORDABLE! ALUMINUM + UV POLYCARBONATE
tips if your pc slow loading or freeze: First I will give you simple fix - usually a restart will fix it. There may be an attached device that it is having issues talking to everything else. (always kip your BIOS OS other drivers up do date) Use on-board video if you got it, unplug all hard drives, DVD and CD drives, and IDE Devices, and all other card (Video, Wifi, Ect) just with those. If it get past that great! then try adding things one at a time and see what is freezes at. Also sometimes all things need is to be pulled and re-seated. Youll be surprised how often that alone fixes boot up issues like this.
I have recently waiting for the WIN logo to get over almost 30 minutes after second restart, (just wait always wait) then I unplug Lite-on DVD/CD Rewritable drive Model LH-20A1S, AND PC boots in 20 seconds. Please note if you just reinstall your OS, you will need update drivers for the DVD drive even if you updated it before, it is all gone and fresh copy windows is missing it, it is different with Firmware, these are stay on the drive
Tips for troubleshooting SerialATA & ATA/IDE internal drive that is not detected in the system BIOS.
There are several reasons why a system BIOS will not detect the presence of an internal hard drive. Follow these steps one by one to see if any can fix this problem:
Drive is not spinning up
If the drive is not receiving power, it will not spin up. To check to see if this is the cause of the BIOS not detecting the hard drive, follow these steps:
Power off the computer. Open the computer case and remove the ATA or SATA cable from the hard drive. This will stop any power saving commands from being sent. Turn on the system. Check to see if the hard drive is spinning. If you touch the side of the drive you should feel vibration. If you do not hear or feel the hard drive acting, the drive did not start.
If you cannot determine whether the drive is spinning: , Boot the computer and listen if it is, Try to shutdown the computer, Disconnect the power cord from behind your computer, Disconnect the power cable from the hard drive, Reconnect the power cord to the back of your computer ,Power on the computer, to see if the drive sound was audible before & then repeat, but only reconnect the hard drive and listen for it sound, Switch power cables with a device like Optical drive, so that you are using a functional power cable.
Check the power supply on your computer to determine whether it is providing sufficient electrical power to operate the drives and devices you have in your computer. If the drive is still not spinning, connect it in another computer if possible. Connect the drive in a SATA-USB enclosure or something similar if possible. If the drive does not spin up after all of these steps, please visit manufacture Warranty page to begin a warranty replacement order if it is still under warranty.
Drive not enabled in the BIOS:
Most personal computers display a brief message about entering System Setup soon after the power is turned on. System Setup is also called the <<system BIOS>> or sometimes call <<CMOS Setup>> - each is a name for the same thing, for example, on HP systems you will see <<F2=Setup>> in the upper right hand corner during the computer boot-up. This means to press the F2 key so you can enter the Setup or BIOS. Different computer manufactures have different methods to enter Setup, so please check your documentation for specifics.
BIOS is where the date and time are stored and where startup preferences like NumLock or Passwords are defined. In different hard disk drives are often controlled here. Hard drives are numbered in Setup as Drive 0, Drive 1, etc. or in some cases as Primary Master or Primary Slave. Which ever way these are named, they have ON & OFF setting <<sometimes AUTOMATIC or similar>>. If your drive is not detected it may be because it is turned OFF in System Setup.
In most cases, the boot drive is Drive 0 or Primary Master. When you add a second drive to the system, it may be need to be enabled by turning it ON in System Setup.
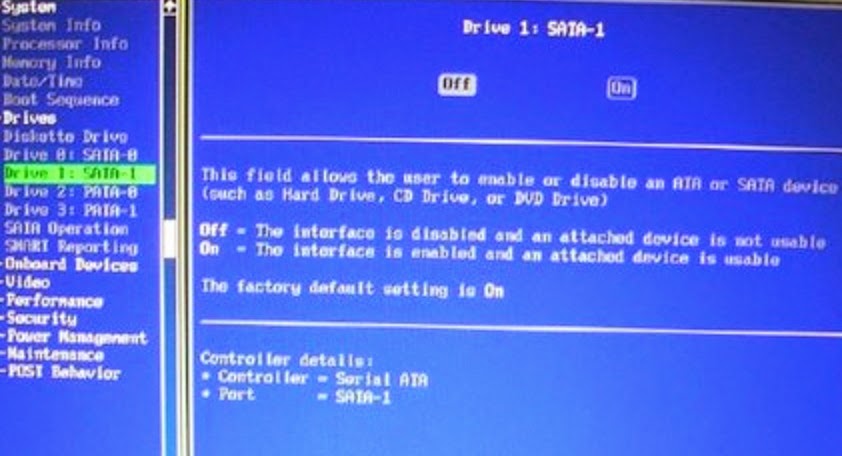 Screen shot showing System Setup section for disk drives:
Faulty or Unplugged Data Cable
Always inspect the motherboard and hard disk connections for bent or misaligned pins. Folding, crimping, pinching, or creasing data cables can cause the wires to break inside the insulation, leaving the exterior of the cable looking normal. When in doubt of data cable condition, replace it.
For SATA cables, Seagate recommends using cables shorter than 39.37 inches (1 meter). For further information, please see Document ID: 182453.
Images of Serial ATA cables. 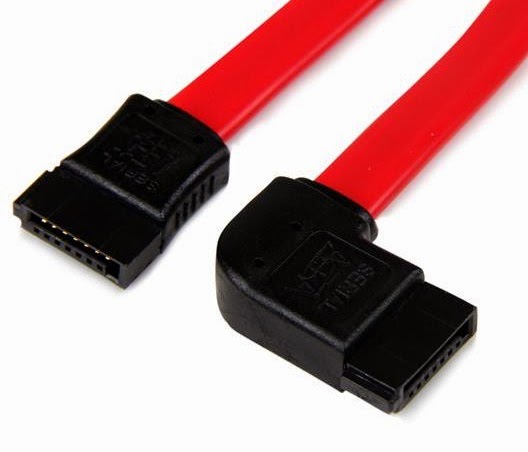
The BIOS will not detect a hard disk if the data cable is damaged or the connection is incorrect.
Serial ATA cables, can sometimes fall out of their connection. Check your SATA cables are tightly connected to the SATA port connection, sometimes you can hear click, from lock.
The easiest way to test a cable is to replace it with another cable. If you still have a problem, then the cable was not the cause.
For ATA drives, use UDMA cabling with a maximum length of 18 inches. UDMA cables have color coded connections which require proper orientation when connecting.
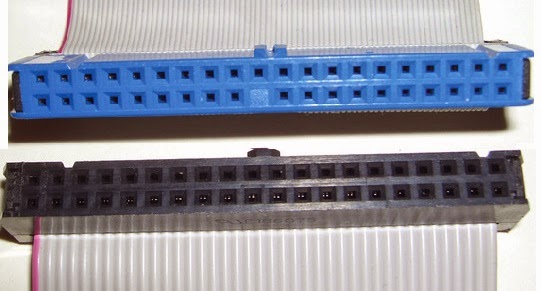 Blue connector - always connects to the motherboard.Grey (middle) connector - is used for slave devices on the cable.Black connector - is used for master device connection.
Faulty Hard Drive
If you have completed the above checks and procedures and the drive is still not properly detected, please attempt to use FreeTools to test the drive. If Tools does not detect the drive after the steps followed above, or an error code that signifies drive failure displays, please proceed to the manufacture Warranty Services page to begin a warranty replacement order.
Tips from Tomshardware website! By Paperdoc on March 16, 2012 2:37:24 AM
First, I dont expect you need to update your BIOS. A lot of people recommend "update your BIOS" whenever the mobo has trouble working with a "large" HDD because that WAS an issue for drives over 128 GB on IDE ports a while back. It has NEVER been an issue for SATA drives.
However, I do recognize that there sometimes are odd problems that can be fixed by BIOS update. If you need or want to do that without an OS installed, your manual (per the reference above from rolli59) shows you how under Section 2.1.2 on p. 2-2. It assumes you will download the latest BIOS file and place it on a USB thumb drive. Then you use a BIOS updating utility already built into your existing BIOS, following the manuals instructions.
Your manual deals with drive configuration in Sections 2.3.3 and 2.3.4 on pp 2-7 and 2-8. It does not indicate that there is any option to Enable or Disable drives, so well assume they are all Enabled. The Main screen of BIOS Setup shows the drives: if your drives are not detected and shown on this screen, you do have a problem. If you know your drives are good but all your SATA devices are Not Detected on this screen, then Id suggest you have a bad mobo.
On the other hand, Im not clear from your post that you are looking at this screen when you say, "BIOS not detecting SATA drives". If this screen does show your SATA units properly, then the BIOS HAS detected them, and you have a different problem, probably in configuration. In Section 2.3.4 you set the SATA Enhanced Mode. IF you are using Win XP in any version, you should set this to P-ATA. But assuming youre using Win7 or Vista, set this to S-ATA to get best use of your drives.
If your CD is the ONLY device on the IDE port, its jumper MUST be set to Master, and it should be plugged into the END connector on the ribbon cable. I would assume that is how it was on the old mobo, but check it.
Are you re-using your drives from before the mobo change? I would assume you are. It sounds like you are trying to Install your OS on one of them, which is a good idea. You probably cannot simply hook up your drives and expect the new mobo to boot from that - at least, not without some work to fix driver problems.
Assuming you are trying to Install to a previously-used HDD, the Install Process may tell you it cannot find any empty drive to Install to. That is NOT because the BIOS is failing to detect. It is because the drives are all "full" - that is, their entire space is assigned to existing Partitions. To do the Install of the OS, you need either to use its tools to Delete all existing Partitions on the ONE HDD youre installing to, or at least to tell it to use one specific Partition (large enough for the job) to Install to. IF you Install to any existing Partition, be aware it will wipe that entire Partition clean and you will lose all its old data.
Thank you Tomshardware website please visit them here!
Durable Greenhouses made from Polycarbonate UV Protected material and Aluminum

ALSO PLEASE VISIT THIS VIDEOS AND SEE IF YOU FIND SOMETHING NEED:
Windows Registry Tools can be downloaded here:
How to kip your PC Private by deleting DATA Permanently
http://askpctech.blogspot.com/2016/03/kip-your-pc-privat.html
This tutorial is made up on request several users, is well is fallowing video:
1)How to Delete Paint Recent Pictures from List in Windows 7
2)Win 7? Fix for ?Safely Remove Hardware and Eject Media? not working How To
3)Windows 10 How to Fix Black Screen After Booting
4)How To Remove Windows 10 Upgrade Notification On Windows 7 And Windows 8
5)How to Delete Face book Page Permanently - 2015
6)How to Uninstall Windows 10 and Downgrade to Windows 7 or 8.1
7)detected: not-a-virus:remoteadmin.win32
8)How to change pictures into icons for folders
9)Speed up your PC Disable System Restore on SSD
10)Speed up your PC Disable Scheduled De-fragmentation SSD
11)2015 Black screen of DEATH Windows 7 & 8 - with cursor at start-up SOLVED
12)Upon start up only wallpaper shows FIX
13)Here is video on Windows 7 & 8 - Black screen with cursor at start-up FIX
You can also open Task Manager by pressing Ctrl+Shift+Esc.
14) I bought a windows 7 PC but it Look alike old PC FIX:
15) Windows 7 & 8 - Black screen with cursor at start-up FIX:
16) How To Fix Minecraft OpenGL Error Windows 7 xp vista 720p :
17) removing bars using regscanner regedit & file shredder 720p:
18) How to Recover windows Explorer from error 2014 720p
19) HOW TO Save on battery online
20) Windows 7 & 8 - Black screen with cursor at start-up FIX
Upon start up only wallpaper shows no icons
CTL+ALT+DEL then click file and new task. then type explorer.exe and press ok
Best Greenhouse system 2015
Available link for download
Thursday, February 16, 2017
What do you know about external hard drives and data recovery
What do you know about external hard drives and data recovery
What do you know about external hard drives and data recovery
External hard drives, portable hard drives are also called, are a popular choice for the storage of data between the consumer and professional and personal. External devices offer the convenience, allowing greater storage capacity for data
Challenging external drives, portable hard drive to be a popular choice for data storage to consumers for both business and personal. External drives provide the convenience, so that extensive storage capacity for data capacity internal drive and the ability to easily back up files from one computer to another. They are particularly useful for users of laptops or notebooks. They are generally relatively light and compact and yet capable of a considerable amount of data
.
An external hard drive is a difficult challenge, which is connected to the computer to a door. There are some common interfaces for the remote stations, such as:
Firewire (a popular interface for Mac users)
Universal Serial Bus or USB. USB sticks can be a variety of devices such as MP3 and PDAs, but also external hard drives
.
The new eSATA interface for external hard drives. eSATA external drives using the same protocol of indoor units, so the best performance of your external hard drive.
Ethernet connections. These are less common, they behave like a file is used to store data.
External drives are relatively inexpensive so that you keep your data wherever you go, and in nearly all computers, thanks to its portability and ease of use. These devices require a large number of different models, with different speeds and capacity data.
When choosing the right design, you should know the amount of data to be stored, so do the size of the disk space you to determine. Please note you grow, your data storage needs will almost certainly over time, and make sure there is one that not only your short-term, but also buy to cover your long-term needs.
You go to the size of the disk cache to consider. The cache size determines how fast you can save data to disk. The larger the cache, the faster you can copy the file to disk. The larger the cache, the system can be expensive, you can determine your needs and situation of your purchase.
One of the advantages of using an external hard disk to store data that you add on the size of the backup drive, how can you grow your storage needs. You can store more than the amount of data increases add. Since the size of the units increases, the device will probably need their own power because it does not provide enough power to pull the USB or FireWire only.
Recovering data from an external hard drive
The loss of data on external hard drives is very rare, as long as you are looking for that device, but still happen. There are several reasons that the external hard disk for data loss, as it would occur:
Physical damage
Deleted partition or logical drive
Files written to bad sectors
Virus attacks
I accidentally deleted files
Backup or corrupt data application
Accidental reformatting
Force draws
Please note that the most important data, the greater the chance that you have to take the failed drive to a professional data recovery lab to recover files. But if any of these happen to you, there are some steps you can take data from your external hard drive.
Restart the computer normally, connected with the external hard drive to your computer.
Download or perform data recovery hard drive and install it on your main computer. Make sure there are no programs on the external drive to install because they write some of the lost data.
Start Data Recovery. It is likely that more "option to recover deleted files, lost finding, if not your hard drive respond and recover data lost due to formatting.
Choose to scan the drive with the lost data and files. Save all recovered data on the internal hard disk.
Send your external hard drive to a professional computer technician or company for repair. It is not likely to repair situation, particularly when a substantial physical damage to the plate.
The best protection against data loss is to regularly back up your system and protect the demanding outdoor unit (s) for protection against heat, moisture and mechanical damage. Be sure to protect your hard drives against power surges or other electrical problems. Taking care of your equipment can save you time, money and effort to restore the lost files.
What do you know about external hard drives and data recovery
Available link for download
Wednesday, February 1, 2017
Test your Hard drive for errors and problems before you lose your important files
Test your Hard drive for errors and problems before you lose your important files
Hard Drive Testing Tools
Your hard drive is the most important hardware in your computer, it keeps all of your files, Pictures,documents,Music, Movies and everything on your computer so it is a wise decision to keep checking your Hard drive before it fails.There are multiple hard drive testing software available in the market but few of them are reliable and famous.
Some of these tools may be built in to your operating systems already while others are available from hard drive manufacturers that you can download from their website.
Some of the computer manufacturers ship your computer with this Hardware diagnostic tools or hard drive diagnostic tool preinstalled which you can use to test the hard drive.Some of the computers have a built in S.M.A.R.T ( Self-Monitoring, Analysis and Reporting Technology often written as SMART) test which test the functionality and reliability of Hard Drive.It detects and report on various indicators of reliability, in the hope of anticipating failures.
Replace your hard drive if it fails any of your tests.
Windows operating system has its own Error checking tool that you can use to check any errors on hard drive and fix it if fixable.To run windows hard drive error checking tool go to my computer and right click on any of the drive and select properties.It will open drive properties window, Click on Tools tab, then Click on Check Now under Error Checking as shown below.
It will open another small window as shown in the Picture 21 (c) below so make sure the option " Scan for and attempt recovery of bad sectors " is checked and then click on the start button to run the scan.
It will start the scan for hard drive and will show you messages as shown below.
Once all the scan is completed it will show you the result or a message that No problems were found as shown in the picture -21(e) below.
Now there is one third party free ware utility that you can use to test your hard drive.
HDDScan - Its a free hard drive testing program for all types of drives ( RAID arrays, Flash USB and SSD drives are also supported ), no matter who the manufacturer is.
It has several tools included such as SMART and a surface test.It can test storage device for errors (Bad-blocks and bad sectors), show S.M.A.R.T. attributes and change some HDD parameters such as AAM, APM, etc.
Additionally, software can be used as the hard disk temperature monitor and reading/writing benchmark ? performance graph is displayed for every test.
You can download HDDScan from the download section on this blog or download from the following link.
Your hard drive is the most important hardware in your computer, it keeps all of your files, Pictures,documents,Music, Movies and everything on your computer so it is a wise decision to keep checking your Hard drive before it fails.There are multiple hard drive testing software available in the market but few of them are reliable and famous.
Some of these tools may be built in to your operating systems already while others are available from hard drive manufacturers that you can download from their website.
Some of the computer manufacturers ship your computer with this Hardware diagnostic tools or hard drive diagnostic tool preinstalled which you can use to test the hard drive.Some of the computers have a built in S.M.A.R.T ( Self-Monitoring, Analysis and Reporting Technology often written as SMART) test which test the functionality and reliability of Hard Drive.It detects and report on various indicators of reliability, in the hope of anticipating failures.
Replace your hard drive if it fails any of your tests.
 |
| Pic-21(a) |
 |
| Pic-21 (b) |
 |
| Pic-21(c) |
 |
| Pic-21(d) |
Once all the scan is completed it will show you the result or a message that No problems were found as shown in the picture -21(e) below.
 |
| Pic-21(e) |
Now there is one third party free ware utility that you can use to test your hard drive.
HDDScan - Its a free hard drive testing program for all types of drives ( RAID arrays, Flash USB and SSD drives are also supported ), no matter who the manufacturer is.
It has several tools included such as SMART and a surface test.It can test storage device for errors (Bad-blocks and bad sectors), show S.M.A.R.T. attributes and change some HDD parameters such as AAM, APM, etc.
Additionally, software can be used as the hard disk temperature monitor and reading/writing benchmark ? performance graph is displayed for every test.
You can download HDDScan from the download section on this blog or download from the following link.
Download HDDScan
Available link for download
Friday, January 27, 2017
Tips OSX How to Save Space Hard Drive Mac
Tips OSX How to Save Space Hard Drive Mac
MacBook Air with SSD capable of quickly indeed very proud of its users but in some cases, the SSD is too small to store a variety of data, especially for those who choose a lot of files in bulk. For that you need to perform well SSD management, including removing all source files iMovie. If you have done it but the Mac hard drive space is still not enough to accommodate a collection of files then you need to follow these tips advanced that contains 5 steps to avoid overloading the hard drive.
1. Delete Cache Files
Even if you use a Mac desktop that has a very large space but to save hard drive space is still important to do. You can do this by deleting the cache files.
When you delete apps to make the disk space a little relieved, that still leaves the actual user application cache is not deleted also. The files were left to help the performance of OS X and various applications installed on the Mac. If you no longer use an application, you can delete the entire cache file.
How, in the Finder press Command-Shift-G or click on the Go menu, select Go To Folder. Then type:
~ / Library / Caches /
This way you will display the folder that contains the user caches. Once open, you need sorting files by size to determine the size of the files and folders you want to delete.
Open the View menu and select Show View Options or press Command-J on the keyboard. Click the checbox which is on the Calculate All Sizes and close the windows View.
The next Mac will show the number of all files in the Finder, including folders. If you are not yet set, then immediately set course windows to do with the List View or Command-2 on the keyboard.
Well, now you can see the cache file with the largest size there at the top by clicking the Size once again. Furthermore please delete all the files that you no longer need.

2. Delete Speech Voices
Another thing you can do to save hard drive space by deleting voices Mac files are used OS X for text-to-speech. This file type can be very large and need to be removed when no longer used.
Open Terminal from the Application folder, dock, or use an app like Alfred launching system. Type the following command:
cd / System / Library / Speech /
The above command will change the directory (cd) that you use speech to another directory where files are located. To delete all of them, type the following command:
Voices sudo rm-rf / *
If in doubt use the method above, you can manually delete the voice files through the folder / System / Library / Speech / Voices / then delete the voices that you do not use, such as the cello or Bahh.

3. Check the Application Support folder for Steam Game Files
For gamers who frequently use digital gaming portal Steam, you need to check the Steam files that you can delete.
Open the Finder, open the folder behavior ~ / Library / Application Support /. Inside that folder you will find a folder that Steam could be lots and lots of files from different games you no longer play. Be sure to Calculate All Sizes from the View menu when viewing the Steam folder and sorting based on Size. You will be able to see the game files are very large, delete it if you no longer use.
Other folders that you need to see is the Application Support. A number of applications use the folder to store the files that you no longer even wear. Make sure you pick and choose which files should be deleted.

4. Delete File in System Logs and QuickLook Cache
System logs is one place that contains a lot of files to help work the system OS X. However, you can just delete the files in it because the files can be made many times.
Open Terminal from the Applications folder or Dock. Type the following command:
sudo rm-rf / private / var / log / *
Command over befungsi to clean up system logs, including when you run the command above. Therefore you can often do this to increase your Mac space.
Furthermore please close the Terminal window and open another one. Type the following command:
sudo rm-rf / private / var / folders /
The above command will clean QuickLook file and you can do regularly to keep the Mac space. It should be noted that each of the above command prompts you to enter the administrator password.

5. Disable Mac SafeSleep Mode
There is an OS X feature that was released in 2005 called SafeSleep. SafeSleep is basically made a hibernation mode to save the current condition of your use Mac so that when you turn it on at a later time after sleep, the Mac will be in the same condition as when you left. Such conditions do not change even when the battery ran out and shut down.

In OS Lion, Apple then introduced two new features called Autosave and Resume that provides similar SafeSleep. Unfortunately, all of these features actually consuming hard drive space. To disable SafeSleep mode, open a terminal and type the following command:
sudo pmset hibernatemode 0
Command over deadly SafeSleep function. Afterwards you need to delete the image SafeSleep file by typing the following command:
sudo rm / var / vm / sleepimage
If you use Mac often still connected to power when in sleep mode and the battery has never been below 20% then it means you are not using a Mac SafeSleep. Thus disabling SafeSleep become mandatory for you to do.
For non-Mac equipped with SSD, it takes longer to save SafeSleep image to your hard drive. In contrast, for the Mac that uses SSD Mac, not necessary at all to do the same. Later if you want to reactivate SafeSleep, type the following command in Terminal:
sudo pmset-a hibernatemode 3
Good luck!
Available link for download
Sunday, January 1, 2017
Upgrade to a new hard drive on your MacBook Pro and clone OSX and BootCamp
Upgrade to a new hard drive on your MacBook Pro and clone OSX and BootCamp
***DISCLAIMER...Its your fault if you screw up your system. Read through the entire post before attempting.
I purchased a new larger capacity hard disk drive (hdd) to upgrade an existing smaller solid state drive (ssd) because I started running out of room. I liked the speed of the ssd, dont get me wrong, but a weighed the options and more storage space was a priority. So I compromised and picked up a Seagate hybrid sshd. Got one while they were on sale $100 through newegg http://www.newegg.com/Product/Product.aspx?Item=N82E16822178340.
This one took a while to rap my fingers around and Ill say most of it was dumb luck. I know there is WinClone available on OSX and probably would have made this easier. Think WinClone is about $30 and honestly probably would have saved me a bunch of time, but being the stubborn ba$T@rd I am, I decide to stick through it on principle.
What I had...
OSX was 10.8
Windows was 8 with media center
Things youll need:
- hdd enclosure; this is to connect your existing hdd to copy data over to your new hdd
- windows 8 installation DVD (or Win7); needed to allow bootcamp creation
- OSX installation USB or SD drive to boot from; might be able to use the recovery instead
- windows 7 repair CD; needed to run specific commands to fix the boot (the version of win7 repair CD I used was modified because getting the timing right to engage the CD boot process made me pull more hair out than I care to discuss. I renamed the bootfix.bin file from the boot directory. This causes the CD to boot instead of waiting for prompted. The MacBook keyboard didnt work and the screen picture were out of sync to enable to proper timely to engage the CD. You can create your own using UltraISO and renaming bootfix.bin under the boot directory. https://dl.dropboxusercontent.com/u/92763248/Repair%20disc%20Windows%207%2064-bit.iso
- GPART CD http://gparted.sourceforge.net/livecd.php
- Remove encryption.
1. With your existing OSX installation, install the gdisk program http://sourceforge.net/projects/gptfdisk/. We will use that to modify our soon to be screwed up hybrid MBR. In the mean time lets take a look at a none screwed up hybrid MBR.
Issue the following commands on your old OSX operating system (OS):
sudo fdisk /dev/disk0
sudo gpt -r -vv show disk0
diskutil list

Steps:
2. Attached your old hdd to a USB enclosure and attached to your macbook. I had purchased a simple USB3 sata link from newegg.com.

3. I made an SD OSX installation media disk. I think you could probably use the recovery hd to do the same thing. I attached the SD to its slot.
4. I then booted the macbook holding the option key down.

5. It should boot and look like the following. If the new hdd has no bootable partition you will not see your new drive. The orange in color USB symbol enclosures are your old OS. The mountain lion emblem is the OSX installation SD. This is whether I think its possible to boot from your old OS recovery hd to perform this next action. I havent tried that. The next action will be to copy your old OSX to the new hdd. I decided to use my OSX SD and booted from that.

6. Select Disk Utility.

7. Your new hdd should be at the top. Select it on the left pane.

8. Now select the partition drop down. This is where we are going to partition and format your new drive. Select 1 partition.

9. Title the new volume "new mac". Ensure it is Mac OS Extended (Journaled) format. Then Select options.

10. It needs to be set to GUID Partition Table. Select OK. Apply.

11. Partition.

12. Once completed your "new mac" partition should show on the left. Select the Restore tab.

13. This is were we can copy our existing OSX OS to the new hdd. Left click on your old OSX partition and hold the mouse button down as you drag it to the Source. Notice the orange color enclosure icon. This indicates an external device. Now drag your newly created "new mac" partition to the Destination. Should look just like mine. Restore.

14. Erase.

15. Should begin copying the data over. This processes should take a while. After that is complete reboot your macbook while holding the option key on boot. Now boot to your new macbook OS. I removed the old hdd and installation SD before booting.

16. Lets see what has changed in our partitions on the new hdd. Here is an example with the above three commands issued again. This was on a 1TB HDD. Notice the size in the fdisk command takes up the entire hdd.


20. I decide to divide my partitions equally. You do what you want. Install. It is required to have the Win8/7 installation dvd installed to get this step rolling.

21. You system will automatically reboot to DVD. ***HOLD THE OPTION KEY DOWN WHEN THE SYSTEM AUTO REBOOTS.*** Now I have done this two different ways. Ive booted to the Windows DVD and formatted the bootcamp partition and not installed a new OS which formats it NTFS. Ive also skipped this step and booted straight to GPART CD as well. I suspect its not necessary to format because when we use GPART to copy the old Windows OS to our new bootcamp partition it takes on the format of the copied partition anyway so why bother. I ejected the Windows installation DVD and swapped for the GPART CD and continued the boot of the CD. With GPART booted it should show your new hdd and old hdd so long as both are still attached to your system. If you forgot just connect and under Gparted select rescan. Notice the far upper right drop down to select drives. Now to distinguish which drive is which the /dev/sda is your onboard hdd and /dev/sdb should be your external. Another way is your new hdd will say BOOTCAMP (FAT32). Your external or old hdd should say either BOOTCAMP (NTFS) or what ever name you modified the volume name to. Mine was Win8Pro.

22. Select your external or old hdd.


24. Now change back to your new hdd and select the FAT32 BOOTCAMP partition. The paste button should become available and select.

25. It should warn you about this action. It should be on /dev/sda4. OK.

26. Select Apply.

27. Another warning. Apply.

28. Working. Could take some time.

29. Once completed, reboot holding the option key and boot to OSX. The Windows partition shouldnt appear here. We need to modify the hybrid MBR. You should see after booting into OSX the Windows drive and its contents though.

30. Now a decided to look at my partitions. #1 is the EFI boot. #2 is my OSX. #3 is my Recovery. #4 is Windows bootcamp. Notice the differences in size. The other thing I noticed was the * was on the OSX #2 and not on the Windows #4 under the fdisk command. This is where printing out the old hdd setting is nice to see the difference.
new hdd


33. Reboot into OSX. Time to make the hybrid MBR right again. Open terminal. Enter the following commands and see the images below. We need to get the hybrid MBR like our old hdd. This is how to do this.
sudo gdisk /dev/disk0
r
h
2 3 4
y
<enter>
n
<enter>
n
<enter>
y
o
w
y
sudo fdisk /dev/disk0
gdisk = allows us to modify the GUID partition. Since Windows requires an MBR which GPTs dont use and only have them for legacy purposes we have to fix it.
r = recovery and transformation options
h = make hybrid MBR
2 3 4 (Thats the number 2 space 3 space 4 <enter>) = modifying those three partitions
y = EFI needs to be first
<enter> = select the default because thats the way our original partition was
n = the bootable flag was not set in our original
<enter> = select the default because thats the way our original partition was
n = the bootable flag was not set in our original
<enter> = select the default because thats the way our original partition was
y = because the bootable flag was set in our original
o = print protective MBR data
w = write table to disk and exit
y = confirm


35. Windows repair CD should load. It should also prompt that your Windows install is corrupt. If you select details it will let you know what its changing. Select Repair and reboot. This will be quick so be fast with the option key and attempt to boot Windows now.

36. Thats it. After booting it might ask to reboot.

37. If your not a fan of rEFIt you can always remove. http://refit.sourceforge.net/doc/c1s3_remove.html
Hope this works for you...
Available link for download
Subscribe to:
Posts (Atom)