Showing posts with label android. Show all posts
Showing posts with label android. Show all posts
Thursday, April 27, 2017
Tips Download BBM 2 0 For Android
Tips Download BBM 2 0 For Android

Saat ini BBM merupakan aplikasi messenger terpopuler di jagad ini, tidak heran jika banyak gadget android makin laku,salah satu sebabnya karena aplikasi ini. hal ini tentu membawa angin segar bagi pihak Blackberry,hanya saja akan membawa imbas yang negatif pula untuk penjualan Gadgetnya. Baru-baru ini ada fitur terbaru dari BBM yaitu BBM voice dan BBM vidio untuk androi dan IOS,walau hal ini sudah lebih dahulu terpasang komplit di BB OS 10 seperti BBQ10 dan BBZ10. Fitur ini akan ada di versi BBM for android 2.0
Available link for download
Sunday, April 23, 2017
Tutorial Mengganti Icon Softkey Android
Tutorial Mengganti Icon Softkey Android
Tutorial Mengganti Icon Softkey Android
Tutor ini di pakai untuk mengganti icon Dari Persian softkey sesuai keinginan, caranya easy banget, ikuti dengan seksama kalo tidak mau bootloop. Tutorial ini i buat dengan cara principle lamban tapi pasti dan mudah dimengerti bagi pemula, principle lebih tahu jangan protes jika tutor terlalu lamban
ekstrak hasil transfer dan cari gambar softkey.nya
rename masing2 menjadi seperti ini :
Tombol BACK :
ic_sysbar_back.png
ic_sysbar_back_land.png
Tombol HOME :
ic_sysbar_home.png
ic_sysbar_home_land.png
Tombol RECENT :
ic_sysbar_recent.png
ic_sysbar_recent_land.png
buka rootExplorer, masuk ke direktori System -> app
cari SystemUI.apk
copy ke sdcard, buka di pc
buka SystemUI dengan winrar (jangan di ketsrak)
masuk ke direktori res -> drawable-hdpi
choose all semua icon principle agan transfer dan sudah di ganti namnya tadi
langsung drag ke folder drawable-hdpi Dari Persian SystemUi.apk
setelah itu copy lagi ke mmc SystemUI.apk principle sudah agan edit tadi
copy SystemUi.apk ke Folder System
klik icon di pojok kanan Dari Persian r/w menjadi r/o
setelah itu tahan principle lama SystemUi.apk pilih set permission, dan ubah menjadi
[*] [*] [ ]
[*] [ ] [ ]
[*] [ ] [ ]
setelah itu klik OK
selanjutnya copy SystemUI.apk principle sudah di set permissionya ke folder App
replace
reboot
selesai
Available link for download
Saturday, April 22, 2017
Tips Android How To Take Screenshot on HTC One
Tips Android How To Take Screenshot on HTC One
Whether you are one of those who ended up being a fan of Android because HTC captivated? If yes, here is a little guide on how to take screenshots on your new phone.
HTC has 2 ways to take a screenshot: 1) version of Android (4.0 and above) and 2) his own version of HTC. For the first way is a universal way for users of Android 4.0 to the above: a combination of pressing the Power and Volume Down buttons, while the 2nd way is the HTC version that uses a combination of buttons; Power and Home button.
For the first way, you have to press both the Volume Down button and its Power simultaneously until there was a shutter sound, then release both buttons. Thumbnail of the screenshot will appear briefly on the screen, and it will pop up a new notification in the Notification Shade. You can tap the notification to view it, or access it on the album is also in the application Screenshot Gallery.

2nd way is the HTC version; You can take a screenshot by pressing the Home button Power button. This method can also be done in a number of HTC products such as the HTC One X, X HTC Desire, HTC Desire dam U. To retrieve it, simply press the Power button for a half second and then quickly press the Home button. Do not press the Power button too long because it will actually bring up the option to turn off the phone.

Difference of these two methods are both have flash animations and also shutter a different tone. 2nd way will bring the message at the bottom of the screen and does not show up in the notifications, so you can only see it in the screenshot album in the Gallery application.
Good luck!
HTC has 2 ways to take a screenshot: 1) version of Android (4.0 and above) and 2) his own version of HTC. For the first way is a universal way for users of Android 4.0 to the above: a combination of pressing the Power and Volume Down buttons, while the 2nd way is the HTC version that uses a combination of buttons; Power and Home button.
For the first way, you have to press both the Volume Down button and its Power simultaneously until there was a shutter sound, then release both buttons. Thumbnail of the screenshot will appear briefly on the screen, and it will pop up a new notification in the Notification Shade. You can tap the notification to view it, or access it on the album is also in the application Screenshot Gallery.
2nd way is the HTC version; You can take a screenshot by pressing the Home button Power button. This method can also be done in a number of HTC products such as the HTC One X, X HTC Desire, HTC Desire dam U. To retrieve it, simply press the Power button for a half second and then quickly press the Home button. Do not press the Power button too long because it will actually bring up the option to turn off the phone.
Difference of these two methods are both have flash animations and also shutter a different tone. 2nd way will bring the message at the bottom of the screen and does not show up in the notifications, so you can only see it in the screenshot album in the Gallery application.
Good luck!
Available link for download
Friday, March 31, 2017
Tips Android Jelly Bean Equalizer For Android Phone
Tips Android Jelly Bean Equalizer For Android Phone
Tips Android Jelly Bean: Equalizer For Android Phone You must have been accustomed to using the equalizer to get good audio quality. On the Android device, you can get similar functionality?
Music app in the Android Jelly (4.1 and 4.2) has a built-in equalizer that you can use. Ability to balance the audio in Android Jelly Bean may direct you try without installing anything.
When playing a song, please tap on the 3-point is in the upper right-hand corner and select Equalizer. You can select presets are provided, such as Folk and Heavy Metal. Or if you want to set your own, please drag each of the 5 sliders are provided for generating audio quality as per your expectations.
Under the slider there are additional controls. You can drag each one to get a boost bass or 3D effect.
It should be noted that all of these options will only be active if you are using headphones. Why is that? Because generally Equalizer does not provide significant audio changes when using the built-in speakers in your Android device.
Available link for download
Friday, March 17, 2017
Update Android 5 0 Lollipop Note 3 SM N900 Stock Rom ChÇðnh Th ¯¸c T ¯® Samsung
Update Android 5 0 Lollipop Note 3 SM N900 Stock Rom ChÇðnh Th ¯¸c T ¯® Samsung

Sau khi s? ra m?t c?a phiˆn b?n Android Lollipop 5.0 ra m?t. Hi?n n…y phiˆn b?n 5.0 ?Æ ???c h? tr? trˆn Galaxy Note 3 - N900. Bƒy gi? mnh s? h??ng d?n c c b?n c ch up rom Lollipop 5.0 cho Samsung Galaxy Note 3 SM-N900.
I - C“ng c? c?n thi?t:
- Rom Lollipop SM-N900 (d?ng OTA update.zip): https://www.fshare.vn/file/AF1LLWKS1I6Z
- Recovery TWRP: Recovery
- Root: Super SU
- Rom G?c: Link
- Odin: Odin_v3.10.0
II - Ti?n h…nh c…i ??t
1/ C…i ??t Recovey:
- ??a m y v? Dowload Mod b?ng c ch: t?t ngu?n, b?m c—ng 1 l£c t? h?p ph¡m n£t home , volumn - v… n£t ngu?n, sau khi m y v…o m…n hnh c¢ ch? ti?p t?c nh?n thˆm 1 l?n volumn + n?a th s? v…o ???c dowload mod
- Sau khi ?Æ v…o ???c dowload mod, c?m ?iˆn tho?i k?t n?i v?i m y t¡nh ? c?ng ID:COM s? hi?n ra s? c?ng COM ?Æ k?t n?i m…u l?c nh‚
- Ch?n trˆn Odin ch?n ? m?c AP ch?n ??n file openrecovery-twrp-2.8.0.0-ha3g.img.tar, ch?n Open. B?m start v…o ??i Odin flash v… b o Pass l… xong nh‚.
2/ C…i ??t rom 5.0:
Ch£ ì: Ch? c?p nh?t t? n?n rom stock, n?u m y c?a b?n ?ang s? d?ng rom cook th c?n up v? rom stock tr??c
- Copy file Rom (update.zip) v…o b? nh? m y ho?c th? nh?
- Copy file Rom (update.zip) v…o b? nh? m y ho?c th? nh?
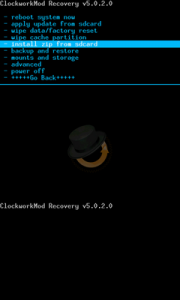
- V…o recovery, ch?n Install ch?n file rom update.zip
- Sau khi qu trnh c?p nh?t ho…n t?t ti?p t?c ch?n factory reset/wipe date ch?n Yes
- Sau ?¢ kh?i ??ng l?i l… ho…n t?t qu trnh c?p nh?t Android Lollipop cho Note 3 N900
3/ H??ng d?n root:
- Hi?n t?i m y c?a b?n ?Æ c¢ Recovery, v…o recovery b?ng t? h?p ph¡m: volumn + , home v… ngu?n
- V…o recovery, chon Install ch?n file UPDATE-SuperSU-v2.40.zip, k‚o thanh tr??t t? tr i qua ph?i, sau khi flash xong ch?n reboot system ?? kh?i ??ng l?i!
- Ho…n th…nh
Available link for download
Tuesday, March 14, 2017
Tips How to Overclock Your Rooted Android Phone
Tips How to Overclock Your Rooted Android Phone
How to Overclock Your Rooted Android Phone - One of the advantages of Android is the ability to overclock like a PC. This time we will share how to overclock. Keep in mind, if you do not dare to take risks overclock, then you should not try. Because overclocking can damage your Android device.
STEP ONE:
Rooting
Android root function is to give the user full rights to the Android to be able to get into the Android system. By doing root, the user can add, subtract or modify files or data that lies on the Android system when in the default state (not root) files are not accessible. If the analogy like the Windows computer operating system, Android root function is to give administrator privileges to the user.
By doing root on Android will not necessarily increase the performance or capabilities of Android phones. Rooting Android as "open the door" for you to develop the operating system.
Why Android operating system developers do not give root access since the beginning?
It aims to protect the Android operating system as a whole. If users accidentally or intentionally alter or eliminate one or more file systems, it can cause the performance of mobile phone or tablet to become unstable, corrupt, and most severe brick or mobile phone can not be lit. Therefore Android developers limit access to the file system.
STEP TWO:
Flash Custom Kernel
Kernel is a software which is a major part of an operating system. Their duties to serve a variety of application programs to access hardware safely.
Due to limited access to the hardware, while there is more than one program to be served at the same time, the kernel is also tasked to regulate when and how long a program can use one part of the hardware. For more details take a look at the picture below.

So the kernel, we can maximize and minimize our Android processor frequency. For example when we want to overclock your Android device, the first thing we do is change the default kernel with kernel that has been modified to be able to reach the highest point.
To replace the Kernel, you can replace it with a custom kernel that has been posted on XDA source. Make sure that you download the custom kernel according to your device. Because if not, then the device will occur immediately bootlop even brick.
To flash a custom kernel is quite simple. You simply go to the Custom Recovery as CWM or TWRP. Always the first thing to do is back up. To maintain if something unexpected happens to your device. Then later you can simply flashing via SDcard.
STEP THREE: Using the SET-CPU
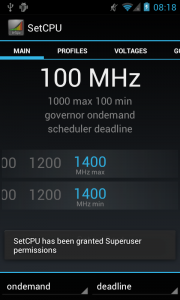
Tools used after flashing a custom kernel was to install SetCPU. SetCPU is a tool application to change the CPU settings (capable of overclock and underclock) on Android phones that have been in the position of "root", including the type of Galaxy Nexus, Nexus S, Motorola Droid, Nexus One, G1, G2, Samsung Galaxy S II, MyTouch 4G, Motorola Xoom, or one of the other devices to improve performance or save battery.
SetCPU also allows you to set up profiles to change the CPU speed under certain conditions, such as when the device is asleep or charging, when the battery level drops below a certain point, when the phone temperature is too high, or during certain time.
Comprehensive feature set SetCPU makes it useful for beginners and advanced level. Accelerate your processor to unlock the potential of your mobile phone to do multitasking, or make your CPU speed down to save battery.
SetCPU also includes a menu to set the "control voltage", available for certain devices with custom kernels that support it, to control undervolting, and to save more battery. Keep in mind that undervolting is only available for certain kernels.
How to use the SET-CPU
Select SPEED AUTO DETECT, if there is a notification root access, select ALLOW.
Then select and set the overclock to high frequency and low frequency as well (not too high or low).
After that select SET ON BOOT, when you turned on the Android gadgets, then this application will directly overclock your Android device.
SetCPU SetCPU Governors-Main-SetCPU-Voltages
STEP ONE:
Rooting
Android root function is to give the user full rights to the Android to be able to get into the Android system. By doing root, the user can add, subtract or modify files or data that lies on the Android system when in the default state (not root) files are not accessible. If the analogy like the Windows computer operating system, Android root function is to give administrator privileges to the user.
By doing root on Android will not necessarily increase the performance or capabilities of Android phones. Rooting Android as "open the door" for you to develop the operating system.
Why Android operating system developers do not give root access since the beginning?
It aims to protect the Android operating system as a whole. If users accidentally or intentionally alter or eliminate one or more file systems, it can cause the performance of mobile phone or tablet to become unstable, corrupt, and most severe brick or mobile phone can not be lit. Therefore Android developers limit access to the file system.
STEP TWO:
Flash Custom Kernel
Kernel is a software which is a major part of an operating system. Their duties to serve a variety of application programs to access hardware safely.
Due to limited access to the hardware, while there is more than one program to be served at the same time, the kernel is also tasked to regulate when and how long a program can use one part of the hardware. For more details take a look at the picture below.
So the kernel, we can maximize and minimize our Android processor frequency. For example when we want to overclock your Android device, the first thing we do is change the default kernel with kernel that has been modified to be able to reach the highest point.
To replace the Kernel, you can replace it with a custom kernel that has been posted on XDA source. Make sure that you download the custom kernel according to your device. Because if not, then the device will occur immediately bootlop even brick.
To flash a custom kernel is quite simple. You simply go to the Custom Recovery as CWM or TWRP. Always the first thing to do is back up. To maintain if something unexpected happens to your device. Then later you can simply flashing via SDcard.
STEP THREE: Using the SET-CPU
Tools used after flashing a custom kernel was to install SetCPU. SetCPU is a tool application to change the CPU settings (capable of overclock and underclock) on Android phones that have been in the position of "root", including the type of Galaxy Nexus, Nexus S, Motorola Droid, Nexus One, G1, G2, Samsung Galaxy S II, MyTouch 4G, Motorola Xoom, or one of the other devices to improve performance or save battery.
SetCPU also allows you to set up profiles to change the CPU speed under certain conditions, such as when the device is asleep or charging, when the battery level drops below a certain point, when the phone temperature is too high, or during certain time.
Comprehensive feature set SetCPU makes it useful for beginners and advanced level. Accelerate your processor to unlock the potential of your mobile phone to do multitasking, or make your CPU speed down to save battery.
SetCPU also includes a menu to set the "control voltage", available for certain devices with custom kernels that support it, to control undervolting, and to save more battery. Keep in mind that undervolting is only available for certain kernels.
How to use the SET-CPU
Select SPEED AUTO DETECT, if there is a notification root access, select ALLOW.
Then select and set the overclock to high frequency and low frequency as well (not too high or low).
After that select SET ON BOOT, when you turned on the Android gadgets, then this application will directly overclock your Android device.
SetCPU SetCPU Governors-Main-SetCPU-Voltages
Note: if you want to save battery life, you can minimize the processor clock and if you want to play heavy games you can increase the processor clock or you can also set automatically on SetCPU.
Available link for download
Saturday, March 11, 2017
Update Vine for Android Capture Widget Channels Revine and Camera Tools
Update Vine for Android Capture Widget Channels Revine and Camera Tools

The good news for you Android users Vine. Having recently Vine presents a number of updates for iOS, now owned video-sharing service Twitter also provide additional features in Android users, including camera tools, channels, Revine and many others.
But there is one feature that distinguishes Vine Android update with iOS, which capture widget that can be added to the home screen. This feature allows you to display the recording interface capture only the tap on the widget.
Like the iOS update, Vine for Android now also allows you to post Revine other users. There is also a new tool for recording, including grid, focus, and other enhancements. Not forgetting also channel support for browsing a specific topic, such as Sports, Family, Dogs, Cats and Other. Update is now available in the Google Play Store. Here is a complete list of updates:
- Browsing or submit a new post up to 15 channels
- Revining
- Share your favorite posts with followers in a single tap
- Capture Widget
- Capture new tools
- Camera new tools: focus, grid and ghost tools
Available link for download
Twitter 5 84 0 For Android
Twitter 5 84 0 For Android

Description:-
Find the best of Twitter in an instant with Moments. Follow top stories through immersive pics, clips, and conversations. Get insights and perspectives you wont find anywhere else.
Twitter is a free app that lets you connect with people, express yourself, and discover more about all the things you love.
Get breaking news. Stay informed with the local and global news that matters to you most, as it happens.
Go behind the scenes at exclusive events like the Oscars, the Emmys, the MTV VMAs and the World Cup.
Express yourself with text, photos, emoji, emoticons, video, GIFs and Vines.
Use hashtags (like #NFL) to find more Tweets about topics you love.
Get closer to people who interest you, including celebrities like Kim Kardashian, Harry Styles and Rihanna.
Share Tweets with apps like Facebook, Whatsapp, Kik, LINE, email and SMS.
Tweet links from sites like YouTube, Pinterest, Instagram, Spotify and Pandora.
Send a private message without limits: now youre no longer limited to 140 characters when writing a Direct Message.
Now its even easier to share a Tweet privately in a Direct Message. Simply press and hold the Tweet you want to share, then pick the people you want to send it to.
Version:-
5.84.0
Requirements:-
4.0.3 + or Up
File Size:-
21 MB
Previews:-


Download Link:-

Available link for download
Wednesday, March 8, 2017
Tips Mengatasi Force Close Pada Android
Tips Mengatasi Force Close Pada Android

Sistem operasi android merupakan sistem operasi multitasking yang memungkinkan pengguna dapat membuka aplikasi secara bersamaan, tapi sering terjadi beberapa masalah ketika user menjalankan aplikasi dan tiba-tiba keluar dengan sendirinya, Hal ini disebabkan beberapa faktor Diantaranya :
1, Aplikasi dalam Tahap beta.
2, Spesifikasi smartphone yang tidak mempuni.
3, Terlalu banyaknya cache yang tersimpan dalam aplikasi.
4, Koneksi internet yang tidak stabil.
Selain bebrapa penyebab diatas masih banyak hal lain tentunya yang menybabkan aplikasi dapat berhenti secara tiba-tiba, Untuk itu admin akan berbagi beberapa tips agar aplikasi yang kita gunakan dapat berjalan secara lancar.
Berikut adalah beberapa tips agar aplikasi yang terinstal pada Gadget bisa berjalan dengan baik.
1, Lakukan update pada aplikasi yang sering Force Close, jika aplikasi yang digunakan adal versi baru cobalah untuk menginstal aplikasi yang lebih lawas.
2, Pastikan selalu koneksi internet dalam keadaan lancar, Dengan koneksi yang tidak stabil smartphone dipaksa untuk dapat bekerja lebih keras.
3, Lakukan pembersihan Cache, Untuk dapat membersihkan Cache User dapat mendownload aplikasi Ccleaner di Play Store.
4, Melegakan penyimpanan internal pada smartphone.
5, Untuk pengguna yang menggunakan smartphone dengan spesifikasi terbatas dianjurkan untuk tidak terlalu banyak dalam menginstal aplikasi.
Tips kali ini semoga bisa bermanfaat bagi para pembaca, untuk tips dan trik lainnya bisa membuka halaman INI.
Available link for download
Tuesday, February 21, 2017
UC Browser Fast Download 10 4 1 For Android
UC Browser Fast Download 10 4 1 For Android

Description:-
Online videos without waiting Movies and TV shows in Speed mode.
Fast and stable downloads thanks to our powerful servers.
Expanding AdBlock adapted to main websites and blocks most ads.
Main Features:
Fast and stable navigation
With UC Browser does not have this history of "hang". Navigation a good flowing.
Fast mode
UC Browser compresses data, speeds up navigation and saves precious MBs of your internet package.
ADBlock
With helps from our users, UC Browser adBlock will block out most annoying Ads on Main sites.
Facebook mode
This unique feature speeds up Facebook. No matter the speed of your internet, UC Browser finds a way to increase the speed.
Smart Downloading
Our servers speed up and stabilize downloads. In addition, if any dropped connections UC Browser continues downloading from the breakpoint.
Video for all tastes
UC Browser will display any movie and TV series! The menu has categories with videos for all tastes: the humor, the clips, girls, anime, trailers and even war films.
Control Videos with Gestures
Volume, brightness, progress, etc. can all be controlled by gestures in UC Browser.
Night Mode
Switch to night mode to read more comfortably at night.
Version:-
10.4.1
Requirements:-
2.3 + or Up
File Size:-
15 MB
Previews:-


Download Link:-
Available link for download
Saturday, February 11, 2017
Tutorial Root Android Mudah dengan TowelRoot
Tutorial Root Android Mudah dengan TowelRoot
Tutorial Root automaton Mudah dengan TowelRoot
Anda ingin melakukan root di perangkat automaton Anda? Kini ADA cara mudah untuk melakukannya. Bila sebelumnya Anda harus mengikuti langkah-langkah principle cukup rumit, Anda mungkin harus mencoba TowelRoot.
Aplikasi semacam Framaroot. Jadi kita tidak perlu pot saat pengen ngurut eh nge-root! Tinggal klik, dan jadi deh! Towelroot ini cuma ADA satu tombol aja, setelah di klik tinggal tunggu sampai prosesnya selesai.
transfer Towelroot
Install TowelRoot
Open TowelRoot
Pilih tombol ?make it ra1n?
Tunggu sampai proses selesai dan jadi deh
Towelroot merupakan aplikasi gratis rule dikembangkan oleh GeoHot, seorang hacker rule dulu pernah membobol iPhone untuk pertama kalinya juga.
Nah buat kamu pengguna mechanical man khususnya device-device keluaran baru, dan kamu pengen nge-root tapi ternyata belum nemu cara rule praktis. Kamu bisa coba bureau aplikasi Towelroot. Tapi ingat ya, melakukan growth dan kegiatan-kegiatan oprek lain di mechanical man itu resikonya ditanggung sendiri. Jadi nanti kalau ADA apa-apa, jangan protes ke saya! Hape, hape siapa? rule oprek juga siapa? koq nyalahin Pongo pygmaeus lain :p
Available link for download
Monday, January 30, 2017
Update Android Market to Google Play Store
Update Android Market to Google Play Store
As we know Google has changed the name into Google Play Android Market. For Android mobile users, and are familiar with the Market place where we can download a variety of games and applications, from now on have to get used to calling it Google Play Store or simply by calling Play Store or Google Play
So, if anyone asks whether Google Play it? The answer of course Google Play is a place where we can download a variety of games and applications, Play Store is the latest name for the Android Market.
For Android phone users, just wait for the Android Market will automatically be updated automatically into Google Play Store. Well, what if you are impatient, and want to get Google Play Store today. With a little trick we can update the Android Market to Google Play Store!
First go to the menu Settings - Application - Manage Application. Then find Application Market, after the meet, touch or tap the Market. When you get to Properties Market, you have to do is Clear Data and Clear Cache.

Once you do the Clear Data and Clear Cache, then run the Market app. You will get a screen like below. Upon entry to the Market, wait a while (5-15 minutes depending on the speed of your mobile internet connection), which is automatically updated Android Market and youll turn into Google Play. Let me not be annoyed while awaiting the update, you can run other applications.
When the update is complete, you will get a Play Icon Store (Pocket Colour White with logo Play) replaces the Market icon on your Android phone.

This is the first appearance of the Google Play Store on your Android phone after the process is complete Market Update.
For menu Google Play Store, the Android Market is actually similar to, this of course could be because it has changed its name wrote that from the Android Market to Google Play Store.

Available link for download
Wednesday, January 25, 2017
Tips Presenting LCD Retro Theme in Android
Tips Presenting LCD Retro Theme in Android
Still remember the LCD screen of mobile phone products in the late 90s? If yes, and you do a flashback of development over the last 20 years, the LCD screen on a smartphone today could be considered a miracle in itself.
LCD display screen in the 90s is very simple, with no variation in color except black and gray. If you are someone who is spirited and loved the simplicity of the retro design of the past, a YouTube user with the ID z3u5 recently posted a video tutorial to bring the classic LCD theme for Android users, and it looks very cool guaranteed (at least, for fans of theme retro of course).
This classic theme can be presented through a launcher like Nova, ssLauncher, and also Go Launcher. You need to download resource packs of MyColorScreen first, and then use the theme and background contained in it in the launcher of your choice. Icon pack that is going to bring you a list of the applications you need, with the added note only slight adjustments. Not all themes will have a classic-style text LCD, so you may also need removing icon labels as well if you do not want this classic effect broken zoom.
LCD theme also comes with a number of skins for UCCW Elixir 2 widgets and system information widgets. To understand the application process, go see the video below. Some parts might be a bit tricky as changing the icon for the shortcut, but the result is guaranteed to satisfy you.
To download a needed resource pack, click the following links:
- Ultimate custom widgets (UCCW)
- Elixir 2 - Widgets
- Elixir 2
Available link for download
Friday, January 20, 2017
Tidak Punya Gadget android PC Pun Jadi
Tidak Punya Gadget android PC Pun Jadi

Mungkin tidak semua dari kita yang sempat membeli atau mencoba Device android, bisa jadi karna Faktor dana atau memang belum ada niat untuk membelinya. Selain itu bisa juga karna ingin mencoba menjalankan aplikasi android di sebuah PC sehingga kita tidak perlu atau harus membawa Device android untuk menjalankan hal-hal yang dianggap perlu di Device android. Untuk menjalankannya di PC kita bisa menggunakan emulator android, ada dua emulator yang terkenal yaitu Youwave dan BlueStacks. Kami yakin yakin banyak dari pembaca yang sudah tau dan bahkan mencoba software ini, tapi tidak ada salahnya kita membahas ulang tentang hal ini,sehingga para pembaca yang lain yang belum mengetahui bisa mencoba tips ini.
Selanjutnya¯
Available link for download
Wednesday, January 18, 2017
Whatsapp Plus V2 22 Apk For Android Latest Free Download
Whatsapp Plus V2 22 Apk For Android Latest Free Download
Whatsapp Plus V2.22 Apk For Android 2015 Free Download Full Version [Latest]
 Welcome to All Crack Free Download. Today we share v2.22 apk free whatsapp plus free 2015 edition. It is the most sought whatsapp plus apk v2.22 download on the internet now. We received a lot of messages from our daily visitors to upload a new apk whatsapp plus 2015 v2.22 for android free. So here at last on special request we introduce new whatsapp plus apk v2.22 2015. This is a working v2.22 apk free whatsapp plus is available on All Crack Free Download. It is very easy to use this whatsapp plus apk v2.22 Download.
 We have attached files with whatsapp instruction plus apk v2.22 for android in 2015. Prior to running this application, first you need to read all whatsapp plus apk v2.22 2015 Directive. This v2.22 apk free whatsapp plus completely virus free. Bookmark this page to get the latest updates on whatsapp plus apk v2.22 Download.

Whatsapp Plus V2.22 for Android APK 2015

Whatsapp Plus V2.22 Apk Download 2015 Key and Features:
- COLORFUL
- EXTRA UPLOAD LIMIT
- PIC SEND ORIGINAL
- FREE AD
- STOCK FAST
- PARTIAL COPY / PASTE
- WATCH STATUS
- HIDE PROFILE PICTURE
- LOAD THEME
- NO BAN
Whatsapp Plus V2.22 Apk 2015 Instructions:
- First temporary disable your anti-virius because anti-virius prevent crack file to install
- Download full version software live installer package from the below link
- Now open the file and run client installer .exe file (crack file is included into the package)
- Keep doing next and allow all programs by clicking yes until installation complete
Dont forget to run live installer after download

Download Whatsapp Plus V2.22 Apk Free 2015
Note: This full version live installer package has made for complete PC installation with cracked file without any survey exclusive on All Crack Free Download. The above given whatsapp plus apk v2.22 for android in 2015 is given on special request of our visitors. We have shared this apk v2.22 whatsapp plus there is a survey freed. If you like this whatsapp plus apk v2.22 for android 2015 then you can share with your friends. Bookmark it to get the latest updates on whatsapp plus apk v2.22 2015.
Available link for download
Tweak Audio Engines Untuk Semua Perangkat Android
Tweak Audio Engines Untuk Semua Perangkat Android

Syarat:
Sudah ROOT
Sudah terpasang cwm/twrp,dll
Terinstall aplikasi Terminal Emulator (di playstore ada)
1. Pure Audio Engine

Bahan:
download DISINI
Cara pasang:
- Download bahan di atas
- Masuk ke mode recovery
- Flash bahan di atas
- Reboot
2. Awesome Beats Audio Engine

Bahan:
download DISINI
Cara pasang:
- Download bahan di atas
- Masuk ke mode recovery
- Flash bahan di atas
- Pilih Base Rom yg kalian pakai
- Reboot
- Buka aplikasi Terminal Emulator
- Tulis
Terima Kasih Anggota XDA :
Jeeko- Creator Of Pure Audio Engine...Awesome...- Creator Of Awsome Beats Audio Engine
Jika tweak di atas kurang memuaskan, sobat bisa pakai dolby atmos,viper4android,dll
Available link for download
Tuesday, January 10, 2017
Tips Android Accelerate the search via Google Search
Tips Android Accelerate the search via Google Search

A number of users sometimes complain that even if they had advanced Android smartphone and have subscribed to unlimited internet package, but do a search via Google Search is also very long. If you are tired of seeing the spinning loading circle endlessly, there is an easy trick to speed up the process.
The main cause of the slow process of setting was allegedly Search Applications Provider in Android, which uses a reference from the list of applications you have in your smartphone to be used as the basis of the search. To fix this, you can simply disable the feature. The trick? Immediately, access Settings - Apps - All - Search Applications Provider, then check the option to disable the app, and finish. Easy, is not it?
Features Search Applications Provider may still not be optimized to the maximum. A bug has been identified and presented on the issue tracker, but Jean Baptiste Queru aka AOSP JBQ as the boss still has not agreed that the bug is entered into the realm of AOSP.
Some people may complain that it get a new problem when disable Search Applications Provider, but the trick proved successful when tested by the Android Police team. If you are ready to risk it, just try this trick on your Android smartphone.
Available link for download
Friday, January 6, 2017
Trik Rahasia Menyadap Android Orang Lain Tanpa diketahui
Trik Rahasia Menyadap Android Orang Lain Tanpa diketahui
Dalam kesempatan kali ini, Room Rom akan memberikan tips yang sangat rahasia untuk Menyadap Smartphone Android orang lain tanpa diketahui pemiliknya. Penasaran bukan?? Siap-siap deh buat menyimaknya.. Trik ini akan sangat membantu buat Anda yang sering curiga dengan aktivitas Pacar/istri ataupun ingin mengawasi pemakaian smartphone pada Anak Anda. Ingat!! Jangan gunakan untuk melakukan sesuatu yang dapat merugikan orang lain. Gunakanlah tips berikut untuk kebaikan.

Trik Rahasia Menyadap Android Orang Lain Tanpa Diketahui :
Langkah pertama (Install Aplikasinya di Android)
- Install Aplikasinya pada Android yang akan disadap di situs berikut ini www.thetruthspy.com

- Buka Aplikasi yang barusan sudah terinstall, kemudian Buat akun baru (jika belum punya akun) dengan memilih Register New Account. Masukkan Alamat email dan password.

- Kemudian Halaman Device Administrator akan terbuka. Tap Activate untuk mengaktifkan.
- Aplikasi Truth Spy sekarang telah terinstall dan semua aktivitas akan terupload ke situs http://my.thetruthspy.com/ . Untuk menyembunyikan Aplikasi truth spy tekan menu configuration kemudian pilih hide icon truth spy

- Untuk memunculkan kembali aplikasi truth spy, Tekan #2013* kemudian call
- Buka situs http://my.thetruthspy.com/
- Sign in dengan akun yang tadi sudah login di Android Korban. Masukkan email dan password

- Untuk Versi standard, Anda hanya akan mendapatkan fitur GPS History, SMS, Call History, dan Auto Answer. Untuk mendapatkan versi penuh seperti monitoring whatsapp, line, browser, dll. Anda harus mengeluarkan biaya sesuai dengan paket yang tersedia. Premium Fitur dan Gold Fitur.

- Di bagian SMS, Anda akan melihat isi pesan yang ada dalam inbox korban
- Di bagian Call History, Anda akan melihat list panggilan masuk dan panggilan keluar.
- Dan yang terakhir GPS history akan bisa lihat history lokasi dari Android korban.
Available link for download
Thursday, December 29, 2016
Tango 3 14 134034 For Android
Tango 3 14 134034 For Android

Description:-
Make free voice and video calls. Send free text messages and share photos, videos, and status updates.Swipe profile cards or join a trending conversation to make new friends near and far. Over 300 million people use Tango to connect with people nearby and around the world.
Stay in touch with family and friends?the free way
Make free calls
Top-quality video calls
Save your minutes: Tango calls are outside of your carrier?s voice plan
Call any phone
Share photos, news, and status updates and see updates from others
Send text messages and create group chats
Works over Wi-Fi so you avoid using data
Personalize your messages by adding videos or fun stickers and emoji
Make new friends?nearby or around the world
Swipe through profile cards to discover new people
See what you have in common
Save interesting people to Favorites
Start a chat
Join a conversation
From movies to mountain climbing, there?s a group chat for you. Come see what people are saying.
Play a game
Road Riot. Jewel Raiders. Toon Squad. Challenge your friends to one of 15+ games.
11 in-call games including Tic Tac Toe and Checkers
Version:-
3.14.134034
Requirements:-
3.0 + or Up
File Size:-
27 MB
Previews:-


Download Link:-
Available link for download
Subscribe to:
Posts (Atom)