Showing posts with label your. Show all posts
Showing posts with label your. Show all posts
Monday, March 20, 2017
Store Your Data Offsite with Cloud
Store Your Data Offsite with Cloud
Data storage and backup is vital to the smooth and efficient running of any business, but a lot of companies and IT managers make a number of routine mistakes when it comes to backing up data. Key among these is the propensity to use complicated backup systems that require constant management. The cost of maintaining a dedicated staff solely for the purpose of protecting your data systems can become expensive. However, it is not absolutely necessary to back up your data systems onsite. The runaway train of technological innovation has made it possible to safely back up your data without needing to resort to multiple pieces of storage hardware. Cloud backup services have a number of advantages over more traditional backup systems, including safe and reliable data encryption and the ability to sync your data to both mobile and web devices. With easy access and a lower overhead, Cloud backup services are undeniably the best solution for all your data storage needs.

Created by Metiix. Metiix specializes in accelerated data recovery.
Share this Image on your site:
Available link for download
Tuesday, March 14, 2017
Tips How to Overclock Your Rooted Android Phone
Tips How to Overclock Your Rooted Android Phone
How to Overclock Your Rooted Android Phone - One of the advantages of Android is the ability to overclock like a PC. This time we will share how to overclock. Keep in mind, if you do not dare to take risks overclock, then you should not try. Because overclocking can damage your Android device.
STEP ONE:
Rooting
Android root function is to give the user full rights to the Android to be able to get into the Android system. By doing root, the user can add, subtract or modify files or data that lies on the Android system when in the default state (not root) files are not accessible. If the analogy like the Windows computer operating system, Android root function is to give administrator privileges to the user.
By doing root on Android will not necessarily increase the performance or capabilities of Android phones. Rooting Android as "open the door" for you to develop the operating system.
Why Android operating system developers do not give root access since the beginning?
It aims to protect the Android operating system as a whole. If users accidentally or intentionally alter or eliminate one or more file systems, it can cause the performance of mobile phone or tablet to become unstable, corrupt, and most severe brick or mobile phone can not be lit. Therefore Android developers limit access to the file system.
STEP TWO:
Flash Custom Kernel
Kernel is a software which is a major part of an operating system. Their duties to serve a variety of application programs to access hardware safely.
Due to limited access to the hardware, while there is more than one program to be served at the same time, the kernel is also tasked to regulate when and how long a program can use one part of the hardware. For more details take a look at the picture below.

So the kernel, we can maximize and minimize our Android processor frequency. For example when we want to overclock your Android device, the first thing we do is change the default kernel with kernel that has been modified to be able to reach the highest point.
To replace the Kernel, you can replace it with a custom kernel that has been posted on XDA source. Make sure that you download the custom kernel according to your device. Because if not, then the device will occur immediately bootlop even brick.
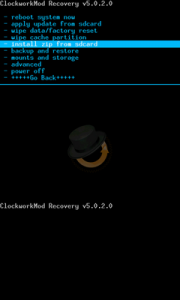
To flash a custom kernel is quite simple. You simply go to the Custom Recovery as CWM or TWRP. Always the first thing to do is back up. To maintain if something unexpected happens to your device. Then later you can simply flashing via SDcard.
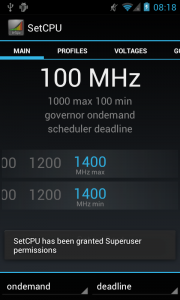
STEP THREE: Using the SET-CPU
Tools used after flashing a custom kernel was to install SetCPU. SetCPU is a tool application to change the CPU settings (capable of overclock and underclock) on Android phones that have been in the position of "root", including the type of Galaxy Nexus, Nexus S, Motorola Droid, Nexus One, G1, G2, Samsung Galaxy S II, MyTouch 4G, Motorola Xoom, or one of the other devices to improve performance or save battery.
SetCPU also allows you to set up profiles to change the CPU speed under certain conditions, such as when the device is asleep or charging, when the battery level drops below a certain point, when the phone temperature is too high, or during certain time.
Comprehensive feature set SetCPU makes it useful for beginners and advanced level. Accelerate your processor to unlock the potential of your mobile phone to do multitasking, or make your CPU speed down to save battery.
SetCPU also includes a menu to set the "control voltage", available for certain devices with custom kernels that support it, to control undervolting, and to save more battery. Keep in mind that undervolting is only available for certain kernels.
How to use the SET-CPU
Select SPEED AUTO DETECT, if there is a notification root access, select ALLOW.
Then select and set the overclock to high frequency and low frequency as well (not too high or low).
After that select SET ON BOOT, when you turned on the Android gadgets, then this application will directly overclock your Android device.
SetCPU SetCPU Governors-Main-SetCPU-Voltages
STEP ONE:
Rooting
Android root function is to give the user full rights to the Android to be able to get into the Android system. By doing root, the user can add, subtract or modify files or data that lies on the Android system when in the default state (not root) files are not accessible. If the analogy like the Windows computer operating system, Android root function is to give administrator privileges to the user.
By doing root on Android will not necessarily increase the performance or capabilities of Android phones. Rooting Android as "open the door" for you to develop the operating system.
Why Android operating system developers do not give root access since the beginning?
It aims to protect the Android operating system as a whole. If users accidentally or intentionally alter or eliminate one or more file systems, it can cause the performance of mobile phone or tablet to become unstable, corrupt, and most severe brick or mobile phone can not be lit. Therefore Android developers limit access to the file system.
STEP TWO:
Flash Custom Kernel
Kernel is a software which is a major part of an operating system. Their duties to serve a variety of application programs to access hardware safely.
Due to limited access to the hardware, while there is more than one program to be served at the same time, the kernel is also tasked to regulate when and how long a program can use one part of the hardware. For more details take a look at the picture below.
So the kernel, we can maximize and minimize our Android processor frequency. For example when we want to overclock your Android device, the first thing we do is change the default kernel with kernel that has been modified to be able to reach the highest point.
To replace the Kernel, you can replace it with a custom kernel that has been posted on XDA source. Make sure that you download the custom kernel according to your device. Because if not, then the device will occur immediately bootlop even brick.
To flash a custom kernel is quite simple. You simply go to the Custom Recovery as CWM or TWRP. Always the first thing to do is back up. To maintain if something unexpected happens to your device. Then later you can simply flashing via SDcard.
STEP THREE: Using the SET-CPU
Tools used after flashing a custom kernel was to install SetCPU. SetCPU is a tool application to change the CPU settings (capable of overclock and underclock) on Android phones that have been in the position of "root", including the type of Galaxy Nexus, Nexus S, Motorola Droid, Nexus One, G1, G2, Samsung Galaxy S II, MyTouch 4G, Motorola Xoom, or one of the other devices to improve performance or save battery.
SetCPU also allows you to set up profiles to change the CPU speed under certain conditions, such as when the device is asleep or charging, when the battery level drops below a certain point, when the phone temperature is too high, or during certain time.
Comprehensive feature set SetCPU makes it useful for beginners and advanced level. Accelerate your processor to unlock the potential of your mobile phone to do multitasking, or make your CPU speed down to save battery.
SetCPU also includes a menu to set the "control voltage", available for certain devices with custom kernels that support it, to control undervolting, and to save more battery. Keep in mind that undervolting is only available for certain kernels.
How to use the SET-CPU
Select SPEED AUTO DETECT, if there is a notification root access, select ALLOW.
Then select and set the overclock to high frequency and low frequency as well (not too high or low).
After that select SET ON BOOT, when you turned on the Android gadgets, then this application will directly overclock your Android device.
SetCPU SetCPU Governors-Main-SetCPU-Voltages
Note: if you want to save battery life, you can minimize the processor clock and if you want to play heavy games you can increase the processor clock or you can also set automatically on SetCPU.
Available link for download
Thursday, March 9, 2017
What To Do If Your Hotmail Account Gets Hacked
What To Do If Your Hotmail Account Gets Hacked

Steps To Be Taken By You Once You Find Out Your Hotmail Account Is Hacked :
Now that you have a strong idea that your Hotmail account has been hacked, you shall need to take immediate steps to retrieve the situation. We present a list of immediate actionable steps to be taken by you. However, before we go into the details, in case of any confusion in following the instructions given by us, we advise you to please use the Hotmail customer service contact number and get the help of the Microsoft service team to help deal with the problem.Step 1 : Free Your PC From Malware Or Virus
Download and install a reputed anti-virus and anti-malware system such as the Microsoft Security Essentials (for a Windows 7 operating system) and Microsoft Defender ( for a Windows 8 operating system). Make certain of running a full scan of your system. And only after that, change your Hotmail account password.Step 2 : Reset Your Hotmail Account Password
Once you have fully completed the scanning of your system, log in to your Hotmail account and reset your password. While selecting a new password, you shall need to make completely sure that you use something that is totally different from the old one. Please do not use any of the commonly used passwords that may be found in many accounts, such as "passwd" or "admin". Use something much more complicated. Make use of capital letters, symbols, lower case letters and numbers. But do make sure that this new password may be easily remembered by you. Run your password through Microsofts password checker to make sure it has never been used before by anyone. And once set, make sure of changing your password at regular intervals.Step 3 : Change Your Account Settings
Make sure of resetting your Hotmail account settings. Click on the "more mail settings" field in the "Options" tab and follow the instructions given on how to reset the various options available in your Hotmail account.Step 4 : Get Back The Deleted Mail
One of the most important signs that your Hotmail account has been hacked is the sheer number of deleted mail. Once the Microsoft mail server has an inkling that your account is being hacked, it saves all the deleted mail in a special "Deleted" folder. Click on this folder, and opt for for "restore deleted mail" option. Now you are good to go!Summary:
Hacking of the Hotmail account of private individuals is a serious problem that has become very common of late. The first step in dealing with it is to check for the signs that tell you whether your Hotmail account has been hacked or not. Then the instructions given in this article should be followed step by step to help in retrieving the situation.Image Credit: Stuart Miles
Author Bio:
Smith is a professional programmer from NewYork , who has often been the victim of a Hotmail hack, and has found using the Hotmail customer service contact number a mighty useful way to deal with this mini-crisis. Besides helping out people who are under attack from dangerous hackers, He dabbles in photography and hates global warming.Available link for download
Tuesday, March 7, 2017
What is Safe Mode and How to start your Mac in Safe Mode
What is Safe Mode and How to start your Mac in Safe Mode
You can use safe mode to help you resolve issues that might keep your Mac from completely starting up.
What is safe mode?
Safe mode (sometimes called safe boot) is a way to start up your Mac so that it performs certain checks, and prevents some software from automatically loading or opening. Starting your Mac in safe mode does the following:
What is safe mode?
Safe mode (sometimes called safe boot) is a way to start up your Mac so that it performs certain checks, and prevents some software from automatically loading or opening. Starting your Mac in safe mode does the following:
- Verifies your startup disk, and attempts to repair directory issues if needed
- Only essential kernel extensions are loaded- (a.k.a. ketxs, or hardware and software drivers), No third party items
- Prevents Startup Items and Login Items from opening automatically
- Disables user-installed fonts
- Deletes font caches, Kernel cache and other system cache files
- Together, these changes can help resolve or isolate issues related to your startup disk.
And its very simple to start your Mac in Safe Mode, either using your keyboard or by entering a command in Terminal.We will learn different way of starting your Mac in Safe Mode later in this post.
When and why should we start Mac in Safe Mode?
When you have some problem with your mac the first troubleshooting you do is restart the Mac.
Most of the time, your Mac just works after restarting.
But there will be times when a rogue app, a misbehaving service, outdated caches and other issue will cause your Mac to slow, stop starting up or exhibit other unwanted symptoms. Thankfully, Apple has provided a way to boot OS X in Safe Mode.
Although booting in Safe Mode on a daily basis?or whenever an insignificant problem arises? isn?t recommended, there are definitely instances when starting up in Safe Mode could be your last resort.
Here are some of the typical scenarios:
If your Mac doesn?t finish starting up?Certain issues might keep your Mac from completely starting up and using Safe Mode can help you resolve them.
If an app is causing issues? An app you recently installed might be the culprit, especially if it came outside the Mac App Store. Starting up in Safe Mode might help isolate the misbehaving app as it prevents certain software from automatically loading or opening.
If your Mac is running slow? Just like Windows, your Mac also creates temporary files and various caches over time which might slow down the overall performance of the operating system and apps. These unnecessary files are safely cleaned from Mac when started in safe Mode.
If your Mac has directory issues?Many, but not all issues with your Mac?s startup disk can be resolved using the built-in Disk Utility application. If you?re plagued with an issue that cannot be reproduced in Safe Mode but appears to be resolved when you start up normally, chances are it was caused by a cache or a directory issue with your startup disk that Safe Mode fixed.
How to Start your Mac in Safe Mode?
Starting up in safe mode
- Follow these steps to start up into safe mode.
- Start or restart your Mac.
- Immediately after you hear the startup sound, press and hold the Shift key.( Note:- If you are using a Wireless Keyboard,Make sure you press the Shift Key immediately after you hear the start up chimes sound.Bluetooth controllers will only activate after the startup chimes sound, so if the key is held before this, the key press will not be recognized. ).
- Release the Shift key when you see the Apple logo appear on the screen.
- After the Apple logo appears, it might take longer than usual to reach the login screen or your desktop. This is because your Mac performs a directory check of your startup disk as part of safe mode.

Start your Mac in Safe Mode - To leave safe mode, restart your computer without pressing any keys during startup.
 |
| Start your Mac in Safe Mode |
If youre using FileVault
If your startup disk is encrypted with FileVault, you can still hold down the Shift key immediately after powering on your Mac to start up in safe mode. You might be prompted to log in twice as part of this process ? first to unlock the startup disk, and a second time to log into the Finder. You can let go of the Shift key after you see the first login screen.
If an issue doesnt happen in safe mode
If an issue doesnt happen when your Mac is started in safe mode, try restarting again without pressing any keys at startup. If the issue appears to be resolved when you start up normally, it was possibly caused by a cache or a directory issue with your startup disk that safe mode fixed.
If you restart your Mac normally and an issue comes back when you reach your desktop, try disabling any login items that automatically open when you log in.
If your Mac restarts or shuts down in safe mode
If your Mac automatically restarts in safe mode, OS X might have found an issue that its trying to fix.
Safe mode performs a directory check of your startup disk, similar to what happens when you choose to verify or repair a disk using Disk Utility. If OS X finds an issue, the directory on your startup disk is repaired and your Mac restarts.
If your Mac turns itself off when you start up in safe mode, check the power connection on your Mac to make sure its plugged in securely at both your Mac and the power outlet. If youre using a MagSafe power adapter, make sure the LED on your power adapter is yellow or green. Then, try starting up in safe mode again.
If your Mac repeatedly restarts or shuts down during safe mode, contact Apple Support, or consult with an Apple Authorized Service Provider or Apple Genius for more help.
Is your Mac taking longer than usual to boot in Safe Mode?
This is normal.Your Mac performs a directory check of your startup disk as part of Safe Mode so it will take a significantly longer time than usual to reach the login screen or the desktop
3 ways of identifying if you?re started in Safe Mode
If you?re unsure as to whether or not you?re in Safe Mode, take note of the following signs that give it away.
1. Menu bar reads ?Safe Boot?
 |
| Start your Mac in Safe Mode |
The first indication that you?re starting up in Safe Mode appears when you land on the login screen. If you?re in Safe Mode, the words ?Safe Boot? in red letters will appear in the menu bar in the upper right corner of the screen.
2. Slower overall performance
Past the login screen, you?ll notice slower overall performance. Graphics will no longer be accelerated as default drivers are loaded. The OS X menus, windows and the Dock appear solid even if Translucent Menu Bar is selected in System Preferences.
Your screen might blink or tear during the login process. OS X menus, the Dock, your desktop and other aspects of the user interface won?t have as many visual effects and translucency will be disabled.
And as mentioned further below, several OS X features might be unavailable to you in Safe Mode, like watching movies in the DVD Player app, capturing video, connecting to Wi-Fi networks and more.
3. Boot Mode in System Information reads ?Safe?
 |
| Start your Mac in Safe Mode |
Another method of determining the status of your boot mode involves using the System Information application.
Step 1: Open System Information from Applications > Utilities. You can also choose About This Mac from the Apple menu and then click the System Report button in the Overview section.
Step 2: In the lefthand column, locate and click the Software section. You should see a couple related items listed on the right side of the System Information window.
If the Boot Mode is listed as ?Safe? you?re started in Safe Mode. If it reads ?Normal,? you?re in OS X?s normal-boot mode.
Some features arent available in safe mode
Some features of your Mac arent available when its started in safe mode, so after youre done using safe mode you should restart your computer normally.
For example, these features dont work in safe mode:
- You cant play movies in DVD Player.
- You cant capture video in iMovie and some other video apps.
- Some audio input or output devices might not work.
- Some USB, FireWire and Thunderbolt devices might not be available.
- Wi-Fi networking might be limited or unavailable depending on the Mac and OS X version youre using.
Safe mode in OS X v10.5 or later also disables accelerated graphics. This makes the OS X menu bar appear solid even if "Translucent Menu Bar" is selected in System Preferences. Your screen might also "blink" or "tear" during login when your Mac is started in safe mode.
Safe mode in OS X v10.6 or later also disables File Sharing.
Starting in safe mode without a keyboard
If your Mac doesnt have a keyboard available to start in safe mode but you have remote access to it, you can configure the Mac to startup in safe mode using the command line.
Access the command line by either opening Terminal remotely, or by logging into the computer using SSH.
Use the following Terminal command and restart your Mac:
sudo nvram boot-args="-x"
 |
| Start your Mac in Safe Mode |
Unfortunately it is a bit difficult to see if this is the case when the system is only displaying a gray progress bar; however, you can force the system to show you what is going on by having it boot to both Safe and Verbose modes at the same time.If you want to start in verbose mode as well, use this instead:
sudo nvram boot-args="-x -v"
To restart your Mac normally from Safe Mode.After using safe mode, use this Terminal command to return to a normal startup:
sudo nvram boot-args=""
 |
| Start your Mac in Safe Mode |
Note :- You can replace the "v" with an "s" to tell it to use "Single User mode" instead (they should be equivalent for this purpose):
sudo nvram boot-args="-x -s"
Incoming Search Terms
Mac in Safe Mode
Safe mode command for Mac
how to start mac in safe mode
mac verbose safe mode
single user mode
repair mac in safe mode
Safe Mode fix many issue in Mac
Restart in normal mode from safe mode
Mac always start in safe mode
Restart in normal mode from safe mode
Mac always start in safe mode
Available link for download
Wednesday, February 1, 2017
Test your Hard drive for errors and problems before you lose your important files
Test your Hard drive for errors and problems before you lose your important files
Hard Drive Testing Tools
Your hard drive is the most important hardware in your computer, it keeps all of your files, Pictures,documents,Music, Movies and everything on your computer so it is a wise decision to keep checking your Hard drive before it fails.There are multiple hard drive testing software available in the market but few of them are reliable and famous.
Some of these tools may be built in to your operating systems already while others are available from hard drive manufacturers that you can download from their website.
Some of the computer manufacturers ship your computer with this Hardware diagnostic tools or hard drive diagnostic tool preinstalled which you can use to test the hard drive.Some of the computers have a built in S.M.A.R.T ( Self-Monitoring, Analysis and Reporting Technology often written as SMART) test which test the functionality and reliability of Hard Drive.It detects and report on various indicators of reliability, in the hope of anticipating failures.
Replace your hard drive if it fails any of your tests.
Windows operating system has its own Error checking tool that you can use to check any errors on hard drive and fix it if fixable.To run windows hard drive error checking tool go to my computer and right click on any of the drive and select properties.It will open drive properties window, Click on Tools tab, then Click on Check Now under Error Checking as shown below.
It will open another small window as shown in the Picture 21 (c) below so make sure the option " Scan for and attempt recovery of bad sectors " is checked and then click on the start button to run the scan.
It will start the scan for hard drive and will show you messages as shown below.
Once all the scan is completed it will show you the result or a message that No problems were found as shown in the picture -21(e) below.
Now there is one third party free ware utility that you can use to test your hard drive.
HDDScan - Its a free hard drive testing program for all types of drives ( RAID arrays, Flash USB and SSD drives are also supported ), no matter who the manufacturer is.
It has several tools included such as SMART and a surface test.It can test storage device for errors (Bad-blocks and bad sectors), show S.M.A.R.T. attributes and change some HDD parameters such as AAM, APM, etc.
Additionally, software can be used as the hard disk temperature monitor and reading/writing benchmark ? performance graph is displayed for every test.
You can download HDDScan from the download section on this blog or download from the following link.
Your hard drive is the most important hardware in your computer, it keeps all of your files, Pictures,documents,Music, Movies and everything on your computer so it is a wise decision to keep checking your Hard drive before it fails.There are multiple hard drive testing software available in the market but few of them are reliable and famous.
Some of these tools may be built in to your operating systems already while others are available from hard drive manufacturers that you can download from their website.
Some of the computer manufacturers ship your computer with this Hardware diagnostic tools or hard drive diagnostic tool preinstalled which you can use to test the hard drive.Some of the computers have a built in S.M.A.R.T ( Self-Monitoring, Analysis and Reporting Technology often written as SMART) test which test the functionality and reliability of Hard Drive.It detects and report on various indicators of reliability, in the hope of anticipating failures.
Replace your hard drive if it fails any of your tests.
 |
| Pic-21(a) |
 |
| Pic-21 (b) |
 |
| Pic-21(c) |
 |
| Pic-21(d) |
Once all the scan is completed it will show you the result or a message that No problems were found as shown in the picture -21(e) below.
 |
| Pic-21(e) |
Now there is one third party free ware utility that you can use to test your hard drive.
HDDScan - Its a free hard drive testing program for all types of drives ( RAID arrays, Flash USB and SSD drives are also supported ), no matter who the manufacturer is.
It has several tools included such as SMART and a surface test.It can test storage device for errors (Bad-blocks and bad sectors), show S.M.A.R.T. attributes and change some HDD parameters such as AAM, APM, etc.
Additionally, software can be used as the hard disk temperature monitor and reading/writing benchmark ? performance graph is displayed for every test.
You can download HDDScan from the download section on this blog or download from the following link.
Download HDDScan
Available link for download
Tuesday, January 10, 2017
Top 5 Free Methods to Make Your Computer Faster
Top 5 Free Methods to Make Your Computer Faster
If your computer runs slowly during start-up or while running application programs or browsing websites, it is possible to make it run faster even using very simple methods. You can make your computer faster by applying very simple techniques or methods. Here I am going to describe those methods along with their steps to perform it. Follow these methods and feel your computer is running faster then before.
# Delete Temporary Files
If there are lots of temporary files are stored on computer, may slow down your computer. So it may be helpful to increase the speed of your computer, if it has been deleted. Here are the steps to delete temporary files from your computer.
- At first, go to Run from start menu and type "%temp%" on it and click on OK. Then the following window will appear, delete them by selecting All.

#Remove Unnecessary Programs From Startup
The application programs which are placed on startup runs while starting your computer, which may slow down your computer. You can remove unnecessary programs from startup using the steps given below.
- Right click on Task bar and click on task manager as given below.

- Then Task manager dialog box will appear, click on startup tab where the programs are listed which are placed on startup. Click on the program which you dont want to run on starting and then click on Disable button.

# Empty Your Recycle Bin and Clear Your Desktop
Deleting items from recycle bin and removing unnecessary files from desktop also helps to improve the speed of you computer.
To make your recycle bin empty, go to recycle bin which is located on desktop and go to Manage tab and click on "Empty recycle bin".

# Uninstall Unnecessary Application Programs
You can also make your computer faster by uninstalling unnecessary application programs from your computer.
To uninstall programs from your computer, at first go to control panel and click on uninstall program located under programs, select the required program you want to uninstall and click on uninstall as given below.

# Delete Browsing History and Internet Cookies
Deleting browsing history and internet cookies also helps to improve the speed of your computer. Here are the steps to delete browsing history from your computer.
- To remove history and cookies from Mozilla firefox, go to menu and click on history button as given below.

- Then clear history dialog box will appear, select everything to clear and click on Clear now button.

- To remove history and cookies from Google chrome, go to menu and click on history button, then the following dialog box will appear "select the beginning of time" and click on clear browsing data as given on image below.

Related Posts
How to make USB boot drive to Install Windows ?
How to Keep Computer from Sleeping
Top 5 Free Methods to Make Your Computer Faster
How to Know Your Computer Configuration Easily
Top 10 Questions that Computer Beginner may Asked
How to Manage Drives Using Drive Tools
How to Share Printer for Computers on LAN
What are the Basic Components of operating Systems.
How to Share Drive Folder and File in Computer Network
What is Cyber Crime and What are the types?
What is intellectual property law?
What is literal and non-literal copying of computer programs?
Available link for download
Sunday, January 1, 2017
Upgrade to a new hard drive on your MacBook Pro and clone OSX and BootCamp
Upgrade to a new hard drive on your MacBook Pro and clone OSX and BootCamp
***DISCLAIMER...Its your fault if you screw up your system. Read through the entire post before attempting.
I purchased a new larger capacity hard disk drive (hdd) to upgrade an existing smaller solid state drive (ssd) because I started running out of room. I liked the speed of the ssd, dont get me wrong, but a weighed the options and more storage space was a priority. So I compromised and picked up a Seagate hybrid sshd. Got one while they were on sale $100 through newegg http://www.newegg.com/Product/Product.aspx?Item=N82E16822178340.
This one took a while to rap my fingers around and Ill say most of it was dumb luck. I know there is WinClone available on OSX and probably would have made this easier. Think WinClone is about $30 and honestly probably would have saved me a bunch of time, but being the stubborn ba$T@rd I am, I decide to stick through it on principle.
What I had...
OSX was 10.8
Windows was 8 with media center
Things youll need:
- hdd enclosure; this is to connect your existing hdd to copy data over to your new hdd
- windows 8 installation DVD (or Win7); needed to allow bootcamp creation
- OSX installation USB or SD drive to boot from; might be able to use the recovery instead
- windows 7 repair CD; needed to run specific commands to fix the boot (the version of win7 repair CD I used was modified because getting the timing right to engage the CD boot process made me pull more hair out than I care to discuss. I renamed the bootfix.bin file from the boot directory. This causes the CD to boot instead of waiting for prompted. The MacBook keyboard didnt work and the screen picture were out of sync to enable to proper timely to engage the CD. You can create your own using UltraISO and renaming bootfix.bin under the boot directory. https://dl.dropboxusercontent.com/u/92763248/Repair%20disc%20Windows%207%2064-bit.iso
- GPART CD http://gparted.sourceforge.net/livecd.php
- Remove encryption.
1. With your existing OSX installation, install the gdisk program http://sourceforge.net/projects/gptfdisk/. We will use that to modify our soon to be screwed up hybrid MBR. In the mean time lets take a look at a none screwed up hybrid MBR.
Issue the following commands on your old OSX operating system (OS):
sudo fdisk /dev/disk0
sudo gpt -r -vv show disk0
diskutil list

Steps:
2. Attached your old hdd to a USB enclosure and attached to your macbook. I had purchased a simple USB3 sata link from newegg.com.

3. I made an SD OSX installation media disk. I think you could probably use the recovery hd to do the same thing. I attached the SD to its slot.
4. I then booted the macbook holding the option key down.

5. It should boot and look like the following. If the new hdd has no bootable partition you will not see your new drive. The orange in color USB symbol enclosures are your old OS. The mountain lion emblem is the OSX installation SD. This is whether I think its possible to boot from your old OS recovery hd to perform this next action. I havent tried that. The next action will be to copy your old OSX to the new hdd. I decided to use my OSX SD and booted from that.

6. Select Disk Utility.

7. Your new hdd should be at the top. Select it on the left pane.

8. Now select the partition drop down. This is where we are going to partition and format your new drive. Select 1 partition.

9. Title the new volume "new mac". Ensure it is Mac OS Extended (Journaled) format. Then Select options.

10. It needs to be set to GUID Partition Table. Select OK. Apply.

11. Partition.

12. Once completed your "new mac" partition should show on the left. Select the Restore tab.

13. This is were we can copy our existing OSX OS to the new hdd. Left click on your old OSX partition and hold the mouse button down as you drag it to the Source. Notice the orange color enclosure icon. This indicates an external device. Now drag your newly created "new mac" partition to the Destination. Should look just like mine. Restore.

14. Erase.

15. Should begin copying the data over. This processes should take a while. After that is complete reboot your macbook while holding the option key on boot. Now boot to your new macbook OS. I removed the old hdd and installation SD before booting.

16. Lets see what has changed in our partitions on the new hdd. Here is an example with the above three commands issued again. This was on a 1TB HDD. Notice the size in the fdisk command takes up the entire hdd.


20. I decide to divide my partitions equally. You do what you want. Install. It is required to have the Win8/7 installation dvd installed to get this step rolling.

21. You system will automatically reboot to DVD. ***HOLD THE OPTION KEY DOWN WHEN THE SYSTEM AUTO REBOOTS.*** Now I have done this two different ways. Ive booted to the Windows DVD and formatted the bootcamp partition and not installed a new OS which formats it NTFS. Ive also skipped this step and booted straight to GPART CD as well. I suspect its not necessary to format because when we use GPART to copy the old Windows OS to our new bootcamp partition it takes on the format of the copied partition anyway so why bother. I ejected the Windows installation DVD and swapped for the GPART CD and continued the boot of the CD. With GPART booted it should show your new hdd and old hdd so long as both are still attached to your system. If you forgot just connect and under Gparted select rescan. Notice the far upper right drop down to select drives. Now to distinguish which drive is which the /dev/sda is your onboard hdd and /dev/sdb should be your external. Another way is your new hdd will say BOOTCAMP (FAT32). Your external or old hdd should say either BOOTCAMP (NTFS) or what ever name you modified the volume name to. Mine was Win8Pro.

22. Select your external or old hdd.


24. Now change back to your new hdd and select the FAT32 BOOTCAMP partition. The paste button should become available and select.

25. It should warn you about this action. It should be on /dev/sda4. OK.

26. Select Apply.

27. Another warning. Apply.

28. Working. Could take some time.

29. Once completed, reboot holding the option key and boot to OSX. The Windows partition shouldnt appear here. We need to modify the hybrid MBR. You should see after booting into OSX the Windows drive and its contents though.

30. Now a decided to look at my partitions. #1 is the EFI boot. #2 is my OSX. #3 is my Recovery. #4 is Windows bootcamp. Notice the differences in size. The other thing I noticed was the * was on the OSX #2 and not on the Windows #4 under the fdisk command. This is where printing out the old hdd setting is nice to see the difference.
new hdd


33. Reboot into OSX. Time to make the hybrid MBR right again. Open terminal. Enter the following commands and see the images below. We need to get the hybrid MBR like our old hdd. This is how to do this.
sudo gdisk /dev/disk0
r
h
2 3 4
y
<enter>
n
<enter>
n
<enter>
y
o
w
y
sudo fdisk /dev/disk0
gdisk = allows us to modify the GUID partition. Since Windows requires an MBR which GPTs dont use and only have them for legacy purposes we have to fix it.
r = recovery and transformation options
h = make hybrid MBR
2 3 4 (Thats the number 2 space 3 space 4 <enter>) = modifying those three partitions
y = EFI needs to be first
<enter> = select the default because thats the way our original partition was
n = the bootable flag was not set in our original
<enter> = select the default because thats the way our original partition was
n = the bootable flag was not set in our original
<enter> = select the default because thats the way our original partition was
y = because the bootable flag was set in our original
o = print protective MBR data
w = write table to disk and exit
y = confirm


35. Windows repair CD should load. It should also prompt that your Windows install is corrupt. If you select details it will let you know what its changing. Select Repair and reboot. This will be quick so be fast with the option key and attempt to boot Windows now.

36. Thats it. After booting it might ask to reboot.

37. If your not a fan of rEFIt you can always remove. http://refit.sourceforge.net/doc/c1s3_remove.html
Hope this works for you...
Available link for download
Subscribe to:
Posts (Atom)