Showing posts with label mac. Show all posts
Showing posts with label mac. Show all posts
Friday, April 21, 2017
When and How to Reset Mac SMC System Management Controller
When and How to Reset Mac SMC System Management Controller
 |
| Reset Mac SMC |
The system management controller (SMC) is a chip in your intel-based Mac, which plays significant roles in controlling thermal and power management,keyboards and other peripherals, battery charging, video mode switching and cooling fans, sleep and wake, hibernation,Power buttons and LED indicators. It also enables enforcement of the Mac OS X End User License, allowing it to identify when it is running on non-Apple hardware.
 |
| Reset Mac SMC |
If the SMC firmware is corrupt because of any reason, your mac will start behaving strangely with no apparent reason ? the trackpad would stop working,lights won?t be working correctly,display resolution will change,your computer wont turn on or a number of other issues mentioned below. Most of the time, these issues can be solved by closing all of your apps and restarting the computer. Sometimes, though, you?ll need to reset the SMC by following the computers model-specific intructions described by Apple.
 |
| SMC-for-macbook-air-13inch-a1466-2013 |
Fans
- Cooling fans running at high speed.
Lights
- Keyboard Backlight Issues.
- Incorrect behavior with the Status Indicator Lights or Battery Indicator Lights.
- Backlight displays not responding to ambient light changes.
Power
- Your computer won?t turn on
- Non-responsive power button
- Unexpected sleep or shutdown
- Battery not charging properly
- MagSafe LED displays incorrect activity
- A Mac notebook computer doesnt respond properly when you close or open the lid.
System Performance
- The trackpad doesn?t work
- Computer running slowly despite low CPU load
- Long "Bounce" times for application icons in the dock.
- External displays and Ambient Light Sensing
- Unexpectedly switching into or out of target display mode for external displays.
- Your computer won?t connect to Wi-Fi
- Applications may not function correctly, or they may stop responding after being opened.
- The illumination around the I/O ports on a Mac Pro (Late 2013) does not activate when you move the computer.
Resetting the SMC is usually accomplished by removing all power from the system for a period of time (by unplugging the mains connector or removing the battery) or by operating the power button in a special way.Read the following steps to know how to Reset SMC.
Reset the SMC on Mac notebook computers
First determine whether the battery is removable. Mac notebook computers that have a nonremovable battery include MacBook Pro (Early 2009) and later, all models of MacBook Air, MacBook (Late 2009), and MacBook (Retina, 12-inch, Early 2015). Learn more about Mac notebook batteries.
Reset SMC of Macbook whose battery is nonremovable
- Shut down the Mac.
- Plug in the MagSafe or USB-C power adapter to a power source and to your Mac.
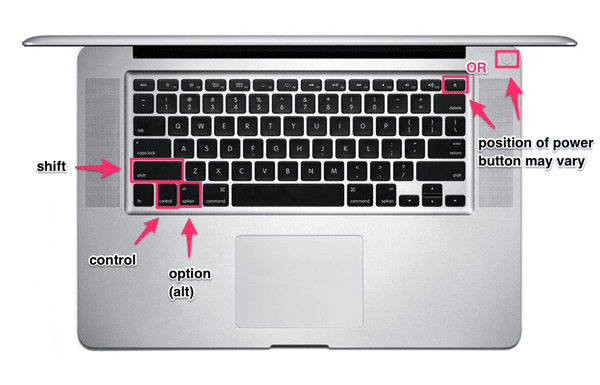
- Using the built-in keyboard, press Shift-Control-Option on the left side of the keyboard, then press the power button at the same time.
 | |
|
- Release all keys, then press the power button again to turn on your Mac
Reset SMC of Macbook whose battery is removable
- Shut down the Mac.
- Disconnect the MagSafe power adapter from the Mac.
- Remove the battery. (Learn about removing the battery in MacBook and MacBook Pro computers.)
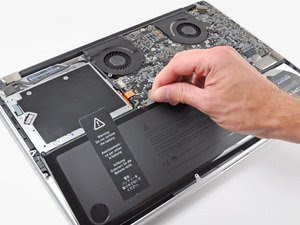 |
| Remove the Battery of Macbook Pro to Reset SMC |
- Press and hold the power button for 5 seconds.
- Reconnect the battery and MagSafe power adapter.
- Press the power button to turn on the Mac.
- The LED on MagSafe power adapters might change states or temporarily turn off when you reset the SMC.
Reset the SMC on Mac desktop computers
Follow these steps for iMac, Mac mini, Mac Pro, and Xserve.- Shut down the Mac.
- Unplug the power cord.
- Wait 15 seconds.
- Plug the power cord back in.
- Wait 5 seconds, then press the power button to turn on the Mac.
- For Intel-based Xserve computers that arent responding, you can shut down locally or by using remote commands. You can also shut down by pressing and holding the power button for 5 seconds.
Note:- Resetting the SMC does not reset or otherwise change the contents of NVRAM or PRAM on Intel-based Macs.
The SMC is responsible for these and other low-level functions on Intel-based Macs:
- Responding to presses of the power button
- Responding to the display lid opening and closing on portable Macs
- Battery management
- Thermal management
- The SMS (Sudden Motion Sensor)
- Ambient light sensing
- Keyboard backlighting
- Status indicator light (SIL) management
- Battery status indicator lights
- Selecting an external (instead of internal) video source for some iMac displays
If the resetting does not fix the issue , you might need to update SMC.
Apple released a SMC Update Version 2.0 for all models of the mid-2013 MacBook Air. The update fixes battery problems that may cause the ultralight laptop?s battery to drain faster when the lid is closed.
 |
| Update for SMC |
System Requirements:
OS X Mavericks 10.9.2 & later
OS X Mountain Lion 10.8.5 & later
To Look for latest update available on SMC go to Apple SMC Download page.
Available link for download

Friday, April 14, 2017
Top 3 Ways to Play MPG files on Mac OS X El Capitan
Top 3 Ways to Play MPG files on Mac OS X El Capitan
MPG is one of a number of file extensions for MPEG-1 or MPEG-2 audio and video compression. MPEG files can be played on many popular media players, like Windows Media Player, Apple QuickTime Player and other movie players. It also can be supported by programs such as Windows, Mac OS X, Symbian OS, Android and more. If you have an .mpeg or .mpg extension file, you usually have either MPEG-2 or MPEG-1 video And still encounter QucikTime importing MPG file issues like only audio exists or even worse - QuickTime just crashes! Hold on reading...
However, the problems like only audio exists or even worse, QuickTime just crashes may occur while you tried to play MPG video on Mac using QuickTime. This is due to different types of codec issues and the fact that there is no description available for MPG format files on Mac. Luckily, there are always solution out there that allow us to play MPG files on Mac OS X El Capitan without hassle. In this article, I will introduce top 3 best ways to get MPG files and Mac to play nicely. Read on for details.
Hot Search: Install QuickTime | QuickTime Alternative | H.265 to QuickTime | YouTube to MOV |
Solution 1: Convert MPG in Mac OS X El Capitan With Best MPG to MOV Converter
So there is any way to play MPG files on QuickTime sucessfully? Fortunately, the anwser is postive. To convert MPG to Mac compatible MOV, M4V or MP4, the professional yet easy-to-use Pavtube iMedia Converter for Mac (El Capitanand Yosemite compatible) is a necessity. (or There are many free video converter tools out there. Handbrake, MPEG Streamclip, ffmpegX, MediaCoder, iSquint, etc. are all your choices). By installing of this kind of application, you then are able to play MPG files on Mac as easy as ABC. It helps you to change MPG format to Mac friendly format quite fast, while maintaining the good quality of the videos. Besides, there are many optimized presets for iPad, iPhone, iPod Touch, Apple TV, Final Cut Pro, iMovie, etc. which of course saves your time and energy in the process of video conversion. See more tips below.
More Features of Mac MPEG Video Converter:
* Convert MPEG to more than 50 video/audio formats, including MP4, AVI, FLV, MOV, WMV, M4V, VOB, MP3, AC3, AAC, WAV, etc.
* Edit MPEG videos before converting them. It allows you to trim or crop videos with built-in video editor. In addition, you can add watermark and subtitles to the video at will.
*Streaming downloaded videos from YouTube, Vevo, Vimeo, Metacafe, Hulu, Facebook, etc.
* Compatible with Mac OS X 10.11 El Capitan, 10.10 Yosemite, 10.9 Mavericks, 10.8 Mountain Lion, 10.7 Lion and 10.6 Snow Leopard.
Free Download Top MPG Video Converter for Mac:


Other Download:
- Pavtube old official address: http://www.pavtube.cn/imedia-converter-mac/
- Cnet Download: http://download.cnet.com/Pavtube-iMedia-Converter/3000-2194_4-76177788.html
Notes: If you?re Windows users and want to play MPG files, Pavtube Video Converter Ultimate is a great alternative for you. It has a user-friendly interface, which makes it very conveniently to convert MPG on Windows 10 supported video format.
Solution 2: Use Perian Plugin to Play MPG with QuickTime
Perian is one of the most popularly used free QucikTime components to provide native support to a wide variety of file formats such as MPG. However the biggest limitation of using Perian is that it can be only used on Mac OS Snow Leopard. Moreover the latest version of Perian, 1.2.3 requires installation of QuickTime 7 which is not available for other Mac OS apart from Snow Leopard such as Mountain Lion. >> Best Perian Alternative for Mac.
What you need to know before downloading Perian:
1. The latest version 1.2.3 of Perian doesnt work on Mac OS X Mavericks, let alone Yosemite and Mac 10.11 EI Capitan because Perian requires installation of quicktime 7, which doesnt exist for Mavericks and above. It also doesnt work on Mac OS X Mountain Lion.
2. With a Mac running Mac OS X 10.7, say, Lion, you have to downgrade to the previous version, say 1.2.2. The version of 1.2.3 of Perian does not support QuickTime 10 in Lion and fails to fix the loss of audio after one second in xvid files with ac3.
3. Before installing Perian, you need to remove all QuickTime Components installed on your Mac, like FFusion, Xvid Delegate, 3ivX, DivX, DivX Decoder, XviD, msmpeg4v1, msmpeg4v2, AviImporter, EX_M4S2, Casio AVI Importer, AC3 Codec, and MatroskaQT.
4. For a Mac running Lion or Mountain Lion, converting MPG video to QuickTime is highly recommended.
Solution 3: Free MPG Player for Mac ? VLC
Apart from using the video converter and Perian you can also use a universal media player such as VLC player to play various types of file formats such as MPG on Mac. The VLC player works seamlessly on Mac and can be used to convert MPG format files into a format of your choice. However for seamless functioning you must ensure that you download Front Row which will allow you to import the MPG files into the VLC player for conversion. But you will not be able to transfer the converted files into other Apple products for playback.
Now, just pick up the way as you like for playing MPG files on Quicktime Player or Mac OS X El Capitan. Enjoy!
Good News: you can find more wonderful software bundled with MPG Video Converter will provide you more amazing experience in converting videos. Go to Money Saving Software Bundles to get special offer for more software, such as ByteCopy + Video Converter Ultimate = Only $79.9, Save $27.1, ByteCopy($42) + ChewTune($29) = Only $54.9, Save $16.1 and so on.
Read More:
However, the problems like only audio exists or even worse, QuickTime just crashes may occur while you tried to play MPG video on Mac using QuickTime. This is due to different types of codec issues and the fact that there is no description available for MPG format files on Mac. Luckily, there are always solution out there that allow us to play MPG files on Mac OS X El Capitan without hassle. In this article, I will introduce top 3 best ways to get MPG files and Mac to play nicely. Read on for details.
Hot Search: Install QuickTime | QuickTime Alternative | H.265 to QuickTime | YouTube to MOV |
Solution 1: Convert MPG in Mac OS X El Capitan With Best MPG to MOV Converter
So there is any way to play MPG files on QuickTime sucessfully? Fortunately, the anwser is postive. To convert MPG to Mac compatible MOV, M4V or MP4, the professional yet easy-to-use Pavtube iMedia Converter for Mac (El Capitanand Yosemite compatible) is a necessity. (or There are many free video converter tools out there. Handbrake, MPEG Streamclip, ffmpegX, MediaCoder, iSquint, etc. are all your choices). By installing of this kind of application, you then are able to play MPG files on Mac as easy as ABC. It helps you to change MPG format to Mac friendly format quite fast, while maintaining the good quality of the videos. Besides, there are many optimized presets for iPad, iPhone, iPod Touch, Apple TV, Final Cut Pro, iMovie, etc. which of course saves your time and energy in the process of video conversion. See more tips below.
More Features of Mac MPEG Video Converter:
* Convert MPEG to more than 50 video/audio formats, including MP4, AVI, FLV, MOV, WMV, M4V, VOB, MP3, AC3, AAC, WAV, etc.
* Edit MPEG videos before converting them. It allows you to trim or crop videos with built-in video editor. In addition, you can add watermark and subtitles to the video at will.
*Streaming downloaded videos from YouTube, Vevo, Vimeo, Metacafe, Hulu, Facebook, etc.
* Compatible with Mac OS X 10.11 El Capitan, 10.10 Yosemite, 10.9 Mavericks, 10.8 Mountain Lion, 10.7 Lion and 10.6 Snow Leopard.
Free Download Top MPG Video Converter for Mac:
Other Download:
- Pavtube old official address: http://www.pavtube.cn/imedia-converter-mac/
- Cnet Download: http://download.cnet.com/Pavtube-iMedia-Converter/3000-2194_4-76177788.html
Notes: If you?re Windows users and want to play MPG files, Pavtube Video Converter Ultimate is a great alternative for you. It has a user-friendly interface, which makes it very conveniently to convert MPG on Windows 10 supported video format.
Solution 2: Use Perian Plugin to Play MPG with QuickTime
Perian is one of the most popularly used free QucikTime components to provide native support to a wide variety of file formats such as MPG. However the biggest limitation of using Perian is that it can be only used on Mac OS Snow Leopard. Moreover the latest version of Perian, 1.2.3 requires installation of QuickTime 7 which is not available for other Mac OS apart from Snow Leopard such as Mountain Lion. >> Best Perian Alternative for Mac.
What you need to know before downloading Perian:
1. The latest version 1.2.3 of Perian doesnt work on Mac OS X Mavericks, let alone Yosemite and Mac 10.11 EI Capitan because Perian requires installation of quicktime 7, which doesnt exist for Mavericks and above. It also doesnt work on Mac OS X Mountain Lion.
2. With a Mac running Mac OS X 10.7, say, Lion, you have to downgrade to the previous version, say 1.2.2. The version of 1.2.3 of Perian does not support QuickTime 10 in Lion and fails to fix the loss of audio after one second in xvid files with ac3.
3. Before installing Perian, you need to remove all QuickTime Components installed on your Mac, like FFusion, Xvid Delegate, 3ivX, DivX, DivX Decoder, XviD, msmpeg4v1, msmpeg4v2, AviImporter, EX_M4S2, Casio AVI Importer, AC3 Codec, and MatroskaQT.
4. For a Mac running Lion or Mountain Lion, converting MPG video to QuickTime is highly recommended.
Solution 3: Free MPG Player for Mac ? VLC
Apart from using the video converter and Perian you can also use a universal media player such as VLC player to play various types of file formats such as MPG on Mac. The VLC player works seamlessly on Mac and can be used to convert MPG format files into a format of your choice. However for seamless functioning you must ensure that you download Front Row which will allow you to import the MPG files into the VLC player for conversion. But you will not be able to transfer the converted files into other Apple products for playback.
Now, just pick up the way as you like for playing MPG files on Quicktime Player or Mac OS X El Capitan. Enjoy!
Good News: you can find more wonderful software bundled with MPG Video Converter will provide you more amazing experience in converting videos. Go to Money Saving Software Bundles to get special offer for more software, such as ByteCopy + Video Converter Ultimate = Only $79.9, Save $27.1, ByteCopy($42) + ChewTune($29) = Only $54.9, Save $16.1 and so on.
Read More:
- Rip Blu-ray to 1080p DivX AVI Videos For Streaming
- Top Solution - Xbox One wont play DVDs to new 4K UHD TV
- Convert Windows Media File to MP4 on Windows 10/Mac 10.11
- The Best DVD Copy Software of 2016 for DVD Discs Backup
- Top 5 Alternatives to MakeMKV : Top Best Alternatives
Available link for download
Tuesday, March 28, 2017
The boot partition restore deleted with Mac Disk Recovery
The boot partition restore deleted with Mac Disk Recovery
The boot partition restore deleted with Mac Disk Recovery
Mac OS X hard disk volume is divided into several partitions called for effective management of your valuable data stored there. Every Mac has a boot capacity that critical system files for the Mac OS X computer system is required to start. These files are very important for booting the system. In the event that the boot partition is damaged or removed, your system will not boot and unusable. It leads to severe data loss and require Mac drive recovery solutions to the problem, if no backup available.
The boot volume of your Mac OS X operating system contains the following files: Mac OS X operating system. MBR (Master Boot Record). BootX, Mac OS X boot loader. Operating system kernel. Binary files that are required for multiple kernel extensions. Mach / BSD data structures. Input / output-kit. Init, Mach bootstrap (Naming Service) daemon. The luggage capacity of the hard disk on Mac OS X, a primary volume and the focus. This requirement can be on any hard disk of a computer system BIOS (Basic Input / Output System) is looking into Mac OS X operating system is started, be carried out. There are some situations where the boot volume is corrupted on your Mac computer and the system can not be started. This behavior, lead to the loss of important data, and you need to sell Mac recovery solutions
Improper system shutdown due to power failure, system crash, and user error: boot volume can be one of the following reasons may be damaged. Accidentally deleting a number of critical system boot files from the user. Virus infection. Viruses are malicious programs that the system via the Internet, e-mail or removable media can be accessed. System occur.
Missing or corrupted data structures, such as file system, MBR, boot loader, kernel and operating system. If you have any of the above situations, you need to format the hard drive, install Mac OS X operating system and then restore the data from the backup. But you can deal with critical situations, if backup is not available. In such situations, Mac disk recovery software for all your help unpack the data inaccessible. I encourage the resumption of Mac tools developed to extract the entire hard drive and all available data from it to scan.
Stellar Phoenix Macintosh Data Recovery Software recovers lost, missing, inaccessible or deleted data supported by the hard drive of your Mac software recovery from HFS, HFS +, HFSX, HFS Wrapper and FAT file system volumes. It can be used with Mac OS X 10.6 Snow Leopard, 10.5 Leopard, 10.4 Tiger and 10.3.9 Panther.
The boot partition restore deleted with Mac Disk Recovery
The boot volume of your Mac OS X operating system contains the following files: Mac OS X operating system. MBR (Master Boot Record). BootX, Mac OS X boot loader. Operating system kernel. Binary files that are required for multiple kernel extensions. Mach / BSD data structures. Input / output-kit. Init, Mach bootstrap (Naming Service) daemon. The luggage capacity of the hard disk on Mac OS X, a primary volume and the focus. This requirement can be on any hard disk of a computer system BIOS (Basic Input / Output System) is looking into Mac OS X operating system is started, be carried out. There are some situations where the boot volume is corrupted on your Mac computer and the system can not be started. This behavior, lead to the loss of important data, and you need to sell Mac recovery solutions
Improper system shutdown due to power failure, system crash, and user error: boot volume can be one of the following reasons may be damaged. Accidentally deleting a number of critical system boot files from the user. Virus infection. Viruses are malicious programs that the system via the Internet, e-mail or removable media can be accessed. System occur.
Missing or corrupted data structures, such as file system, MBR, boot loader, kernel and operating system. If you have any of the above situations, you need to format the hard drive, install Mac OS X operating system and then restore the data from the backup. But you can deal with critical situations, if backup is not available. In such situations, Mac disk recovery software for all your help unpack the data inaccessible. I encourage the resumption of Mac tools developed to extract the entire hard drive and all available data from it to scan.
Stellar Phoenix Macintosh Data Recovery Software recovers lost, missing, inaccessible or deleted data supported by the hard drive of your Mac software recovery from HFS, HFS +, HFSX, HFS Wrapper and FAT file system volumes. It can be used with Mac OS X 10.6 Snow Leopard, 10.5 Leopard, 10.4 Tiger and 10.3.9 Panther.
The boot partition restore deleted with Mac Disk Recovery
Available link for download
Tuesday, March 7, 2017
What is Safe Mode and How to start your Mac in Safe Mode
What is Safe Mode and How to start your Mac in Safe Mode
You can use safe mode to help you resolve issues that might keep your Mac from completely starting up.
What is safe mode?
Safe mode (sometimes called safe boot) is a way to start up your Mac so that it performs certain checks, and prevents some software from automatically loading or opening. Starting your Mac in safe mode does the following:
What is safe mode?
Safe mode (sometimes called safe boot) is a way to start up your Mac so that it performs certain checks, and prevents some software from automatically loading or opening. Starting your Mac in safe mode does the following:
- Verifies your startup disk, and attempts to repair directory issues if needed
- Only essential kernel extensions are loaded- (a.k.a. ketxs, or hardware and software drivers), No third party items
- Prevents Startup Items and Login Items from opening automatically
- Disables user-installed fonts
- Deletes font caches, Kernel cache and other system cache files
- Together, these changes can help resolve or isolate issues related to your startup disk.
And its very simple to start your Mac in Safe Mode, either using your keyboard or by entering a command in Terminal.We will learn different way of starting your Mac in Safe Mode later in this post.
When and why should we start Mac in Safe Mode?
When you have some problem with your mac the first troubleshooting you do is restart the Mac.
Most of the time, your Mac just works after restarting.
But there will be times when a rogue app, a misbehaving service, outdated caches and other issue will cause your Mac to slow, stop starting up or exhibit other unwanted symptoms. Thankfully, Apple has provided a way to boot OS X in Safe Mode.
Although booting in Safe Mode on a daily basis?or whenever an insignificant problem arises? isn?t recommended, there are definitely instances when starting up in Safe Mode could be your last resort.
Here are some of the typical scenarios:
If your Mac doesn?t finish starting up?Certain issues might keep your Mac from completely starting up and using Safe Mode can help you resolve them.
If an app is causing issues? An app you recently installed might be the culprit, especially if it came outside the Mac App Store. Starting up in Safe Mode might help isolate the misbehaving app as it prevents certain software from automatically loading or opening.
If your Mac is running slow? Just like Windows, your Mac also creates temporary files and various caches over time which might slow down the overall performance of the operating system and apps. These unnecessary files are safely cleaned from Mac when started in safe Mode.
If your Mac has directory issues?Many, but not all issues with your Mac?s startup disk can be resolved using the built-in Disk Utility application. If you?re plagued with an issue that cannot be reproduced in Safe Mode but appears to be resolved when you start up normally, chances are it was caused by a cache or a directory issue with your startup disk that Safe Mode fixed.
How to Start your Mac in Safe Mode?
Starting up in safe mode
- Follow these steps to start up into safe mode.
- Start or restart your Mac.
- Immediately after you hear the startup sound, press and hold the Shift key.( Note:- If you are using a Wireless Keyboard,Make sure you press the Shift Key immediately after you hear the start up chimes sound.Bluetooth controllers will only activate after the startup chimes sound, so if the key is held before this, the key press will not be recognized. ).
- Release the Shift key when you see the Apple logo appear on the screen.
- After the Apple logo appears, it might take longer than usual to reach the login screen or your desktop. This is because your Mac performs a directory check of your startup disk as part of safe mode.

Start your Mac in Safe Mode - To leave safe mode, restart your computer without pressing any keys during startup.
 |
| Start your Mac in Safe Mode |
If youre using FileVault
If your startup disk is encrypted with FileVault, you can still hold down the Shift key immediately after powering on your Mac to start up in safe mode. You might be prompted to log in twice as part of this process ? first to unlock the startup disk, and a second time to log into the Finder. You can let go of the Shift key after you see the first login screen.
If an issue doesnt happen in safe mode
If an issue doesnt happen when your Mac is started in safe mode, try restarting again without pressing any keys at startup. If the issue appears to be resolved when you start up normally, it was possibly caused by a cache or a directory issue with your startup disk that safe mode fixed.
If you restart your Mac normally and an issue comes back when you reach your desktop, try disabling any login items that automatically open when you log in.
If your Mac restarts or shuts down in safe mode
If your Mac automatically restarts in safe mode, OS X might have found an issue that its trying to fix.
Safe mode performs a directory check of your startup disk, similar to what happens when you choose to verify or repair a disk using Disk Utility. If OS X finds an issue, the directory on your startup disk is repaired and your Mac restarts.
If your Mac turns itself off when you start up in safe mode, check the power connection on your Mac to make sure its plugged in securely at both your Mac and the power outlet. If youre using a MagSafe power adapter, make sure the LED on your power adapter is yellow or green. Then, try starting up in safe mode again.
If your Mac repeatedly restarts or shuts down during safe mode, contact Apple Support, or consult with an Apple Authorized Service Provider or Apple Genius for more help.
Is your Mac taking longer than usual to boot in Safe Mode?
This is normal.Your Mac performs a directory check of your startup disk as part of Safe Mode so it will take a significantly longer time than usual to reach the login screen or the desktop
3 ways of identifying if you?re started in Safe Mode
If you?re unsure as to whether or not you?re in Safe Mode, take note of the following signs that give it away.
1. Menu bar reads ?Safe Boot?
 |
| Start your Mac in Safe Mode |
The first indication that you?re starting up in Safe Mode appears when you land on the login screen. If you?re in Safe Mode, the words ?Safe Boot? in red letters will appear in the menu bar in the upper right corner of the screen.
2. Slower overall performance
Past the login screen, you?ll notice slower overall performance. Graphics will no longer be accelerated as default drivers are loaded. The OS X menus, windows and the Dock appear solid even if Translucent Menu Bar is selected in System Preferences.
Your screen might blink or tear during the login process. OS X menus, the Dock, your desktop and other aspects of the user interface won?t have as many visual effects and translucency will be disabled.
And as mentioned further below, several OS X features might be unavailable to you in Safe Mode, like watching movies in the DVD Player app, capturing video, connecting to Wi-Fi networks and more.
3. Boot Mode in System Information reads ?Safe?
 |
| Start your Mac in Safe Mode |
Another method of determining the status of your boot mode involves using the System Information application.
Step 1: Open System Information from Applications > Utilities. You can also choose About This Mac from the Apple menu and then click the System Report button in the Overview section.
Step 2: In the lefthand column, locate and click the Software section. You should see a couple related items listed on the right side of the System Information window.
If the Boot Mode is listed as ?Safe? you?re started in Safe Mode. If it reads ?Normal,? you?re in OS X?s normal-boot mode.
Some features arent available in safe mode
Some features of your Mac arent available when its started in safe mode, so after youre done using safe mode you should restart your computer normally.
For example, these features dont work in safe mode:
- You cant play movies in DVD Player.
- You cant capture video in iMovie and some other video apps.
- Some audio input or output devices might not work.
- Some USB, FireWire and Thunderbolt devices might not be available.
- Wi-Fi networking might be limited or unavailable depending on the Mac and OS X version youre using.
Safe mode in OS X v10.5 or later also disables accelerated graphics. This makes the OS X menu bar appear solid even if "Translucent Menu Bar" is selected in System Preferences. Your screen might also "blink" or "tear" during login when your Mac is started in safe mode.
Safe mode in OS X v10.6 or later also disables File Sharing.
Starting in safe mode without a keyboard
If your Mac doesnt have a keyboard available to start in safe mode but you have remote access to it, you can configure the Mac to startup in safe mode using the command line.
Access the command line by either opening Terminal remotely, or by logging into the computer using SSH.
Use the following Terminal command and restart your Mac:
sudo nvram boot-args="-x"
 |
| Start your Mac in Safe Mode |
Unfortunately it is a bit difficult to see if this is the case when the system is only displaying a gray progress bar; however, you can force the system to show you what is going on by having it boot to both Safe and Verbose modes at the same time.If you want to start in verbose mode as well, use this instead:
sudo nvram boot-args="-x -v"
To restart your Mac normally from Safe Mode.After using safe mode, use this Terminal command to return to a normal startup:
sudo nvram boot-args=""
 |
| Start your Mac in Safe Mode |
Note :- You can replace the "v" with an "s" to tell it to use "Single User mode" instead (they should be equivalent for this purpose):
sudo nvram boot-args="-x -s"
Incoming Search Terms
Mac in Safe Mode
Safe mode command for Mac
how to start mac in safe mode
mac verbose safe mode
single user mode
repair mac in safe mode
Safe Mode fix many issue in Mac
Restart in normal mode from safe mode
Mac always start in safe mode
Restart in normal mode from safe mode
Mac always start in safe mode
Available link for download
Monday, February 20, 2017
Watch Christmas Blu rays to iMac Mac OS X El Capitan
Watch Christmas Blu rays to iMac Mac OS X El Capitan
Summary: Want to copy Christmas Blu-rays to iMac on Mac OS X (El Capitan)? This article will share you how to get it done with professional iMac Blu-ray backup software for VLC playback.
To meet 2015 Christmas, you will decorate a beautiful Christmas illumination, buy Christmas gifts for your kids, prepare Christmas party games and download movies for watching on Christmas. Just before Christmas we wanted to purchase a series of Blu-rays for Christmas. But you may forget one thing ? How to Backup Christmas Blu-ray on iMac for VLC playback at the Christmas day?
Is there any way to turn/transfer these Blu-rays to iMac such that I can play the movies anywhere anytime? Instead of searching for and downloading Christmas full movie torrent online free to iMac, ripping Blu-rays to watch Christmas movie on iMac (Mac OS X El Capitan) is much easier! And it is less risky yet more high-quality guaranteed.
Then, how to make iMac work perfectly with Blu-ray discs? An easy and quick solution I?ve figured out is to rip Blu-ray disc with a piece of Blu-ray backup software as long as it is compatible with your iMac, such as on the latest Mac OS X El Capitan. And your primary concern may be how to keep the best compromise between high visual quality and less take-up of storage. Pavtube ByteCopy for Mac can fulfill your needs and provides perfect solutions for all the Mac OS X users.
Overall, it is a professional Christmas Blu-ray handling tool, featured with decent decrypting capability, high quality video output, considerate backup solution and specific format templates for versatile media players QuickTime, iPad, iPhone, Apple TV, etc. It does work for DVD/Blu-ray: rip, backup, convert and edit DVD/Blu-ray movies to other video formats, like M3U8, H.265, 3D MP4, lossless MKV.
The equivalent Windows version is Pavtube ByteCopy, which shares almost all functions with Mac version. I was doing a general search for Blu-ray rippers for mac. I read reviews and tried a number of them in which Pavtube has been the best. Now download the software on computer and follow the guide to start ripping.
Free Download Top Christmas Blu-ray Ripper for Mac:
Other Download:
- Pavtube old official address: http://www.pavtube.cn/bytecopy-mac/
- Cnet Download: http://download.cnet.com/Pavtube-ByteCopy/3000-7970_4-76177783.html
Copy Christmas Blu-ray Movies on iMac for VLC playback (Mac OS X El Capitan)
Step One: Run the program and insert the Blu-ray disc with BD Drive; click ?Load file(s)? icon to import the Blu-ray movies. When the files are loaded, you can select the subtitle and audio track as you like. Blu-ray/DVD ISO & DVD folders are also supported here.

Step Two: Select and custom output format. Click ?HD Video? > ?H. 264 HD Video (*.mp4)? or ?MKV HD Video(*mkv)? to get the optimized output file for Blu-ray to VLC conversion. For iMac, "Common Video" > "MOV - QuickTime(*.mov)" as the output file format for iMac.

Tip: Besides, Pavtube ByteCopy for Mac could edit videos by trimming, cropping, splitting video, add text/image/video watermark as copyright protection, and attach external *.srt, *.ass, or *.ssa subtitles into source media for entertainment.
Step Three: When everything is OK, press the big ?Start conversion? button to start Blu-ray to iMac conversion on Mac OS X (El Capitan). Once completed, locate and find the generated .mp4 or .mkv files by clicking ?Open? icon on application UI, and you are able to enjoy converted Christmas Blu-ray movies in VLC on iMac without hassle.
Read More:
To meet 2015 Christmas, you will decorate a beautiful Christmas illumination, buy Christmas gifts for your kids, prepare Christmas party games and download movies for watching on Christmas. Just before Christmas we wanted to purchase a series of Blu-rays for Christmas. But you may forget one thing ? How to Backup Christmas Blu-ray on iMac for VLC playback at the Christmas day?
Is there any way to turn/transfer these Blu-rays to iMac such that I can play the movies anywhere anytime? Instead of searching for and downloading Christmas full movie torrent online free to iMac, ripping Blu-rays to watch Christmas movie on iMac (Mac OS X El Capitan) is much easier! And it is less risky yet more high-quality guaranteed.
Then, how to make iMac work perfectly with Blu-ray discs? An easy and quick solution I?ve figured out is to rip Blu-ray disc with a piece of Blu-ray backup software as long as it is compatible with your iMac, such as on the latest Mac OS X El Capitan. And your primary concern may be how to keep the best compromise between high visual quality and less take-up of storage. Pavtube ByteCopy for Mac can fulfill your needs and provides perfect solutions for all the Mac OS X users.
Overall, it is a professional Christmas Blu-ray handling tool, featured with decent decrypting capability, high quality video output, considerate backup solution and specific format templates for versatile media players QuickTime, iPad, iPhone, Apple TV, etc. It does work for DVD/Blu-ray: rip, backup, convert and edit DVD/Blu-ray movies to other video formats, like M3U8, H.265, 3D MP4, lossless MKV.
The equivalent Windows version is Pavtube ByteCopy, which shares almost all functions with Mac version. I was doing a general search for Blu-ray rippers for mac. I read reviews and tried a number of them in which Pavtube has been the best. Now download the software on computer and follow the guide to start ripping.
Free Download Top Christmas Blu-ray Ripper for Mac:
Other Download:
- Pavtube old official address: http://www.pavtube.cn/bytecopy-mac/
- Cnet Download: http://download.cnet.com/Pavtube-ByteCopy/3000-7970_4-76177783.html
Copy Christmas Blu-ray Movies on iMac for VLC playback (Mac OS X El Capitan)
Step One: Run the program and insert the Blu-ray disc with BD Drive; click ?Load file(s)? icon to import the Blu-ray movies. When the files are loaded, you can select the subtitle and audio track as you like. Blu-ray/DVD ISO & DVD folders are also supported here.
Step Two: Select and custom output format. Click ?HD Video? > ?H. 264 HD Video (*.mp4)? or ?MKV HD Video(*mkv)? to get the optimized output file for Blu-ray to VLC conversion. For iMac, "Common Video" > "MOV - QuickTime(*.mov)" as the output file format for iMac.
Tip: Besides, Pavtube ByteCopy for Mac could edit videos by trimming, cropping, splitting video, add text/image/video watermark as copyright protection, and attach external *.srt, *.ass, or *.ssa subtitles into source media for entertainment.
Step Three: When everything is OK, press the big ?Start conversion? button to start Blu-ray to iMac conversion on Mac OS X (El Capitan). Once completed, locate and find the generated .mp4 or .mkv files by clicking ?Open? icon on application UI, and you are able to enjoy converted Christmas Blu-ray movies in VLC on iMac without hassle.
Read More:
- Enjoy Blu-ray/DVD with French subtitles on MacBook Pro
- Playing Blu-ray on MacBook Pro via Mac El Capitan
- Rip DVD movies to iCloud on Mac OS X El Capitan
- Watch Scary Halloween Videos Mac El Capitan
- Convert and Play 2K/4K/HD Video on Mac OS X 10.11 El Capitan
Available link for download
Friday, January 27, 2017
Tips OSX How to Save Space Hard Drive Mac
Tips OSX How to Save Space Hard Drive Mac
MacBook Air with SSD capable of quickly indeed very proud of its users but in some cases, the SSD is too small to store a variety of data, especially for those who choose a lot of files in bulk. For that you need to perform well SSD management, including removing all source files iMovie. If you have done it but the Mac hard drive space is still not enough to accommodate a collection of files then you need to follow these tips advanced that contains 5 steps to avoid overloading the hard drive.
1. Delete Cache Files
Even if you use a Mac desktop that has a very large space but to save hard drive space is still important to do. You can do this by deleting the cache files.
When you delete apps to make the disk space a little relieved, that still leaves the actual user application cache is not deleted also. The files were left to help the performance of OS X and various applications installed on the Mac. If you no longer use an application, you can delete the entire cache file.
How, in the Finder press Command-Shift-G or click on the Go menu, select Go To Folder. Then type:
~ / Library / Caches /
This way you will display the folder that contains the user caches. Once open, you need sorting files by size to determine the size of the files and folders you want to delete.
Open the View menu and select Show View Options or press Command-J on the keyboard. Click the checbox which is on the Calculate All Sizes and close the windows View.
The next Mac will show the number of all files in the Finder, including folders. If you are not yet set, then immediately set course windows to do with the List View or Command-2 on the keyboard.
Well, now you can see the cache file with the largest size there at the top by clicking the Size once again. Furthermore please delete all the files that you no longer need.

2. Delete Speech Voices
Another thing you can do to save hard drive space by deleting voices Mac files are used OS X for text-to-speech. This file type can be very large and need to be removed when no longer used.
Open Terminal from the Application folder, dock, or use an app like Alfred launching system. Type the following command:
cd / System / Library / Speech /
The above command will change the directory (cd) that you use speech to another directory where files are located. To delete all of them, type the following command:
Voices sudo rm-rf / *
If in doubt use the method above, you can manually delete the voice files through the folder / System / Library / Speech / Voices / then delete the voices that you do not use, such as the cello or Bahh.

3. Check the Application Support folder for Steam Game Files
For gamers who frequently use digital gaming portal Steam, you need to check the Steam files that you can delete.
Open the Finder, open the folder behavior ~ / Library / Application Support /. Inside that folder you will find a folder that Steam could be lots and lots of files from different games you no longer play. Be sure to Calculate All Sizes from the View menu when viewing the Steam folder and sorting based on Size. You will be able to see the game files are very large, delete it if you no longer use.
Other folders that you need to see is the Application Support. A number of applications use the folder to store the files that you no longer even wear. Make sure you pick and choose which files should be deleted.

4. Delete File in System Logs and QuickLook Cache
System logs is one place that contains a lot of files to help work the system OS X. However, you can just delete the files in it because the files can be made many times.
Open Terminal from the Applications folder or Dock. Type the following command:
sudo rm-rf / private / var / log / *
Command over befungsi to clean up system logs, including when you run the command above. Therefore you can often do this to increase your Mac space.
Furthermore please close the Terminal window and open another one. Type the following command:
sudo rm-rf / private / var / folders /
The above command will clean QuickLook file and you can do regularly to keep the Mac space. It should be noted that each of the above command prompts you to enter the administrator password.

5. Disable Mac SafeSleep Mode
There is an OS X feature that was released in 2005 called SafeSleep. SafeSleep is basically made a hibernation mode to save the current condition of your use Mac so that when you turn it on at a later time after sleep, the Mac will be in the same condition as when you left. Such conditions do not change even when the battery ran out and shut down.

In OS Lion, Apple then introduced two new features called Autosave and Resume that provides similar SafeSleep. Unfortunately, all of these features actually consuming hard drive space. To disable SafeSleep mode, open a terminal and type the following command:
sudo pmset hibernatemode 0
Command over deadly SafeSleep function. Afterwards you need to delete the image SafeSleep file by typing the following command:
sudo rm / var / vm / sleepimage
If you use Mac often still connected to power when in sleep mode and the battery has never been below 20% then it means you are not using a Mac SafeSleep. Thus disabling SafeSleep become mandatory for you to do.
For non-Mac equipped with SSD, it takes longer to save SafeSleep image to your hard drive. In contrast, for the Mac that uses SSD Mac, not necessary at all to do the same. Later if you want to reactivate SafeSleep, type the following command in Terminal:
sudo pmset-a hibernatemode 3
Good luck!
Available link for download
Sunday, December 25, 2016
Three Methods of Lossless Backup Blu ray on Mac El Capitan
Three Methods of Lossless Backup Blu ray on Mac El Capitan
Overview:
Is there a way to make losslessly copies of your Blu-ray movies on Mac OS X EL Capitan at all? Absolutely not, this article show you 3 ways to backup a copyright protected Blu-ray quickly and efficiently.
When got a pile of Blu-ray discs, you may worry about the kids will scratch or damage them. The safe way is to make a Blu-ray copy. Well, if you have no idea how to make it, get some tips from this article. Wed like to recommend you the best Blu-ray backup software for El Capitan, which can help you copy Blu-ray movies on Mac OS X El Capitan with the original quality.
Hot Search: Blu-ray to PS3 | Blu-ray Tips | | Methods about BD Backup | Directly Copy Blu-ray with keeping 7.1 | 3D Blu-ray to Stereoscopic Player
Pavtube ByteCopy for Mac El Capitan is the best ripper to copy Blu-ray on Mac for its comprehensive features, fastest speed and quality service. It is an all-in-one Blu-ray & DVD copying and ripping tool as well as providing multi-track and 3D ouput. Besides, it can rip Blu-rays and DVDs to popular video formats, AVI, MOV, WMV, MP4, FLV etc, for playback on Mac and mobiles or uploading to video-sharing website.
If you dont need multi-track output, Pavtube BDMagic for Mac is enough which features in copying Blu-ray and DVD with original structure, and converting Blu-rays and standard DVDs to watchable video/audio format for mobile devices. (Here is the review)
Learn the 3 different 3 ways to copy Blu-ray to Mac El Capitan using ByteCopy for Mac:
Option 1. Full disc Copy: 1:1 Copy Blu-ray Without Compression on Mac
Option 2. Directly Copy: Backup Blu-ray TV series discs with DTS audio | Copy DVD movies with chapter markers
Option 3: Lossless MKV output: Make copy of DVD/Blu-ray discs to hard drive on Mac losslessly


Other Download:
- Pavtube old official address: www.pavtube.cn/bytecopy-mac/
- Cnet Download: download.cnet.com/Pavtube-ByteCopy/3000-7970_4-76177783.html
Step by Step Guides of Lossless Backup Blu-ray on Mac El Capitan in 3 Ways
part 1. Load Blu-ray Files.
Insert your Blu-ray disc into Blu-ray external Blu-ray drive and connect with your Mac computer, then launch the application, Click "File" > "Load Disc" to import Blu-ray disc to the program.
Part 2. Backup Blu-ray to OS X El Capitan.
Method one:
Make a full disc copy of Blu-ray movie
Hit the top tool menu bar " " icon to make a full disc copy of your original Blu-ray movies.From "Format" drop-down list, go to "Copy" > "Direct Copy" and backup Blu-ray movies in m2ts format.

Method two:
Backup Blu-ray to Multi-track video format.
Hit "Format" bar, go to "Multi-track Video" option, there are four different Multi-track video for you to output, select your desired one as the final backup format.

Method three:
Backup Blu-ray to media file formats.
You can output a common media file format or a device optimize file format according to your own needs.
Part 3: Start Blu-ray to Mac OS X El Capitan backup process.
Press the "Convert" button to start the backup process.
Good News! To thanks for your continuous support, Pavtube Official Website and Pavtube Facebook are now holding the biggest sale for this summer with fantastic 50% off discounts and giveaway. Pay less to get powerful Blu-ray/DVD/Video Converter to build your own home media center on this summer!
Giveaway: First Five customers can share this post, email us your order numer and the snapshot to win one more FREE license, no product limit!
Read More:
Is there a way to make losslessly copies of your Blu-ray movies on Mac OS X EL Capitan at all? Absolutely not, this article show you 3 ways to backup a copyright protected Blu-ray quickly and efficiently.
When got a pile of Blu-ray discs, you may worry about the kids will scratch or damage them. The safe way is to make a Blu-ray copy. Well, if you have no idea how to make it, get some tips from this article. Wed like to recommend you the best Blu-ray backup software for El Capitan, which can help you copy Blu-ray movies on Mac OS X El Capitan with the original quality.
Hot Search: Blu-ray to PS3 | Blu-ray Tips | | Methods about BD Backup | Directly Copy Blu-ray with keeping 7.1 | 3D Blu-ray to Stereoscopic Player
Pavtube ByteCopy for Mac El Capitan is the best ripper to copy Blu-ray on Mac for its comprehensive features, fastest speed and quality service. It is an all-in-one Blu-ray & DVD copying and ripping tool as well as providing multi-track and 3D ouput. Besides, it can rip Blu-rays and DVDs to popular video formats, AVI, MOV, WMV, MP4, FLV etc, for playback on Mac and mobiles or uploading to video-sharing website.
If you dont need multi-track output, Pavtube BDMagic for Mac is enough which features in copying Blu-ray and DVD with original structure, and converting Blu-rays and standard DVDs to watchable video/audio format for mobile devices. (Here is the review)
Learn the 3 different 3 ways to copy Blu-ray to Mac El Capitan using ByteCopy for Mac:
Option 1. Full disc Copy: 1:1 Copy Blu-ray Without Compression on Mac
Option 2. Directly Copy: Backup Blu-ray TV series discs with DTS audio | Copy DVD movies with chapter markers
Option 3: Lossless MKV output: Make copy of DVD/Blu-ray discs to hard drive on Mac losslessly
Other Download:
- Pavtube old official address: www.pavtube.cn/bytecopy-mac/
- Cnet Download: download.cnet.com/Pavtube-ByteCopy/3000-7970_4-76177783.html
Step by Step Guides of Lossless Backup Blu-ray on Mac El Capitan in 3 Ways
part 1. Load Blu-ray Files.
Insert your Blu-ray disc into Blu-ray external Blu-ray drive and connect with your Mac computer, then launch the application, Click "File" > "Load Disc" to import Blu-ray disc to the program.
Part 2. Backup Blu-ray to OS X El Capitan.
Method one:
Make a full disc copy of Blu-ray movie
Hit the top tool menu bar "
" icon to make a full disc copy of your original Blu-ray movies.From "Format" drop-down list, go to "Copy" > "Direct Copy" and backup Blu-ray movies in m2ts format.Method two:
Backup Blu-ray to Multi-track video format.
Hit "Format" bar, go to "Multi-track Video" option, there are four different Multi-track video for you to output, select your desired one as the final backup format.
Method three:
Backup Blu-ray to media file formats.
You can output a common media file format or a device optimize file format according to your own needs.
Part 3: Start Blu-ray to Mac OS X El Capitan backup process.
Press the "Convert" button to start the backup process.
Good News! To thanks for your continuous support, Pavtube Official Website and Pavtube Facebook are now holding the biggest sale for this summer with fantastic 50% off discounts and giveaway. Pay less to get powerful Blu-ray/DVD/Video Converter to build your own home media center on this summer!
Giveaway: First Five customers can share this post, email us your order numer and the snapshot to win one more FREE license, no product limit!
Read More:
- Upload 4K Video Shot on iPhone 6s to YouTube on Mac OS El Capitan with
- Get the Best TMPGEnc Mac Alternative to Convert Videos on Mac OS X El Capitan
- Playing YouTube (FLV) files on a Keynote on Mac OS X El Capitan
- FFmpeg Alternative - Tutorial to Crop Video Using FFmpeg
- Stream DVD to 4K TV (and HD TV, 8K TV) as Utmost Perfection
Available link for download
Saturday, December 3, 2016
Top 5 Video Players for Mac 2016 ƒ??With Mac Apple TV Remote Control App
Top 5 Video Players for Mac 2016 ƒ??With Mac Apple TV Remote Control App
Summary?This is a list of 2016 top 5 best video player for Mac with suggested Mac/Apple TV remote control app on iPhone for the use of best Mac media player, if you plan to buy or have got a Mac, MacBook Air, MacBook Pro, etc.
For those who are passionate about watching movies or videos you should need a powerful video player. If you are Mac owner, Mac has the problem of being lack of support for video players. If youd like to have a best Mac video player for your video needs, like fluid playback of all video file formats, support of SRT file, etc, on a Mac computer or laptop which might be connected with HDMI to your Apple TV, youve come to the right place. Here we go.
Top 1. VLC Media Player
VLC Media Player comes first on our list. VLC is an absolutely free open-source software for watching movies, other kinds of videos. VLC is much popular because its ease of use and simple interface. VLC is compatible with Mac OS X, Windows, Linux, Android, iOS, etc. You can download latest VLC for Mac OS X 10.6 and later from VLC?s official site. You can also download previous versions of VLC for legacy versions of Mac OS X.
Top 2. QuickTime
QuickTime Player, developed by Apple, is the default video player on any Mac OS system and apparently a good free option for Mac users. This best media player for Mac supports most common video audio and image formats, works great with HD videos, and enables you to record, edit and stream Internet videos and HD movie trailers. One exception is that Mac QuickTime video player does not support WMV and DivX.
Note: Be advised that OS upgrade may lead to your QuickTime player crashing on Mac sometimes. Be sure to research pros and cons of your Mac OS upgrading move, check out if your computer is better enough to run QT and prepare for Mac video player issues in advance.
Top 3. Elmedia Player
Free media player, which supports playback of almost any video or audio files. It offers numerous options to enhance viewing experience: 10-band audio Equalizer, video tuner to change brightness, saturation, contrast, etc., changing video aspect ratio, fitting image to screen, etc.
Handy URL option enables accessing YouTube videos from the app directly without opening a web browser with its noisy ads.
Top 4. MPlayerX
Many Mac users take MPlayerX media player as a standard part of their toolbox simply because it works properly and all most popular codecs are in it. No fuss or headache of codec installing or updating. Seriously, you will not be frustrated with such practical video player on your Mac OS. Problem like disappearing of title bar in QuickTime never happens. When playing AVI file on Mac/MacBook, this best Mac media player performs great without stuttering while Divx player cannot recognize the file sometimes. Well, system crash things happen randomly, which should be tackled properly.
Top 5. DivX
DivX player for Mac is a powerful movie video player for Mac especially for HD videos playback, such as all native DivX videos, MKV and HEVC up to 4K movies. QuickTime files are included as well. With an easy-to-use interface, DivX player also plays as a video converter. But, this Mac video player seems to eat up too much space with its big installation file. So enough space matters to it.
All of them are powerful video players for Mac. You can choose anyone based on your own needs. If you want to playing MOV, AVI, MP4, FLV, MKV, 3GP, MP3, FLAC Video/Auido files on MacBook/MacBook Air/MacBook Pro/iMac/5K Retina iMac With Mac OS X El Capitan? You may need to the below tips.
Additional Tips: Top Video Converter for Mac - Pavtube iMedia Converter for Mac OS X El Capitan
With Pavtube iMedia Converter for Mac, you can convert various video files, such as MOV, AVI, MP4, FLV, MKV, 3GP, MP3, FLAC, etc. Let you able to enjoy them on your Mac OS X El Capitan, as well as other portable devices such as iPhone, iPad, Apple TV, Android, Windows Phones, PSP, PS3, and so on. Meanwhile, you can also use it for some simple editing before conversion (splitting, trimming and combining, rotating and cropping, quality improvement, etc.). There will be no loss of image quality, and conversion itself is swift and effective.

More feature:
Other Download:
- Pavtube old official address: http://www.pavtube.cn/imedia-converter-mac/
- Cnet Download: http://download.cnet.com/Pavtube-iMedia-Converter/3000-2194_4-76177788.html
Special Offer:
ByteCopy($42) + Video Converter Ultimate($65) = Only $79.9, Save $27.1
Video Converter Ultimate($65) + DVD Creater($35) = Only $64.9, Save $35.1
Video Converter Ultimate($65) + ChewTune($29) = Only $74.9, Save $19.1
Read More:
For those who are passionate about watching movies or videos you should need a powerful video player. If you are Mac owner, Mac has the problem of being lack of support for video players. If youd like to have a best Mac video player for your video needs, like fluid playback of all video file formats, support of SRT file, etc, on a Mac computer or laptop which might be connected with HDMI to your Apple TV, youve come to the right place. Here we go.
Top 1. VLC Media Player
VLC Media Player comes first on our list. VLC is an absolutely free open-source software for watching movies, other kinds of videos. VLC is much popular because its ease of use and simple interface. VLC is compatible with Mac OS X, Windows, Linux, Android, iOS, etc. You can download latest VLC for Mac OS X 10.6 and later from VLC?s official site. You can also download previous versions of VLC for legacy versions of Mac OS X.
Top 2. QuickTime
QuickTime Player, developed by Apple, is the default video player on any Mac OS system and apparently a good free option for Mac users. This best media player for Mac supports most common video audio and image formats, works great with HD videos, and enables you to record, edit and stream Internet videos and HD movie trailers. One exception is that Mac QuickTime video player does not support WMV and DivX.
Note: Be advised that OS upgrade may lead to your QuickTime player crashing on Mac sometimes. Be sure to research pros and cons of your Mac OS upgrading move, check out if your computer is better enough to run QT and prepare for Mac video player issues in advance.
Top 3. Elmedia Player
Free media player, which supports playback of almost any video or audio files. It offers numerous options to enhance viewing experience: 10-band audio Equalizer, video tuner to change brightness, saturation, contrast, etc., changing video aspect ratio, fitting image to screen, etc.
Handy URL option enables accessing YouTube videos from the app directly without opening a web browser with its noisy ads.
Top 4. MPlayerX
Many Mac users take MPlayerX media player as a standard part of their toolbox simply because it works properly and all most popular codecs are in it. No fuss or headache of codec installing or updating. Seriously, you will not be frustrated with such practical video player on your Mac OS. Problem like disappearing of title bar in QuickTime never happens. When playing AVI file on Mac/MacBook, this best Mac media player performs great without stuttering while Divx player cannot recognize the file sometimes. Well, system crash things happen randomly, which should be tackled properly.
Top 5. DivX
DivX player for Mac is a powerful movie video player for Mac especially for HD videos playback, such as all native DivX videos, MKV and HEVC up to 4K movies. QuickTime files are included as well. With an easy-to-use interface, DivX player also plays as a video converter. But, this Mac video player seems to eat up too much space with its big installation file. So enough space matters to it.
All of them are powerful video players for Mac. You can choose anyone based on your own needs. If you want to playing MOV, AVI, MP4, FLV, MKV, 3GP, MP3, FLAC Video/Auido files on MacBook/MacBook Air/MacBook Pro/iMac/5K Retina iMac With Mac OS X El Capitan? You may need to the below tips.
Additional Tips: Top Video Converter for Mac - Pavtube iMedia Converter for Mac OS X El Capitan
With Pavtube iMedia Converter for Mac, you can convert various video files, such as MOV, AVI, MP4, FLV, MKV, 3GP, MP3, FLAC, etc. Let you able to enjoy them on your Mac OS X El Capitan, as well as other portable devices such as iPhone, iPad, Apple TV, Android, Windows Phones, PSP, PS3, and so on. Meanwhile, you can also use it for some simple editing before conversion (splitting, trimming and combining, rotating and cropping, quality improvement, etc.). There will be no loss of image quality, and conversion itself is swift and effective.
More feature:
- Decode and Encode H.265/HEVC files
- Transcode Sony XAVC files with MXF container
- Backup BD/DVD with original structure
- Convert 2D/3D BD, DVD, SD/HD video with ease
- Convert to all popular video and audio formats
- Popular 2D/3D BD to 3D video conversion
- Provide native codec for iMovie, Final Cut Pro and much more
Other Download:
- Pavtube old official address: http://www.pavtube.cn/imedia-converter-mac/
- Cnet Download: http://download.cnet.com/Pavtube-iMedia-Converter/3000-2194_4-76177788.html
Special Offer:
ByteCopy($42) + Video Converter Ultimate($65) = Only $79.9, Save $27.1
Video Converter Ultimate($65) + DVD Creater($35) = Only $64.9, Save $35.1
Video Converter Ultimate($65) + ChewTune($29) = Only $74.9, Save $19.1
Read More:
- Rip Blu-ray to Hard drive for Adding to iTunes
- Encode Blu-ray movies playback on Mac Mini HTPC with PLEX
- Playing YouTube (FLV) files on a Keynote on Mac OS X El Capitan
- Three Methods of Lossless Backup Blu-ray on Mac El Capitan
- Play M2TS with Plex media server via Mac OS X El Capitan
Available link for download
Subscribe to:
Posts (Atom)