Friday, April 21, 2017
When and How to Reset Mac SMC System Management Controller
When and How to Reset Mac SMC System Management Controller
 |
| Reset Mac SMC |
The system management controller (SMC) is a chip in your intel-based Mac, which plays significant roles in controlling thermal and power management,keyboards and other peripherals, battery charging, video mode switching and cooling fans, sleep and wake, hibernation,Power buttons and LED indicators. It also enables enforcement of the Mac OS X End User License, allowing it to identify when it is running on non-Apple hardware.
 |
| Reset Mac SMC |
If the SMC firmware is corrupt because of any reason, your mac will start behaving strangely with no apparent reason ? the trackpad would stop working,lights won?t be working correctly,display resolution will change,your computer wont turn on or a number of other issues mentioned below. Most of the time, these issues can be solved by closing all of your apps and restarting the computer. Sometimes, though, you?ll need to reset the SMC by following the computers model-specific intructions described by Apple.
 |
| SMC-for-macbook-air-13inch-a1466-2013 |
Fans
- Cooling fans running at high speed.
Lights
- Keyboard Backlight Issues.
- Incorrect behavior with the Status Indicator Lights or Battery Indicator Lights.
- Backlight displays not responding to ambient light changes.
Power
- Your computer won?t turn on
- Non-responsive power button
- Unexpected sleep or shutdown
- Battery not charging properly
- MagSafe LED displays incorrect activity
- A Mac notebook computer doesnt respond properly when you close or open the lid.
System Performance
- The trackpad doesn?t work
- Computer running slowly despite low CPU load
- Long "Bounce" times for application icons in the dock.
- External displays and Ambient Light Sensing
- Unexpectedly switching into or out of target display mode for external displays.
- Your computer won?t connect to Wi-Fi
- Applications may not function correctly, or they may stop responding after being opened.
- The illumination around the I/O ports on a Mac Pro (Late 2013) does not activate when you move the computer.
Resetting the SMC is usually accomplished by removing all power from the system for a period of time (by unplugging the mains connector or removing the battery) or by operating the power button in a special way.Read the following steps to know how to Reset SMC.
Reset the SMC on Mac notebook computers
First determine whether the battery is removable. Mac notebook computers that have a nonremovable battery include MacBook Pro (Early 2009) and later, all models of MacBook Air, MacBook (Late 2009), and MacBook (Retina, 12-inch, Early 2015). Learn more about Mac notebook batteries.
Reset SMC of Macbook whose battery is nonremovable
- Shut down the Mac.
- Plug in the MagSafe or USB-C power adapter to a power source and to your Mac.
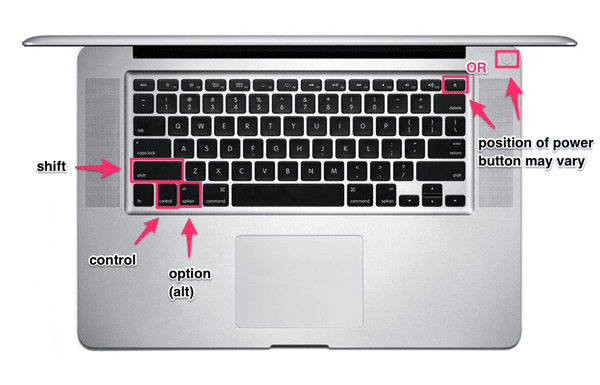
- Using the built-in keyboard, press Shift-Control-Option on the left side of the keyboard, then press the power button at the same time.
 | |
|
- Release all keys, then press the power button again to turn on your Mac
Reset SMC of Macbook whose battery is removable
- Shut down the Mac.
- Disconnect the MagSafe power adapter from the Mac.
- Remove the battery. (Learn about removing the battery in MacBook and MacBook Pro computers.)
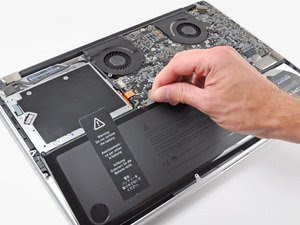 |
| Remove the Battery of Macbook Pro to Reset SMC |
- Press and hold the power button for 5 seconds.
- Reconnect the battery and MagSafe power adapter.
- Press the power button to turn on the Mac.
- The LED on MagSafe power adapters might change states or temporarily turn off when you reset the SMC.
- Shut down the Mac.
- Unplug the power cord.
- Wait 15 seconds.
- Plug the power cord back in.
- Wait 5 seconds, then press the power button to turn on the Mac.
- For Intel-based Xserve computers that arent responding, you can shut down locally or by using remote commands. You can also shut down by pressing and holding the power button for 5 seconds.
Note:- Resetting the SMC does not reset or otherwise change the contents of NVRAM or PRAM on Intel-based Macs.
The SMC is responsible for these and other low-level functions on Intel-based Macs:
- Responding to presses of the power button
- Responding to the display lid opening and closing on portable Macs
- Battery management
- Thermal management
- The SMS (Sudden Motion Sensor)
- Ambient light sensing
- Keyboard backlighting
- Status indicator light (SIL) management
- Battery status indicator lights
- Selecting an external (instead of internal) video source for some iMac displays
 |
| Update for SMC |
Available link for download

Thursday, April 13, 2017
Troubleshoot 64bit system is attempting to install 32bit updates Error
Troubleshoot 64bit system is attempting to install 32bit updates Error
64bit system is attempting to install 32bit updates
my pc keeps wanting me to install new window updates,but my pc is a 64 bit system and the updates that are trying to install are 32 bit?why is windows not detecting automatically?
Keys to the Problem 64bit system is attempting to install 32bit updates
Download SmartPCFixer to Fix It (Free)
If Office 2010 64-bit isÿNOTÿinstalled, the Office 32-bit updates are appropriate for your system.
~Robear Dyer (PA Bear) ~ MS MVP (IE, Mail, Security, Windows & Update Services) since 2002 ~ Disclaimer: MS MVPs neither represent nor work for Microsoft
In this method we will try to Boot in Safe mode with Networking and see if the error still persists.
- Search "MSCONFIG" and Open.
- Click on Boot Tab
- Tick Safe Boot in Boot Option
- Select Network.
- Click Apply and OK.
- Reboot your System.
Recommended Method to Fix the Problem: 64bit system is attempting to install 32bit updates:


How to Fix 64bit system is attempting to install 32bit updates with SmartPCFixer?
1. Download Error Fixer . Install it on your computer. Click Scan, and it will perform a scan for your computer. The junk files will be shown in the list.

2. After the scan is done, you can see the errors and problems which need to be repaired.

3. When the Fixing part is done, your computer has been speeded up and the errors have been fixed

Related:
Read More: Fast Solution to Problem: 32 bit compilers on windows 7__,Fast Solution to Error: 3rd master hard disk error,Solution to Error: 32 bit? 64 bit?,114 errors- Windows Vista Home Premium [Anwsered],How to Fix Problem - 4 GB RAM for Windows 7 32-bit. Good or Bad??,2 minute hang at "Welcome" screen, but only on Admin account.,2 failed updates: KB970892 error code FF, KB978338 error code 800B0100,2003 excel keeps freezing and even crashes when email is active,3D Studio Max side by side configuration error,404 not found nginx message
Available link for download
Thursday, March 16, 2017
Windows 7 System Recovery Disc 32Bit 64Bit
Windows 7 System Recovery Disc 32Bit 64Bit

Available link for download
Tuesday, January 31, 2017
System Image Recovery From OEM Partition
System Image Recovery From OEM Partition
Gigabyte Xpress Recovery2
Gigabyte Xpress Recovery2 supported motherboard provide system image recovery from OEM Partition for desktop computer with just pressing F9 while booting, when your computer face any problem. Xpress Recovery2 back up data on hard disks on SATA and PATA IDE controllers.System Requirements:
- Intel x86 platforms.
- At least 64M bytes of system memory.
- VESA-supported VGA cards.
Note:
1. Everything from your hard disk will be deleted. So backup your important file and data before proceeding.
2. Xpress Recovery2 will backup system image file at the end of the hard disk, so you must have enough (At least 4 GB recommended. But in actual you must have free unallocated space depending on the size of the data to be backed up) unallocated hard drive partition space in advance.
3. If you have not enough hard disk unallocated space then delete and make free unallocated space for data backup. As Xpress Recovery2 will backup image at the end of the Hard Disk so the last partition must be unallocated and must have enough space(As shown in the picture below) otherwise you will be given an error message like "Not enough Hard Disk space".
 |
| Gigabyte Unaalocated Space |
5. To install Xpress Recovery2 with clean Windows installation, boot from your Windows Installation disc. Go to window installation page. Delete all hard drive partitions. Just create one partition(Drive C:) and install window in the very partition and left the remaining partition unallocated for data backup(as Ive already mentioned in Step 3)
Steps:
1. Go to BIOS setting and make you CD/DVD ROM as your first device.Save setting and exit.
2. Insert your motherboard driver CD and restart your computer. After restart a message will be displayed.. "Boot from CD/DVD:"... "Press any key to boot from CD..." Press any key to enter Xpress Recovery2 setup
3. Xpress Recovery2 takes a few second to load.
 |
| Xpress Recovery2 |
4. Now Xpress Recovery2 setup page will start.
5. Select backup(with keyboard) and press enter.
 |
| Xpress Recovery2 |
6. Data backup will start. And it may takes a long time depending upon the size of your data to be backed up.
 |
| Xpress Recovery2 |
7. After completion restart. Data backup with Xpress Recovery2 has been done.
Additional Info:
1. The driver CD is just required for the first time only to install Xpress Recovery2. Thereafter user can access Xpress Recovery2 just by pressing F9 while booting.
2. Install Xpress Recovery2 immediately after installing OS, all required drivers and softwares.
3. Data restoration will replace everything of Drive C: with the backed up System Image.
Some Errors:
1. Not enough Hard Drive space- That means youve not sufficient space to backup in the last unallocated drive in your hard disk.
 |
| Xpress Recovery2 |
2. All primary partition is in use or IDE Drive not detected- That means youve no unallocated space at the end of your hard disk.
For other limitation and requirement go to Gigabyte Official Xpress Recovery2 page.
Available link for download
Saturday, January 14, 2017
System Speedup 3 6 81 3035 Crack Free Download
System Speedup 3 6 81 3035 Crack Free Download

System Speedup
2. Run Activator & Click On Activate Button
3. Wait till a message comes up
4. Thats It ! Enjoy

Click Here to Download / Mirror 1 / Mirror 2
System Speedup, System Speedup crack, System Speedup patch, System Speedup keygen, System Speedup serial keys, System Speedup free full download, System Speedup patched, System Speedup activated, System Speedup pro setup, System Speedup full download, System Speedup activated, System Speedup keys, System Speedup serials, System Speedup registration keys, System Speedup full version setup, System Speedup full setup, System Speedup activator, System Speedup product keys, System Speedup preactivated, System Speedup activated, System Speedup cracked, System Speedup patched, System Speedup precracked, System Speedup pin, System Speedup codes, System Speedup full, System Speedup premium, System Speedup pro, System Speedup free download, System Speedup free, New, Latest, Latest Crack, New Patch, Working Serial Keys, serial key new, applicationname full version with crack, System Speedup full version with crack, System Speedup full version, System Speedup full version crack, System Speedup full version patch, System Speedup full version serial keys, System Speedup preactivated, activator, System Speedup activator, 2014, trick, best trick, tweak , latest crack of System Speedup, patch for System Speedup, crack for System Speedup, serial keys for System Speedup, cracks, new version crack for System Speedup, keygen for System Speedup, new keygen, System Speedup full version with crack and keygen, System Speedup with keygen, System Speedup with crack, System Speedup with serial keys, registered, registered System Speedup, System Speedup registered, new System Speedup registered, latest System Speedup registered, reg keys for System Speedup, System Speedup reg keys, System Speedup registeration keys, full version free, full free, free full version of System Speedup, System Speedup full version free, System Speedup premium, pro, System Speedup professional, System Speedup 3.6.81.3035, System Speedup 3.6.81.3035 crack, System Speedup 3.6.81.3035 patch, System Speedup 3.6.81.3035 keygen, System Speedup 3.6.81.3035 serial keys, System Speedup 3.6.81.3035 free full download, System Speedup 3.6.81.3035 patched, System Speedup 3.6.81.3035 activated, System Speedup 3.6.81.3035 pro setup, System Speedup 3.6.81.3035 full download, System Speedup 3.6.81.3035 activated, System Speedup 3.6.81.3035 keys, System Speedup 3.6.81.3035 serials, System Speedup 3.6.81.3035 registration keys, System Speedup 3.6.81.3035 full version setup, System Speedup 3.6.81.3035 full setup, System Speedup 3.6.81.3035 activator
Available link for download
Tuesday, December 20, 2016
Tips Qnap Firmware Upgrade System update failed Firmware file format error Error code FW004
Tips Qnap Firmware Upgrade System update failed Firmware file format error Error code FW004
I got problems to update firmware on old QNAP product.
When I tried to update firmware through web interface I got this error:
[Firmware Upgrade] System update failed. Firmware file format error. Error code: FW004
Solution was:
1. Start reading this interesting article:
How To Update Qnap Firmware
http://qnapsupport.net/qnap-uygulamalari/qnap-firmware-yazilim-guncellemesi-nasil-yapilir/
2. I went on qnap support web page and I downloaded new firmware (and previsious version too)
https://www.qnap.com/i/it/product_x_down/product_down.php?II=107&cat_choose=1
3. I downloaded and installed Qnap Finder
QNAP Qfinder Pro for Windows
Europe USA Global
https://www.qnap.com/i/it/product_x_down/product_down.php?II=107&cat_choose=4
4. I installed firmware utilizing qnap finder and installation went well
Available link for download
Thursday, November 24, 2016
Strengthen the weakest link in your IT Security System
Strengthen the weakest link in your IT Security System
|


Available link for download